Skip to content

Patient education. This article translates peer-reviewed clinical research for a general audience. It is not a substitute for an in-person consultation, an individualized risk assessment, or informed consent obtained directly from a treating surgeon.

  • Last medically reviewed: 2026-06-01 by Robert J. Troell, MD, FACS
  • Conflict-of-interest disclosure: This article describes techniques used by Troell Cosmetic Surgery & Facial Plastic Clinic and summarizes peer-reviewed studies authored by Dr. Troell. The practice has a direct interest in patients considering the procedures described.
45 cc average enriched fat grafted per hip dip
240 cc average enriched fat grafted per buttock
75–85% grafted fat volume retained at 7 months

Two people can carry the same weight on the same frame and have completely different silhouettes. The difference is rarely size — it is the shape of the gluteal frame: where the waist narrows, where the hip carries volume, and whether the outer hip dips inward or curves outward. A Brazilian Butt Lift (BBL) is often described as "making the buttock bigger." In practice, the result patients respond to is usually a matter of contour: removing fat that flattens the frame, and adding fat where it builds the curve — including the hip dips.

This article focuses on the part of gluteal contouring that gets the least clear explanation online: hip dips and the lateral gluteal frame. It draws on Dr. Robert J. Troell's 2026 peer-reviewed study of 112 women who underwent VASER ultrasound-assisted liposuction with stem cell–enriched fat grafting to the buttocks and hip dips (Medical Research Archives, 14:4, DOI 10.18103/mra.v14i4.7467), and on his published work on aesthetic hip implants — a structural option for hip dips that fat alone cannot correct (Aesthetic Surgery Journal, 2022, DOI 10.1093/asj/sjac064). The figures above are averages from that 112-patient series and describe one surgeon's protocol; they are not a promise of any individual result.

What this article covers: what the gluteal "frame" is and why shape beats size · what hip dips actually are · how fat grafting fills them · how fat removal and fat addition build an A-frame together · when fat is not enough and custom hip implants are considered · how much grafted fat survives · whether it is safe · candidacy · recovery · FAQ.

What the Gluteal "Frame" Is — and Why It Matters More Than Volume

Surgeons who specialize in body contouring describe the buttock not as an isolated structure but as a frame — the surrounding outline made by the lower back, the flanks (love handles), the outer hip, and the upper thigh. The aesthetic of the buttock is set as much by that frame as by the buttock's own projection. A narrow waist, a smooth outer hip, and a clean transition into the thigh read as a curved, lifted shape even when relatively little volume has been added.

The body-contouring literature commonly groups the female gluteal frame into four shapes: the A-shape (wider at the bottom — the most frequently requested), the round shape, the V-shape, and the square. In Dr. Troell's 2026 series, the desired frame was confirmed with each patient in advance, and the A-shape was the most common goal (DOI 10.18103/mra.v14i4.7467). Reaching it depends on three points along the side of the body: the upper outer hip, the mid-buttock, and the lateral (outer) thigh. Get those three points right, and the frame holds the shape.

This is why "how many cc's will you put in?" is the wrong first question. Two patients can receive the same grafted volume and look entirely different, because the frame — including whether the hip dips are addressed — determines how that volume reads.

Hip Dips, Explained: Why They Happen and Who Can Smooth Them

"Hip dips" — the inward depressions along the outer hip, just below the hip bone — are a normal feature of human anatomy, not a sign of being overweight or out of shape. They sit at the point where the outer edge of the pelvis meets the soft tissue of the upper thigh, over a depression near the greater trochanter (the bony prominence at the top of the thigh bone). Many people have them at every weight they have ever been, because their origin is partly skeletal: the width of the pelvis, the position of the hip bone, and the way muscle and fat drape over that structure.

That skeletal contribution is the key to understanding which hip dips respond to which treatment. Clinically, it is useful to separate two patterns:

  • Soft-tissue-dominant hip dips. The depression is mostly a relative lack of fat and soft tissue over the outer hip, framed by fuller areas above and below. These tend to fill predictably with fat grafting.
  • Structurally-dominant hip dips. The depression is driven more by the underlying bony anatomy than by a soft-tissue deficit. These can be softened with fat, but a deep, bony hip dip may not fully correct with fat alone — which is where a custom implant enters the conversation (covered below).

The distinction is made at consultation, using standing photographs in multiple views, palpation of the area, and a discussion of goals. There is no single answer that fits everyone — the honest version of this conversation includes telling some patients that fat grafting will improve a hip dip rather than erase it.

Fat Grafting to the Hip Dips, Step by Step

Hip-dip fat grafting is not a separate operation from a BBL — it is part of the same contouring session, because the fat used to fill the hip dips is harvested by the same liposuction that shapes the rest of the frame. In Dr. Troell's 2026 series, every patient who had buttock fat grafting also had hip-dip fat grafting, and a smaller group elected hip-dip transfer only (DOI 10.18103/mra.v14i4.7467). The sequence is:

  1. Harvest. Fat is removed with third-generation VASER ultrasound-assisted liposuction from areas that also improve the frame — lower back, flanks, and (commonly) the inner and outer thigh. Ultrasound energy is kept at a reduced setting to protect the fat cells that will be re-used.
  2. Process. The harvested fat is purified by centrifugation-filtration — spun and filtered to remove fluid, oil, and damaged cells — and enriched with the patient's own platelet-rich plasma (PRP) and adipose-derived stem cells. Roughly 60% of the raw harvested volume becomes usable, compacted, enriched fat.
  3. Place. Through small incisions at the lateral infragluteal fold (the crease where the buttock meets the thigh), the enriched fat is delivered into the subcutaneous plane only — above the muscle — in tiny 2–5 ml aliquots, with the cannula in motion, so each small parcel of fat sits close to a blood supply.

In the published series, the average compacted, enriched volume placed per hip dip was 45 cc (about 75 cc of raw harvested fat), compared with an average of 240 cc per buttock. Those are averages from one cohort, not a target every patient receives; the right volume is set by how much donor fat is available and how much the subcutaneous space will safely accept.

Why small aliquots matter. Grafted fat has no blood supply of its own for the first 1–2 days. It survives by absorbing oxygen and nutrients from the surrounding tissue until new vessels grow in. Many small parcels of fat have far more surface contact with that tissue than a few large boluses — which is why the technique emphasizes micro-aliquots placed while the cannula is moving, rather than large deposits.

Designing an A-Frame: It Is Built by Removing Fat as Much as Adding It

The most common misunderstanding about gluteal contouring is that it is purely additive. It is not. The curved, "heart-shaped" silhouette many patients describe is created as much by where fat is removed as by where it is added. Removing fat from the lower back and flanks narrows the waist and exposes the upper curve of the buttock; the outer hip and mid-buttock are then built up; and the result reads as an A-frame.

In the 2026 study, this was done in one 360-degree session: fat removed from the lower back, flanks, and frequently the inner and outer thighs to frame the buttock, then re-injected into the buttock and hip dips to build the curve (DOI 10.18103/mra.v14i4.7467). The lower-back and flank reduction is not optional polish — in the surgeon's description, framing those areas is what allows the buttock to read as lifted and projected. The female aesthetic the technique targets is often described as an inverted heart shape, with a small triangle of space defined between the inner thighs and the lower curve of the buttocks.

This is also why hip dips and buttock projection are planned together rather than separately. Filling a hip dip without addressing the waist and flanks can widen the silhouette instead of curving it; narrowing the waist without addressing the outer hip can leave the dip looking deeper. The frame is designed as one shape.

Custom Hip Implants for Structural Hip Dips

For most soft-tissue hip dips, enriched fat grafting is the first-line option — it uses the patient's own tissue, has no implant to maintain, and addresses the whole frame in one session. But some hip dips are structural: the depression is driven by the underlying bony anatomy, and there is a limit to how much a soft-tissue graft can fill a bony concavity. For those patients, fat alone may improve the contour without fully correcting it.

This is the part of hip and gluteal contouring where surgeon experience genuinely diverges, because aesthetic hip augmentation with custom implants is a niche within a niche. Dr. Troell is one of a small number of surgeons who have published peer-reviewed clinical work specifically on aesthetic hip implants — "Evolving Clinical Experiences in Aesthetic Hip Implant Body Contouring" in the Aesthetic Surgery Journal (2022, DOI 10.1093/asj/sjac064), co-authored with Barry Eppley, MD, DMD, and a second paper on hip-implant patient evaluation and implant fabrication. He has also taught hands-on body-implant cadaver courses, where the gluteal and hip vascular anatomy that governs safe placement is dissected directly.

In practice, three options are discussed for a structural hip dip:

  • Enriched fat grafting alone — improves most hip dips; the first choice when the deficit is primarily soft-tissue.
  • A custom (patient-specific) hip silastic implant — a more definitive correction for a deep, bony hip dip, designed to the individual's anatomy.
  • Composite augmentation — an implant for the structural deficit combined with fat grafting to blend and refine the surrounding frame.

Which of these fits a given patient is a consultation decision based on photographs, palpation, the depth and origin of the dip, the amount of donor fat available, and the patient's goals. The point of naming all three is that a surgeon who only offers fat grafting can only offer a fat-grafting answer; addressing a structural hip dip well sometimes requires the implant option to be on the table.

How Much of the Grafted Fat Actually Stays?

The honest answer is that not all of it stays — and a good technique is built around that fact. Grafted fat that fails to establish a blood supply in the first days is reabsorbed by the body. The technique's job is to maximize the share that survives. Two numbers describe how this protocol approaches it:

  • Processing yield. Centrifugation-filtration concentrates the harvested fat down to roughly 60% of its raw volume by removing fluid, oil, and damaged cells. What is injected is compacted, purified fat — so less volume is needed for the same result, and the injected fat is of higher quality.
  • Retention. In the published evidence cited in the 2026 study, ultrasound measurement documented 75–85% volume retention at seven months after injection (DOI 10.18103/mra.v14i4.7467). Long-term data from Coleman shows that once grafted fat stabilizes — typically by 2–3 months — the surviving volume remains stable for years.

The PRP and adipose-derived stem cell enrichment is aimed squarely at this survival window: both promote the new blood-vessel growth (neovascularization) that determines which fat cells live past the first 1–2 days. It is also why the surgeon does not overfill — pushing more fat into the subcutaneous space than it can support raises the pressure on the grafted cells and lowers survival, the opposite of the goal. The durability of a well-executed graft is real: the 2026 paper documents a patient followed for eight years with a maintained result.

Before and after-at-8-years rear-view photographs of gluteal and hip fat grafting, showing a smoother, more contoured lower back, flanks, and buttock
Before and at 8 years after awake VASER liposuction with subcutaneous gluteal and hip fat grafting (rear view). From Dr. Troell's 2026 study in Medical Research Archives (DOI 10.18103/mra.v14i4.7467). One patient's result; individual outcomes vary.

Is Hip and Buttock Fat Grafting Safe?

BBL has historically been the most scrutinized procedure in aesthetic surgery because of a specific, serious risk: pulmonary fat embolism (PFE), which is tied to fat injected deep into the gluteal muscle. The protocol described here is built to avoid that mechanism — fat is placed in the subcutaneous plane only, never the muscle; the patient is awake enough to give immediate feedback if a cannula approaches the muscle; and intraoperative ultrasound is used to confirm the plane. In the 112-patient series, there were no pulmonary fat emboli, no oil cysts, and no anesthesia-related complications (DOI 10.18103/mra.v14i4.7467). The procedure still carries real risks — seroma, contour irregularity, infection, and the need for revision among them — and no single series guarantees outcomes for other patients or surgeons.

Because the safety mechanics deserve more than a paragraph, they are covered in full in a companion article: how awake anesthesia and subcutaneous-only fat grafting lower BBL risk — including the subcutaneous-plane rule, the published complication data, and the questions to ask any prospective surgeon. If you are weighing this procedure, read that article alongside this one.

Who Is a Good Candidate — and Who Is Not

Hip and gluteal fat grafting depends on two things the patient brings to the table: enough donor fat to harvest, and a realistic understanding of what reshaping the frame can and cannot do. A very lean patient may not have the donor volume for a large change; a patient well above their ideal body weight is usually advised to optimize weight first, both for safety and because the result is more stable at a steady weight.

In the 2026 protocol, candidacy and preparation included:

  • Weight optimization. Patients were encouraged to be at or near their ideal body weight; those above it were counseled on a weight-loss trial before contouring.
  • Medication review. Drugs that interfere with the liver enzyme that clears the local anesthetic (cytochrome P-450 inhibitors — certain antidepressants, blood-pressure medications, antifungals, and others) lower the safe anesthetic dose and are reviewed in advance.
  • Hormone and GLP-1 timing. Oral estradiol was stopped at least two weeks before surgery to lower clot risk; GLP-1 weight-loss medications were stopped two weeks before as well.
  • Smoking and vaping cessation. Stopping at least 2–3 weeks before and continuing after surgery to lower infection risk and protect fat survival.

Patients who request general anesthesia, who want a silastic gluteal or hip implant, or whose goals exceed what the subcutaneous space can safely hold in one session may be referred, staged, or counseled toward a different plan. Patient selection is itself part of the safety of the procedure — the favorable outcomes in any published series reflect, in part, who was chosen to operate on.

Recovery and Results Timeline

Recovery from hip and gluteal fat grafting is governed by one overriding principle: protect the newly grafted fat while it establishes a blood supply. That shapes most of the aftercare instructions.

  • Sitting. Patients may sit, but are asked not to sit against the back of a chair — to avoid compressing the grafted fat — for a minimum of two weeks, preferably four to five. Sleeping on the stomach or sides is recommended for the same period.
  • Compression and garments. A fitted compression garment is worn over the liposuction areas (not the buttock) continuously for about a month, then at night for an additional week.
  • Lymphatic massage. Gentle massage of the liposuction sites is used to reduce swelling and fluid; this typically begins a few days after surgery.
  • Activity. No vigorous exercise for several weeks to reduce the risk of seroma; no swimming or soaking until incisions are fully healed at about four to five weeks.

The shape continues to evolve as swelling resolves and the surviving fat stabilizes. A reliable estimate of the final volume is usually available around three months, and the result is stable thereafter — the 2026 study documents a maintained outcome at eight years. Patients who want more volume than a single session safely allows are offered a staged second graft no sooner than three months after the first.

Why a Published, Board-Certified Surgeon's Approach Matters Here

Hip and gluteal contouring sits at the intersection of two things that are hard to find in one surgeon: a safety-first liposuction-and-fat-grafting protocol, and genuine experience with the structural options — custom hip implants — for the hip dips that fat cannot fully correct. Dr. Robert J. Troell is board-certified in cosmetic surgery and in facial plastic & reconstructive surgery, with more than 30 years of surgical experience, and has published peer-reviewed work across this exact territory: the 2026 gluteal and hip fat-grafting series (DOI 10.18103/mra.v14i4.7467), the 2022 aesthetic hip-implant paper in the Aesthetic Surgery Journal (DOI 10.1093/asj/sjac064), and a body of liposuction and fat-grafting research spanning two decades.

That published record is not a marketing detail — it is the difference between a surgeon who follows the contouring literature and one who contributes to it. When you are choosing where to have a procedure as technique-dependent as this one, the substance of the consultation matters more than the size of the promise.

Hip Dips & Gluteal Frame Fat Grafting: Common Questions

What are hip dips, and can surgery fix them permanently?

Hip dips are the inward depressions along the outer hip, where the soft tissue of the upper thigh meets the bony edge of the pelvis over a natural hollow near the greater trochanter. They are a normal anatomical feature, not a sign of being overweight. Most soft-tissue hip dips can be smoothed with fat grafting, and the surviving fat is a stable, long-term result — one patient in Dr. Troell's 2026 study maintained the outcome at eight years. Hip dips that are mainly structural (driven by the bony anatomy) can be improved with fat but may need a custom hip implant for a fuller correction. No procedure makes the underlying pelvic shape change, so "permanent" means the soft-tissue change is durable, not that anatomy is erased.

Fat grafting vs. hip dip filler vs. implants — which is right for me?

For most patients, enriched fat grafting is the first-line option because it uses your own tissue, addresses the whole frame in one session, and has no implant to maintain. Temporary injectable "hip dip filler" (hyaluronic acid or biostimulators) can soften a shallow dip but requires repeat treatment and is limited in volume. Custom hip implants are reserved for deep, structural hip dips that fat alone cannot fully correct, or for patients who want a more definitive, larger augmentation. The right answer depends on the depth and origin of the dip, how much donor fat you have, and your goals — which is what a consultation is for.

Will the fat in my hips stay, or will it disappear?

Some of every fat graft is reabsorbed in the first weeks, before the surviving fat establishes a blood supply. With centrifugation-filtration processing and PRP/stem-cell enrichment, published ultrasound measurement showed 75–85% volume retention at seven months, and grafted fat that survives past 2–3 months tends to remain stable for years. Maintaining a steady weight matters — grafted fat behaves like the rest of your body fat, so significant weight loss can reduce it and weight gain can enlarge it.

Can I get an A-frame or "heart-shaped" result, or does my anatomy decide?

Both. The A-shape (heart-shaped) frame is the most commonly requested goal, and it is created by combining fat removal from the waist and flanks with fat addition to the outer hip and buttock. But your starting anatomy — pelvic width, where you store fat, skin quality, and how much donor fat is available — sets the realistic range. A good consultation shows you, with photographs and morphing, what shape is achievable for your frame rather than promising a shape from a photo of someone else.

How much does hip and buttock fat grafting cost?

Cost depends on the number of liposuction areas, whether hip dips and the buttock are both grafted, and whether skin-tightening or other steps are added — so it is quoted after a consultation, not from a flat price list. For a detailed breakdown of how VASER lipo 360 and BBL pricing is built, see the VASER Lipo 360 & BBL cost guide. Troell Cosmetic Surgery is a cash-pay practice and can provide financing options through CareCredit and Alphaeon.

Is hip dip fat grafting done awake, and is it safe?

In Dr. Troell's protocol, the procedure is performed under awake, oral-sedation, super-wet tumescent anesthesia — the patient is comfortable but alert enough to provide the immediate feedback that keeps the injection cannula in the safe subcutaneous plane. Fat is never injected into the muscle, which is the mechanism behind the most serious BBL risk. The 112-patient series reported no pulmonary fat emboli and no anesthesia complications, though the procedure still carries real risks. The safety mechanics are covered in full in the companion article on awake, subcutaneous-only BBL safety.

What if I'm thin and don't have much fat to transfer?

Fat grafting needs a donor site, so very lean patients may not have the volume for a large change. Options include gaining a small, stable amount of weight before surgery to increase donor fat, staging the procedure over two sessions, or — for the hip dips specifically — considering a custom hip implant, which does not depend on donor fat at all. A consultation assesses how much harvestable fat you have across the typical donor areas (lower back, flanks, thighs) and what that realistically allows.

How long until I see my final hip and buttock shape?

Swelling resolves over the first several weeks, and some of the grafted fat reabsorbs during that time. A reliable picture of your final volume is usually available around three months, and the result is stable after that. You will be asked to protect the area early — not sitting directly against a chair back for two to five weeks, wearing compression over the liposuction sites, and avoiding vigorous exercise — because that early protection is part of how much fat survives to become the final shape.

118 consecutive patients, 2008–2025 (15-year series)
95.8% very satisfied or satisfied with their result
75–85% grafted fat volume retained (3D ultrasound verified)
0 cases of breast oil cyst formation

The most common question in breast augmentation is no longer just "implants or not" — it is whether fat transfer can deliver a durable, natural result without the long-term complications of a synthetic implant. The honest answer has always been limited by the same problem: fat grafting results were variable, and the volume that survived was unpredictable.

In August 2025, Dr. Robert J. Troell, MD, FACS published a 15-year, 118-patient clinical study in the peer-reviewed Journal of Clinical Medicine (DOI 10.3390/jcm14165607; PubMed ID 40869433) documenting a stem cell-enriched fat grafting protocol that addresses exactly that problem. This article summarizes what that study — his own published series — found, in plain language, and what it means for someone weighing fat transfer against implants.

About this study and its author. The findings on this page come from a single-author, peer-reviewed study: Troell RJ, Breast Augmentation in Body Contouring Using Autologous Stem Cell-Enriched Fat Grafting: Fifteen-Year Clinical Experience, Journal of Clinical Medicine 2025, 14, 5607. Dr. Troell is both the operating surgeon for all 118 cases and the sole author of the paper, which was conducted in his practice with Institutional Review Board approval through Touro University Nevada, where he is an adjunct professor in the Department of Surgery. It is open-access under a Creative Commons CC BY 4.0 license. Every outcome number below is drawn directly from that paper.

What the 15-Year Evidence Shows: Fat Grafting vs Implants

Across 118 consecutive women treated between 2008 and 2025 — the cohort Dr. Troell reported in his 2025 Journal of Clinical Medicine study — his stem cell-enriched fat grafting protocol produced consistent breast enhancement with a complication profile materially different from synthetic implants. That published series reports a 75–85% grafted volume take — the proportion of transferred fat that survives long-term — confirmed by a prior diagnostic 3D ultrasound measurement study. Patient satisfaction was 95.8% very satisfied or satisfied, with 4.2% dissatisfied (predominantly patients who wanted more volume than a single session delivered).

The most decisive comparison is the safety profile. Synthetic implants carry a reported long-term complication rate of 10–25%, including capsular contracture and the need for eventual revision or removal. In this 118-patient fat grafting series, the overall complication rate was 11.9% — and critically, there were zero cases of breast oil cyst formation, the complication most feared in fat transfer. The most common issue was seroma at the fat-harvest site (5.1%, six patients), followed by small palpable fibrotic areas (3.4%, four patients).

There is also a cancer-surveillance dimension that rarely gets discussed. Implants and poorly-performed fat grafting can both create calcifications that interfere with a radiologist's ability to read a mammogram. The study notes that meticulous fat grafting technique, distributing small fat aliquots rather than large pooled deposits, minimizes the macrocalcifications that obscure cancer surveillance — and cites evidence finding no increased cancer recurrence with adipose-derived stem cell breast fat grafting.

fat grafting vs breast implants — safety and complication comparison (Dr. Troell 15-year series)
Fat grafting vs breast implants across the dimensions Dr. Troell's 15-year, 118-patient series measured: fat grafting leads on complication rate (11.9% vs 10–25%), oil-cyst formation (0 in the series), longevity, and mammogram surveillance, while implants retain the size-increase advantage. Data: Troell RJ, J Clin Med 2025;14:5607.

How Stem Cell Enrichment Actually Drives Fat Survival

This is the part most discussions skip. Patients hear "stem cell-enriched" and see the result — durable volume, no oil cysts — but the step in between is a black box. Here is what the biology actually does, drawn from the cellular-mechanism discussion in Dr. Troell's published 15-year study.

When fat is transferred, the grafted tissue has no blood supply of its own. For the first few days it survives only by diffusion from the surrounding recipient tissue. The grafted adipocytes (fat cells) at the center of a large deposit are too far from that supply and die — which is what produces fat necrosis and, eventually, oil cysts. The entire game is getting a new blood supply (neovascularization) into the graft before those cells starve.

Three elements of the protocol work together to win that race:

  • Small fat aliquots, widely distributed. Instead of injecting large pooled deposits, the technique places many tiny fat parcels. Each parcel has a high surface-area-to-volume ratio, so every grafted cell is close to the recipient tissue's blood supply during the critical diffusion window. Smaller aliquots allow better neovascularization along the extracellular matrix scaffold.
  • Adipose-derived stem cells (ASCs) and stromal vascular fraction (SVF). The enrichment step concentrates the support cells that keep the graft alive. Stem cells can survive 3 to 5 days on diffusion alone — long enough to bridge the gap until new blood vessels arrive — and they actively signal for that vessel growth.
  • Platelet-rich plasma (PRP) and VEGF. PRP contributes roughly 30 blood-derived growth factors. The most impactful in fat transfer is vascular endothelial growth factor (VEGF), which stimulates new blood-vessel formation in the first 48 hours after grafting. PRP has been shown to increase adipocyte survival, multiply ASC numbers roughly four-fold, and build the fibrin matrix the new vessels grow along.

Put together: the small-aliquot delivery shortens the diffusion distance, the stem cells survive long enough to keep the graft viable and recruit vessels, and the VEGF in PRP accelerates the blood supply arriving. That is the chain that converts "transferred fat" into "surviving tissue" — and it is why this protocol reports a 75–85% volume take and no oil cyst formation rather than the variable, unpredictable results that gave fat grafting its earlier reputation.

Because this survival mechanism is biological rather than breast-specific, the same principles govern autologous fat transfer anywhere in the body. The identical small-aliquot, stem-cell-supported approach is what makes stem cell-enriched buttock fat transfer under awake anesthesia work as well — the destination tissue changes, but the biology that turns transferred fat into surviving, vascularized tissue does not.

Mechanism diagram: small fat-cell aliquots plus adipose-derived stem cells and PRP-derived VEGF drive neovascularization toward surviving tissue — the mechanism behind 75-85% volume take and zero oil cyst formation in Dr. Troell's series.
How the protocol wins the survival race: small fat aliquots shorten the diffusion distance, adipose-derived stem cells (ASCs) keep the graft viable for 3–5 days and recruit blood vessels, and PRP-derived VEGF accelerates neovascularization in the first 48 hours — together producing the 75–85% volume take and zero oil cyst formation reported in Dr. Troell's 118-patient series (J Clin Med 2025).

Why the Harvesting Technique Decides the Outcome

Fat that is damaged during harvest cannot survive transfer, no matter how good the enrichment. The study is explicit that harvesting techniques which protect the adipocytes and avoid stem cell injury are the first determinant of graft survival. Gentle, low-pressure liposuction with the right cannula, the right wetting solution (lactated Ringer's is preferred over normal saline for adipocyte survival), and minimal processing trauma all preserve the living cells the graft depends on.

The harvested fat is then processed by centrifugation and filtration to concentrate the viable adipocytes and stem cells while removing oil, blood, and tumescent fluid — with minimal washing, because aggressive washing strips away the very growth factors that drive survival. In Dr. Troell's published protocol this purification step uses the patented MediKan TP-101 system — a weighted 60 cc syringe fitted with a 100-micron mesh filter that separates harvested fat into discrete layers (free oils above the filter, purified adipose tissue below, and excess fluids at the base). This is where the harvesting method matters: VASER ultrasound-assisted liposuction is the technique Dr. Troell uses to harvest fat with high cellular viability, and the canonical detail of how VASER works lives on its dedicated page. For the purposes of this study, what matters is that the harvest preserves the cells the enrichment step then concentrates.

MediKan TP-101 centrifugation-filtration syringe showing harvested fat separated into free oils, a weighted mesh filter, purified adipose tissue, and excess fluids — the fat-purification step in Dr. Robert J. Troell's J Clin Med 2025 protocol.
The MediKan TP-101 centrifugation–filtration syringe after spinning: a weighted 100-micron mesh filter separates free oils (top) from purified adipose tissue (center) and excess fluids (bottom), yielding the viable, growth-factor-rich fat used for grafting. Source: Troell RJ, J Clin Med 2025;14:5607, CC BY 4.0.

The same VASER-plus-energy technique substrate appears across Dr. Troell's recent published work — including his 2025 study on combining VASER liposuction with Renuvion helium-plasma skin tightening for the face and neck. The harvesting discipline that protects fat for breast grafting is the same discipline that produces clean contour results elsewhere on the body.

Volume Retention: What "75–85% Take" Means Over Time

"Volume take" is the single number that decides whether fat grafting is worth it. Early fat grafting techniques lost so much volume so unpredictably that results were hard to promise. In Dr. Troell's 118-patient series, the mean volume of purified, enriched fat grafted was 192 to 206 cc per breast, with an estimated 75–85% volume take — the proportion of that grafted fat retained long-term — confirmed by a prior diagnostic 3D ultrasound measurement study rather than estimated by eye.

75–85% fat graft volume retention, 15-year evidence (Dr. Troell, n=118)
75–85% of grafted fat volume retained long-term (mean 192–206 cc per breast), confirmed by 3D ultrasound, with 95.8% patient satisfaction and zero oil cysts across the 118-patient series. Data: Troell RJ, J Clin Med 2025;14:5607. Conceptual data graphic, not a diagnostic scan.

Retention matters for planning. Because the surviving fraction is high and consistent, most patients in the series needed only one fat grafting session; just 6.8% requested a second staged procedure to add further volume. That predictability — knowing roughly how much of the transferred fat will still be there a year later — is the practical payoff of the survival mechanism described above.

Complication Rate Across 118 Patients

11.9% overall complication rate (vs 10–25% reported for implants)
5.1% seroma at the fat-harvest site (most common; 6 patients)
3.4% small palpable fibrotic areas (4 patients)
0 oil cyst formation — the complication most feared in fat transfer

The complication rate in Dr. Troell's 118-patient series — 11.9% overall — sits at or below the reported range for synthetic implants, and the nature of the complications is different. The most common was seroma (fluid collection) at the donor liposuction site, not in the breast itself. Palpable fibrotic areas occurred in four patients. The absence of any oil cyst formation across all 118 patients is the standout finding: oil cysts are the classic failure mode of fat grafting, and their elimination here is the direct downstream result of the survival mechanism — small aliquots and stem cell support meaning fewer fat cells die and pool.

One patient had a suspected atypical mycobacteria infection, and a small number of revisions were performed — almost entirely in patients whose only goal was augmentation and who wanted additional volume. These are the honest limits of any surgical series, reported transparently in the paper.

Is Breast Augmentation Without Implants Right for You?

The 118-patient population in Dr. Troell's study shows where stem cell fat grafting fits. The majority of cases — 65.8% — were primary breast augmentation for women who wanted a natural, modest size increase without a synthetic implant. The remaining cases were instructive: 13.6% were fat grafting after implant removal (women choosing to "go natural" after explant), 13.6% were performed during or after a breast lift or reductive mammoplasty, and 12.7% were combined with an implant exchange.

Decision flow sheet from Dr. Robert J. Troell's J Clin Med 2025 study mapping the primary breast augmentation pathway — no-ptosis versus ptosis branches leading to implant, fat grafting, or mastopexy, with technique parameters for each route.
Dr. Troell's primary breast augmentation decision flow sheet: the choice between an implant, fat grafting, and a mastopexy is driven first by the degree of breast ptosis (sag), then by goals and anatomy — with the fat-grafting route specifying VASER harvesting, centrifugation–filtration, and stem cell/SVF/PRP enrichment. Source: Troell RJ, J Clin Med 2025;14:5607, CC BY 4.0.

Good candidates generally share a few traits:

  • A goal of natural, proportionate enhancement rather than a dramatic size jump — fat grafting adds volume gradually and within the limits of available donor fat.
  • Sufficient donor fat to harvest (abdomen, flanks, thighs) — the procedure does double duty as body contouring at the harvest site.
  • A preference to avoid synthetic implants and their long-term maintenance, capsular contracture risk, and eventual revision.
  • Women considering explant who want to restore volume naturally after removing implants.

Whether fat grafting, an implant, or a combination is right for a specific person depends on anatomy, donor fat, and goals. The breast augmentation procedure page covers the full range of options, candidacy, and what to expect — a decision finalized in consultation. This article's purpose is to explain what the 15-year evidence shows about the fat grafting option, not to prescribe one path.

Stem Cell Breast Fat Grafting FAQs

Is stem cell breast augmentation safer than implants?

In Dr. Troell's 118-patient, 15-year published series, the overall complication rate was 11.9%, at or below the 10–25% long-term complication rate reported for synthetic implants — with zero oil cyst formation and no implant-specific risks like capsular contracture. Fat grafting also avoids the implant-related calcifications that can interfere with mammogram cancer surveillance. "Safer" depends on the individual, but the published evidence shows a favorable, different risk profile.

How much fat volume is retained in breast fat transfer long-term?

The study reports an estimated 75–85% grafted volume take, confirmed by a prior diagnostic 3D ultrasound measurement study. With a mean of 192–206 cc grafted per breast and a high, consistent survival fraction, most patients (all but 6.8%) achieved their goal in a single session.

What is the complication rate of autologous fat grafting to the breast?

11.9% overall across 118 patients. The most common complication was seroma at the fat-harvest (donor) site at 5.1% (six patients), followed by small palpable fibrotic areas at 3.4% (four patients). There were no cases of breast oil cyst formation in the series.

Do stem cells prevent fat necrosis and oil cysts in breast grafting?

They are a major contributor. Fat necrosis and oil cysts happen when grafted fat cells die before a new blood supply reaches them. Adipose-derived stem cells survive 3–5 days on diffusion and signal for blood-vessel growth, while PRP-derived VEGF accelerates that vessel formation in the first 48 hours. Combined with small-aliquot placement, this is why the series reported zero oil cyst formation.

Can fat grafting replace implants for breast augmentation?

For the right candidate, yes — 65.8% of the series were primary augmentations with no implant, and another 13.6% were women restoring volume after implant removal. Fat grafting delivers natural, proportionate enhancement within the limits of available donor fat; it does not produce the large size jumps an implant can. The right choice depends on anatomy, donor fat, and goals.

What harvesting method is used for breast fat grafting?

Gentle, low-trauma liposuction that protects the adipocytes and stem cells, followed by centrifugation–filtration processing with minimal washing to preserve growth factors. Dr. Troell uses VASER ultrasound-assisted liposuction for harvesting; the technical detail of VASER lives on its dedicated procedure page.

Warm consultation environment at Troell Cosmetic Surgery
Complimentary Consultation Available

Have Questions About Fat Grafting vs Implants?

A consultation with Dr. Troell is an honest conversation about whether fat grafting, an implant, or a combination fits your anatomy and goals — grounded in the same evidence summarized here.

5375 S Fort Apache Rd #101, Las Vegas, NV 89148
Mon–Fri, 8:30 AM – 5:00 PM

Cited Source

  1. Troell RJ. Breast Augmentation in Body Contouring Using Autologous Stem Cell-Enriched Fat Grafting: Fifteen-Year Clinical Experience. Journal of Clinical Medicine 2025;14(16):5607. DOI: 10.3390/jcm14165607. PMID: 40869433. Open access, CC BY 4.0.
58 patient cohort (2018–2022)
95.5% improved or much improved on the GAIS scale
0 serious adverse events, burns, embolism, or infection

Tightening the lower face and neck has been one of the harder problems in cosmetic surgery. Manual liposuction removes fat but leaves loose skin behind. A traditional facelift tightens skin beautifully but requires incisions, dissection, and recovery on a scale most patients want to avoid for a focal jowl or submental complaint. The two energy-based technologies described in this article — third-generation VASER ultrasound liposuction and Renuvion helium-plasma skin tightening (HPT) — were developed to close that gap.

This article summarizes the technique, the results, and the safety profile from Dr. Robert J. Troell's 2025 peer-reviewed study with co-author Dr. Shahin Javaheri, published in The American Journal of Cosmetic Surgery. Fifty-eight adults presented specifically requesting lower-face and/or neck liposuction and underwent the combined VASER + Renuvion protocol under local anesthesia in two private practices. No general anesthesia. No serious adverse events. A revision rate of 6.9%.

What this article covers: why the face and neck need a different approach than body lipo · the technique step by step · why VASER first and Renuvion second · who is a candidate · how this differs from a traditional facelift · recovery · the 58-patient safety profile · what the procedure cannot do · commonly combined procedures · FAQ.

Why the Face and Neck Need a Different Approach

The aging lower face and neck has three overlapping problems: excess fat under the jaw and along the jowls, skin that has lost elasticity and no longer retracts on its own, and the underlying soft-tissue support of the deep facial compartments that thins with age. Removing the fat is the easy half. The challenge is the skin envelope above it.

The published baseline is that manual suction-assisted liposuction (SAL) alone produces only about 8% to 10% skin retraction at six to eight weeks, stabilizing at roughly 8% at one year. That is enough for a younger patient with very localized fat and good skin tone, but it is not enough for a patient who already has visible jowl skin laxity or platysmal banding in the neck. Aggressive superficial liposuction can push retraction higher, but it raises the risk of contour irregularities, post-operative skin laxity from over-resection, and full-thickness skin injury — tradeoffs that are particularly intolerable in the face and neck, where contour irregularities are immediately visible.

Two energy-based technologies were developed to bring more retraction to the procedure without those tradeoffs: ultrasound-assisted liposuction (UAL) and radiofrequency-assisted liposuction (RFAL). VASER — third-generation UAL — delivers vibration amplification of sound energy at resonance through a small probe that emulsifies fat selectively while sparing connective-tissue scaffolding. Renuvion is a more recent technology: a helium-based plasma device that delivers radiofrequency energy through ionized helium gas, contracting collagen in the fibroseptal network (FSN) without the bulk heating risk of older RF body-contouring systems.

Combined, they target each layer of the problem separately. VASER addresses the fat. Renuvion addresses the skin envelope. The protocol Dr. Troell published is the safe and reproducible way to layer them in one operative setting.

The Combined VASER + Renuvion Technique, Step by Step

The published protocol is performed under local anesthesia, supplemented by oral lorazepam (1–2 mg) and hydrocodone (5–10 mg) about thirty minutes before the start of the case if the patient elects sedation. Cephalexin 1 g and ondansetron 4–8 mg are administered preoperatively. No general anesthesia or intravenous sedation is required.

  1. Marking. The lower face and/or cervical area is marked with the patient upright. Anatomical landmarks — the inferior border of the mandible, the gonial notch (location of the marginal mandibular nerve crossing at the facial artery), and the areas of fullness in the jowls and submentum — are identified before the wetting solution is delivered.
  2. Wetting solution. Klein-type solution (diluted lidocaine + epinephrine + bicarbonate in lactated Ringer's) is delivered to the surgical sites through blunt infiltration cannulas using either tumescent or super-wet anesthesia technique. The wetting solution provides the local anesthesia — the patient is awake but comfortable on oral medication alone.
  3. Incisions. Small 11-blade incisions are placed in the post-auricular crease at the earlobe (and occasionally the anterior neck). Plastic round skin guards protect the incision edges from thermal injury during energy delivery.
  4. VASER ultrasound delivery. A grooved 3.7 mm ultrasound probe is passed through the wetting solution at 40% energy in pulsed mode. The face receives 3 to 4 minutes of energy per side; the neck receives 3 to 6 minutes. The probe is felt as "buttery" tactile resistance — the published technique calls for low resistance and easy passage to indicate adequate emulsification.
  5. Small-cannula liposuction. 2.0 and 3.0 mm vented liposuction cannulas are used to evacuate the emulsified fat. The published protocol cautions against avoiding the gonial notch (where the marginal mandibular nerve crosses) and against superficial over-resection that produces contour irregularities. The deep portion just under the mandibular border is addressed disproportionately to define an aesthetically pleasing acute cervical-mental angle.
  6. Renuvion (HPT) energy delivery. A 15 cm radiofrequency helium-plasma handpiece is introduced through the same incisions, delivering 70 to 80 Joules of energy at 1.5 to 3 L/min helium flow. Six passes are performed for each treatment area — three antegrade and three retrograde — with probe movement no faster than 3 cm/s. The pre-tunneling that ultrasound and liposuction already performed enables smooth, comfortable advancement of the RF handpiece.
  7. Evacuation and closure. External hand pressure evacuates residual helium gas and fluid through the incisions. The incisions are closed; a bulky compression dressing is applied.

The published energy parameters in one place:

  • VASER: 3.7 mm grooved probe, 40% energy, pulsed mode, 3–4 min face / 3–6 min neck per side
  • Liposuction cannulas: 2.0 and 3.0 mm vented (low-trauma)
  • Renuvion (HPT): 70–80 J energy, 1.5–3 L/min helium flow, 6 passes per treatment area, probe speed ≤3 cm/s
  • Anesthesia: tumescent or super-wet local, optional oral lorazepam + hydrocodone, preop cephalexin + ondansetron
  • Postoperative: bulky compression dressing 1–2 days, then Velcro compression garment continuously for 1 week and at night for 1–2 weeks

Why VASER First, Then Renuvion

The case for combining the two technologies is additive. Each contributes a different mechanism of skin retraction, and the combination produces a result neither can reach alone.

Manual SAL alone produces 8% to 10% skin retraction by inducing a low-grade non-thermal inflammation of the fibrocollagenous matrix that promotes neovascularization, neocollagenesis, and scar-tissue formation in the treatment plane.

Adding VASER ultrasound contributes another approximately 20% retraction on top of that baseline. The mechanism is mechanical stimulation of the fibroseptal network — the same scaffolding that holds the skin to the deeper structures — without thermal damage to the overlying skin. The Nagy and Vanek randomized split-body study comparing UAL versus SAL on opposite sides showed a 53% improvement in skin retraction on the UAL side at one year versus the 17% on the laser-assisted-lipo side.

Adding Renuvion (HPT) contributes additional skin retraction, with the published combination yielding measurably better skin tightening than UAL alone. The helium-plasma mechanism is different from older bulk-heating RF: helium is ionized at very low energy levels and the resulting plasma allows heat to be delivered to the fibroseptal network in two distinct ways — through the plasma beam itself and through joule-heating from the RF current passing from the electrode through the plasma to the patient. The treated tissue heats; the surrounding tissue stays cool. Because the FSN is the treatment target, there is no real focus on heating the overlying skin. Once the FSN contracts (collagen fibers shrink up to 65% when triple-helical collagen denatures from 290 nm to 105 nm), the overlying skin retracts and tightens.

Surface skin temperatures with bulk-heating technologies can reach 45°C and increase the risk of full-thickness skin injury. The Renuvion handpiece, by contrast, has been shown in a published animal study to raise external skin temperature no more than 3.6°C from baseline over the course of a typical six-pass treatment — with a maximum external tissue temperature of 43.3°C at the 80%-power, 4 L/min-helium setting. This is the safety margin that makes the combination feasible in the thin-skin anatomy of the face and neck.

Sequence matters. VASER is performed first because the emulsification and small-cannula liposuction pre-tunnel the tissue. The Renuvion probe then advances smoothly and comfortably through that pre-tunneled space. Without pre-tunneling, the helium gas flow can become obstructed at the probe tip and produce a brief automatic gas-flow shutoff (F13 error). With pre-tunneling, the antegrade and retrograde fanning pattern can be completed cleanly across all six passes.

Layered tissue cross-section diagram showing skin, subcutaneous fat compartments, and the fibroseptal network of collagen strands that VASER ultrasound liposuction emulsifies and Renuvion helium-plasma skin tightening contracts — the dual-mechanism that drives skin retraction in Dr. Robert J. Troell's published technique.
Layered cross-section of the face/neck soft tissue: skin (top), subcutaneous fat compartments (middle layers), and the fibroseptal network of collagen strands (vertical brown elements) that anchor skin to deeper structures. VASER emulsifies the fat layers; Renuvion's helium plasma contracts the fibroseptal collagen — together they drive measurable skin retraction beyond what manual liposuction produces alone.

Who the Combined Procedure Is For — and Who It Isn't

The published cohort enrolled adults between 24 and 66 years of age (mean 36) who presented specifically requesting lower-face (jowls) and/or neck liposuction. All participants were medically stable for an outpatient surgical procedure under local anesthesia. The fifty-eight patients across two clinical practices were consented to the implementation of UAL with HPT, including a discussion of the limitations of persistent excess skin, possible side effects, and complications.

Good candidates share a few traits:

  • Discrete fat excess in the jowls, submentum, or anterior neck, with or without mild-to-moderate skin laxity
  • Healthy enough for an outpatient procedure under local anesthesia
  • Realistic expectations — the combination tightens skin substantially but does not reposition the SMAS or deep facial structures the way a deep-plane facelift does
  • Stable weight — significant weight fluctuation after the procedure can affect the long-term result
  • Non-smokers, or willing to abstain from smoking and vaping for 2–3 weeks before surgery and 2–4 weeks after

Patients who are less ideal candidates include those with severe skin laxity and platysmal banding who would be better served by a neck lift; patients with true SMAS ptosis requiring repositioning of the deeper facial soft tissues; patients on certain medications that interact with lidocaine through the cytochrome P-450 system; and patients with metallic implants in the head or neck that contraindicate radiofrequency energy delivery in that field.

How This Differs From a Traditional Facelift

The combined VASER + Renuvion procedure and a traditional facelift are not competing for the same patient. They are different operations that address different anatomical problems. The questions to ask are which problem the patient has, which approach fits their anatomy, and which recovery profile fits their life.

Element VASER + Renuvion Traditional Facelift
Anatomical target Subcutaneous fat + skin envelope (fibroseptal network) SMAS, deep facial compartments, skin redraping
Incisions Small post-auricular and occasionally anterior neck (4–5 mm) Pre-auricular and post-auricular extending into hairline
Anesthesia Local with optional oral sedation General or deep IV sedation typical
Skin tightening mechanism Fibroseptal network contraction (up to 65% collagen shrinkage) Mechanical redraping after SMAS lift
Typical recovery 1–2 days bulky dressing, garment 1–2 weeks, social downtime ~1 week 2–3 weeks social downtime, full recovery 6–8 weeks
Best for Discrete jowl or neck excess with mild-to-moderate laxity Moderate-to-severe SMAS ptosis, deep nasolabial and jowl descent
Longevity Multi-year result; depends on weight stability and aging trajectory Long-lasting SMAS repositioning; visible 8–12 years

For many patients, the right answer is one of the two. For some, the right answer is both — VASER + Renuvion is frequently combined with a midfacelift, facelift, neck lift, or chin implant in the same operative setting, as documented in the published series.

Recovery: Days, Weeks, and Months

Recovery is short by surgical standards but real. A bulky compression dressing is placed at the end of the operation and stays on for one to two days to prevent fluid collection and to keep the skin adherent to the contracting fibroseptal network beneath it. After the dressing comes off, a Velcro compression garment replaces it: worn continuously for one week and at night for an additional one to two weeks.

Expected clinical effects in the first weeks include mild discomfort, edema, ecchymosis, and itching. None of these were reported as serious in the published cohort. Patients were instructed to follow up at 1 day, 1 and 2 weeks, 1, 2, 3, and 6 months, and every year thereafter using the Global Aesthetic Improvement Scale (GAIS).

The visible skin-retraction improvement appears earlier than most patients expect — immediate contraction of the fibroseptal network occurs without heating the dermal full thickness, and that contraction is noted at the 24-hour postoperative visit. The retraction continues to improve over the first six months as collagen remodeling progresses, with the final aesthetic result stabilizing well beyond that point.

Most patients return to non-physical work within five to seven days, although bruising, edema, and the visible garment can shift that depending on the patient's social and professional context.

58 Patients, Zero Serious Adverse Events

95.5% GAIS very much / much improved / improved (56 of 58)
0 helium embolism, burn, infection, hematoma, seroma, or scarring
6.9% revision rate
12% temporary marginal mandibular nerve weakness — all fully resolved

Two patients (3.4%) reported no change. No patient reported a worse aesthetic outcome.

The complication with the most concern in any face/neck procedure is marginal mandibular nerve weakness, which appeared in seven patients (12%) as a temporary, unilateral lower-lip muscle weakness. The published protocol used a methylprednisolone (Medrol) dose pack to facilitate speed of recovery. All seven cases resolved completely within 1 to 6 weeks. None required surgical intervention.

Nine patients (15.5%) experienced minor contour irregularities; all but two resolved over several months spontaneously. The remaining two had persistent minor depressions in the jowl that were addressed with one syringe of dermal filler each. Two morbidly obese patients (3.4%) requested additional liposuction in a revision setting. The combined revision rate including both filler corrections and additional liposuction was 6.9%.

The five negative findings — helium embolism, deep or superficial burns, infection, hematoma, seroma, pigmentation change, increased healing time, scarring — were all reported as zero in the published series. Expected clinical side effects included mild discomfort, edema, ecchymosis, and itching, which are not adverse events.

Both surgeons (Dr. Troell and Dr. Javaheri) subjectively assessed skin retraction with the combination versus ultrasound alone and reported better skin tightening when HPT was added. The improvement was visible at the 24-hour postoperative visit and continued to improve over the first six months.

Real Patient Results from the 58-Patient Study

The following six figures are published in Combining Third-Generation Ultrasound Liposuction With Helium-Based Plasma Technology Skin Tightening in the Face and Neck (Troell & Javaheri, The American Journal of Cosmetic Surgery, 2025; DOI 10.1177/07488068251330030) and are republished here with patient consent. They show before-and-after results across the age range and procedure variations documented in the 58-patient cohort: lower-face-only, full face-and-neck, jowls-only, and combination presentations with adjunct procedures (blepharoplasty, midfacelift, chin implant).

Figure 1 from Troell+Javaheri 2025 AJCS — A 32-year-old woman before and three months after VASER ultrasound liposuction with Renuvion helium-plasma skin tightening of the lower face and neck; approximately 100 cc of fat removed.
Figure 1 (Troell & Javaheri, AJCS 2025). 32-year-old woman, lower face and neck, ~100 cc fat removed, three-month result. (A) frontal before, (B) frontal after, (C) profile before, (D) profile after.
Figure 2 from Troell+Javaheri 2025 AJCS — A 38-year-old woman before and after VASER ultrasound liposuction with Renuvion helium-plasma skin tightening of the jowls and neck; approximately 50 cc of fat removed.
Figure 2 (Troell & Javaheri, AJCS 2025). 38-year-old woman, jowls and neck, ~50 cc fat removed. (A) frontal before, (B) frontal after, (C) profile before, (D) profile after.
Figure 3 from Troell+Javaheri 2025 AJCS — A 40-year-old woman before and four months after VASER ultrasound liposuction with Renuvion helium-plasma skin tightening of the face and neck; approximately 125 cc of fat removed.
Figure 3 (Troell & Javaheri, AJCS 2025). 40-year-old woman, face and neck, ~125 cc fat removed, four-month result. (A) frontal before, (B) frontal after, (C) profile before, (D) profile after.
Figure 4 from Troell+Javaheri 2025 AJCS — A 46-year-old woman, 4 feet 11 inches, 141 pounds, before and after VASER ultrasound liposuction with Renuvion helium-plasma skin tightening of the face and neck; approximately 125 cc of fat removed, six panels showing frontal, oblique, and profile views.
Figure 4 (Troell & Javaheri, AJCS 2025). 46-year-old woman (4'11", 141 lb), face and neck, ~125 cc fat removed. Six-panel composite: (A) frontal before, (B) frontal after, (C) oblique before, (D) oblique after, (E) profile before, (F) profile after.
Figure 5 from Troell+Javaheri 2025 AJCS — A 59-year-old woman, 5 feet 1 inch, 130 pounds, who underwent upper blepharoplasty, midfacelift, VASER ultrasound liposuction, and Renuvion helium-plasma skin tightening of the jowls only; approximately 75 cc of fat removed.
Figure 5 (Troell & Javaheri, AJCS 2025). 59-year-old woman (5'1", 130 lb), combined upper blepharoplasty + midfacelift + jowls-only VASER + Renuvion (no cervical treatment), ~75 cc fat removed. Documents the combined-procedure approach common in mature-skin candidates.
Figure 6 from Troell+Javaheri 2025 AJCS — A 37-year-old man, 5 feet 11 inches, 185 pounds, before and after VASER ultrasound liposuction with Renuvion helium-plasma skin tightening of the face and neck combined with a silicone chin implant; approximately 35 cc of fat removed, six panels.
Figure 6 (Troell & Javaheri, AJCS 2025). 37-year-old man (5'11", 185 lb), face and neck VASER + Renuvion with simultaneous silicone chin implant, ~35 cc fat removed. Six-panel composite: (A) frontal before, (B) frontal after, (C) oblique before, (D) oblique after, (E) profile before, (F) profile after.

Honest Limitations

The combined VASER + Renuvion procedure does several things very well. It also has limits the operator and the patient should understand before consenting.

  • It does not replace a deep-plane facelift for severe ptosis. The procedure tightens skin and removes fat. It does not reposition the SMAS or the deeper facial soft tissues. A patient whose principal concern is the deep nasolabial fold or marionette descent of the lower face will not get a deep-plane-facelift result from this approach — even with maximum skin retraction.
  • It does not address platysmal banding requiring direct correction. True platysmaplasty — the surgical correction of the central anterior neck band — is a different operation. Patients with prominent platysmal banding may benefit from VASER + Renuvion in combination with a neck lift that includes platysmaplasty.
  • It does not address bony or volumetric deficits. A small or recessed chin contributes to the perception of a "double chin" that fat removal alone cannot fix. Patients with weak chin projection often benefit from a chin implant in the same operative setting.
  • Result longevity depends on weight stability and the natural aging trajectory. Major weight gain or loss after the procedure can alter the contour. The skin tightening achieved is durable but not permanent against continued aging.
  • It is not a weight-loss procedure. The published cohort enrolled patients who were medically stable for an outpatient procedure; two of the patients who later requested additional liposuction were morbidly obese. The procedure is a contouring operation, not a method of weight reduction.

Setting honest expectations during the consultation is the single most reliable predictor of patient satisfaction at six months. The 95.5% satisfaction rate in the published series was achieved in part by selecting the right patients and by setting the right expectations during the consent process.

Combined Procedures

The published case series notes that midfacelift, facelift, neck lift, and facial implants (midface or chin) are procedures commonly combined with face and neck liposuction. The combinations are not arbitrary — each addresses a layer the VASER + Renuvion procedure cannot reach on its own.

  • Facelift / Midfacelift — for the patient whose principal concern is mid-to-deep facial soft-tissue descent rather than focal jowl or submental fat. Adding VASER + Renuvion to a facelift refines the skin envelope along the jaw and neck after SMAS repositioning.
  • Neck Lift — for the patient with prominent platysmal banding or significant skin redundancy that cannot be tightened by HPT alone. VASER + Renuvion thins and tightens the surrounding skin; the neck lift addresses the platysma directly.
  • Chin Implant — for the patient with a recessed or weak chin contributing to a poorly defined cervicomental angle. A silicone or extended anatomic chin implant placed through a submental incision in the same setting reshapes the lower-face profile (Figure 6 in the published series demonstrates this combination).
  • Upper Blepharoplasty — for the patient whose upper-lid hooding distracts from the lower-face rejuvenation. The two procedures recover on overlapping timelines (Figure 5 in the series shows this combination).
  • Facial Fat Grafting — the fat aspirated during the VASER liposuction can be processed and re-injected to add volume to deflated mid-face compartments. The same harvested fat that creates the jaw definition can restore mid-face volume in the same operative setting.

The decision to combine procedures is anatomical, not commercial. The right combination is the one that addresses every layer of the patient's actual concern in a single recovery period.

VASER + Renuvion FAQs

Is this a non-surgical procedure?

VASER + Renuvion is a minimally invasive surgical procedure. There are small (4–5 mm) incisions in the post-auricular crease and occasionally in the anterior neck. There is anesthesia (local, with optional oral sedation), an operating-room or surgical-suite environment, sterile technique, and energy delivery beneath the skin. It is meaningfully less invasive than a traditional facelift — no long incisions, no SMAS dissection, no general anesthesia — but it is not a no-incision treatment. Calling it “non-surgical” would be inaccurate.

How long until I can return to work?

Most patients return to non-physical work within five to seven days. The visible Velcro compression garment is worn continuously for one week. Bruising and edema in the lower face and neck typically resolve enough for routine appearances in seven to ten days. Vigorous exercise and physical activity are typically resumed at three to four weeks. Each patient is different; Dr. Troell reviews individual recovery expectations during the consultation.

Will I have visible scars?

The incisions for this procedure are 4 to 5 mm placed in the post-auricular crease and occasionally in the anterior neck. The post-auricular incision sits inside the natural skin fold behind the earlobe and is essentially hidden in everyday wear. The series of 58 patients reported zero cases of visible scarring as an adverse event.

What is the difference between Renuvion and other radiofrequency skin-tightening devices?

Older bipolar and monopolar radiofrequency-assisted liposuction (RFAL) devices work by bulk heating — the entire treatment volume is heated until a target temperature is reached, then maintained for a fixed time. Bulk heating drives skin-surface temperature up significantly (sometimes to 45°C) and increases the risk of full-thickness skin injury. The Renuvion helium-plasma mechanism is different: the device delivers radiofrequency energy through ionized helium gas, and the resulting plasma heats only the tissue surrounding the treatment area — the rest of the tissue cools rapidly. In the published animal study, external skin temperature rose no more than 3.6°C from baseline over the course of a typical six-pass treatment. That safety margin is what makes the technology useful in the thin-skin anatomy of the face and neck.

How much fat is typically removed?

Volumes in the published cohort ranged widely with the anatomy. Representative examples from the published figures: a 32-year-old patient had approximately 100 cc of fat removed (Figure 1); a 38-year-old had approximately 50 cc (Figure 2); a 40-year-old had approximately 125 cc (Figure 3); a 46-year-old had approximately 125 cc (Figure 4); a 59-year-old had approximately 75 cc from the jowls only (Figure 5, no cervical treatment); and a 37-year-old male had approximately 35 cc with a simultaneous chin implant (Figure 6). The volume target is anatomical, not numerical — the goal is the defined cervical-mental angle and the smooth jawline, not a specific cc number.

Is this covered by insurance?

VASER + Renuvion for the face and neck is a cosmetic procedure and is not covered by insurance. Dr. Troell’s practice does not bill insurance for any procedure. Patient-financing options including CareCredit and Alphaeon are available; the consultation includes a written quote with all costs disclosed.

How does this compare to a Renuvion-only treatment?

Renuvion-alone treatments target skin laxity in patients who do not have significant submental or jowl fat to remove. They are appropriate for the patient whose only complaint is skin looseness with minimal underlying fat excess. The published combination treats the two problems together: VASER removes the fat that defines the contour, and Renuvion tightens the skin envelope above it. Patients with both fat and skin laxity get a substantially better aesthetic result from the combination than from either treatment alone.

Will I need a facelift later?

It depends on the trajectory of aging and on the patient’s anatomy. The VASER + Renuvion result is durable but not permanent against continued aging of the deeper facial structures — the SMAS, the deep mid-face compartments, and the supporting fascia all continue to descend with age. A patient who has this procedure in their 40s may later choose a traditional facelift in their 50s or 60s to address that deeper descent. Many patients have both procedures across their cosmetic timeline; the two are complementary rather than competing.

Warm consultation environment at Troell Cosmetic Surgery
Complimentary Consultation Available

Considering VASER + Renuvion for the Face or Neck?

Schedule a consultation with Dr. Troell to discuss whether the combination is right for your anatomy — or whether a different procedure or combination of procedures would serve you better.

5375 S Fort Apache Rd #101, Las Vegas, NV 89148
Mon–Fri, 8:30 AM – 5:00 PM

Cited Sources

  1. Troell RJ, Javaheri S. Combining Third-Generation Ultrasound Liposuction With Helium-Based Plasma Technology Skin Tightening in the Face and Neck. The American Journal of Cosmetic Surgery 2025. DOI: 10.1177/07488068251330030.
  2. Nagy MW, Vanek PF. A multicenter, prospective, randomized, single-blind, controlled clinical trial comparing VASER-assisted lipoplasty and suction-assisted lipoplasty. Plast Reconstr Surg 2012;129:681e–689e.
  3. Ruff PG, Vanek P, Nykiel M. Adverse events of soft tissue coagulation using helium-based plasma technology alone and in combination with ultrasound-assisted liposuction. Aesthet Surg J Open Forum 2022;4:1–10.
  4. Duncan DI, Roman S. Helium plasma subdermal tissue contraction method of action. Biomed J Sci & Tech Res 2020;31(2):24063–24068.
  5. Chen SS, Wright NT, Humphrey JD. Heat-induced changes in the mechanics of a collagenous tissue: isothermal free shrinkage. J Biomech Eng 1997;119(4):372–378.
  6. Ruff PG, Bharti G, Hunstad J, et al. Safety and efficacy of Renuvion helium plasma to improve the appearance of loose skin in the neck and submental region. Aesthet Surg J 2023;43(10):1174–1188.

Patient education. This article summarizes a peer-reviewed clinical study for general audiences. It is not a substitute for an individual consultation, an individualized risk assessment, or informed consent obtained directly from a treating surgeon.

  • Last medically reviewed: 2026-05-12 by Robert J. Troell, MD, FACS
  • Originally published: 2026-05-11
  • Conflict-of-interest disclosure: This article summarizes a technique used by Troell Cosmetic Surgery & Facial Plastic Clinic and a peer-reviewed study authored by Dr. Troell. The practice has a direct interest in patients considering the procedure described.
112 patient cohort (2016–2022)
97.6% improved or better on GAIS scale
0 pulmonary fat emboli, oil cysts, or anesthesia events reported in this cohort

The Brazilian Butt Lift (BBL) is one of the fastest-growing body-contouring procedures in the world and one of the most scrutinized. From 2015 onward, peer-reviewed mortality data showed that traditional large-volume, intramuscular fat injection carried a career mortality risk as high as 1:6,214 from pulmonary fat embolism (PFE). The technique has since been rebuilt around three safety principles: subcutaneous-plane-only fat placement, awake anesthesia, and ultrasound-guided cannula control.

This article summarizes the technique, results, and complication profile from Dr. Robert J. Troell's 2026 peer-reviewed study (Medical Research Archives, 14:4) of 112 women who underwent awake, super-wet, VASER ultrasound-assisted liposuction with stem cell–enriched fat grafting to the buttocks and hip dips. (For how those hip dips and the outer gluteal frame are shaped, see our companion guide to hip dip fat grafting.) In this cohort: no general anesthesia, no intramuscular injection, and no fatal complications. These results are specific to this 112-patient series under one surgeon's protocol and should not be read as a guarantee of outcomes for other surgeons, other patients, or different techniques.

What this article covers: Why BBL safety changed after 2015 · the subcutaneous-plane-only rule · awake anesthesia as a safety feature · fat processing with PRP and adipose-derived stem cells · typical volumes · 112-patient outcome data · who is not a candidate · recovery · FAQ.

Key Risks and Limitations of This Procedure

BBL surgery — even under the safest protocols currently available — carries meaningful risk. The risks below are the ones most relevant to patients considering the procedure, in plain language. Each is described in clinical detail later in the article.

  • Pulmonary fat embolism (PFE). The most serious BBL-specific complication. Historical career mortality under older intramuscular technique was approximately 1:6,214 (ASERF, 2016); under subcutaneous-only protocols, published rates fall to 1:23,000 or better, but the risk is not zero.
  • Anesthesia complications. Awake tumescent anesthesia has its own risks — lidocaine toxicity, oversedation, allergic reaction. Published evidence suggests these are substantially lower than general anesthesia for liposuction, but not absent.
  • Infection. Standard surgical infection risk applies. The 112-patient cohort reported one suspected atypical mycobacterial case that resolved with antibiotics; bacterial infection was not observed in that series, but the published evidence suggests overall surgical infection risk for body contouring is in the low single-digit percent range.
  • Seroma. Fluid collection at liposuction sites. 5.6% in the published cohort, treated by needle aspiration.
  • Deep vein thrombosis (DVT). Standard risk for any prolonged surgical procedure. Risk-factor screening, oral estradiol cessation, GLP-1 cessation, and early mobilization mitigate but do not eliminate the risk.
  • Fat necrosis and oil cysts. Grafted fat that fails to vascularize can form palpable cysts. None were observed in the published cohort under centrifugation-filtration processing; the available evidence suggests this is uncommon under stem-cell-enriched protocols but is reported in the broader BBL literature.
  • Revision surgery. 4.5% of the published cohort needed a second grafting session for size or contour. Patients seeking large volumes are more likely to need a second stage.
  • Candidacy exclusions. Patients requesting general anesthesia, patients requesting silastic gluteal/hip implants, patients above ideal body weight, patients on cytochrome-P-450-inhibiting medications, patients on oral estradiol, patients on GLP-1 agonists within two weeks, and active smokers may be deferred, referred, or asked to modify medications. Patient selection is itself a safety mechanism, and the cohort outcomes below reflect this filtering.
  • Generalizability. The 112-patient outcomes described later were observed in a single-surgeon retrospective series with specific exclusion criteria. They are not a guarantee of outcomes for other surgeons, other techniques, or different patient populations. See the dedicated study-limitations section below.

The 2015–2023 Safety Rebuild

The first fatal pulmonary fat embolism (PFE) from BBL was published by Astarita and colleagues in 2015. Shiffman followed in 2016 with the description of "fat tissue pulmonary embolism syndrome." That same year, the Aesthetic Surgery Education and Research Foundation (ASERF) Task Force surveyed 198,857 gluteal fat grafting cases and identified 13 non-fatal and 32 fatal PFEs — a career mortality rate of approximately 1:6,214 for surgeons performing the procedure.

Mofid and colleagues showed that 3% of plastic surgeons had experienced a patient fatality from BBL and 7% had at least one non-fatal PFE in their careers. The risk factor most strongly associated with fatal outcome was deep intramuscular fat injection — a 4-fold increase in fatal PFE and 6-fold increase in non-fatal PFE versus subcutaneous-only placement.

Regulation followed. The Florida Board of Medicine mandated subcutaneous-plane-only fat grafting in 2019, capped the number of BBLs per surgeon at three per day in 2022, and required intraoperative ultrasound guidance. In 2023, Florida HB 1471 prohibited non-surgeons from harvesting or administering fat and barred surgeons from supervising BBL procedures across multiple operating rooms. By the time the Multi-Society Task Force for Safety in Gluteal Fat Grafting released its 2018 practice advisory, the International Society of Aesthetic Plastic Surgeons reported only a single fatal PFE following the new guidelines.

The numbers, before and after the safety rebuild:

  • Career mortality from intramuscular technique: 1:6,214 (ASERF, 2016)
  • Career mortality from subcutaneous-only technique: 1:23,000 or better (ABCS / WAGS surveys, 2022)
  • Cases with fat in gluteal muscle on post-mortem: 100% of fatal PFEs (Florida 2019 data)
  • PFE risk reduction with subcutaneous or superficial-to-mid-muscular placement vs deep-muscle: 63–82% (Mofid et al. 2017)

Subcutaneous Plane Only — What That Actually Means

Editorial illustration of the gluteal anatomical planes showing the subcutaneous space, investing muscular fascia, and underlying gluteus maximus muscle
The subcutaneous plane sits above the investing muscular fascia and is thicker than the gluteus maximus muscle at every measured anatomical point. Fat injected here cannot reach the deep gluteal veins that drive pulmonary fat embolism risk.

The gluteus maximus muscle contains the superior and inferior gluteal veins, which sit roughly 4.5 to 5 cm from the sacral midline and 6 cm deep from the skin surface. These veins are 7 to 13 times larger in diameter at the medial aspect of the gluteus maximus than the smaller venules that travel in the subcutaneous space. When a fat-injection cannula injures a vein in the muscle, fat is forced into the venous circulation under the pressure gradient of the injection, transported through the inferior vena cava, and lodged in the pulmonary arteries.

The subcutaneous plane is thicker than the gluteus maximus muscle at every anatomical point measured — by 57%, 55%, and 51% at the three points Zhang et al. studied on MRI — and has a larger capacity for fat volume than the muscle compartment. The available published evidence suggests there is no technique-level requirement to inject fat into the muscle to achieve the aesthetic outcome; the published society guidance has converged on subcutaneous-only placement, with right fat processing and cannula control supplying the remaining technical control.

Three independent surgical society task forces — ASERF, the American Board of Cosmetic Surgery (ABCS), and the World Association of Gluteal Surgeons (WAGS) — converged on the same recommendations:

  • Inject fat only above the investing muscular fascia (subcutaneous plane)
  • Use a 4-mm or larger smooth, blunt-tip injection cannula (smaller diameters bend under pressure and lose plane control)
  • Inject parallel to the back, never with downward inclination
  • Inject only while the cannula is in motion (avoids high-pressure bolus injection)
  • Single-hole cannulas only (multi-hole cannulas spray fat in unpredictable directions)
  • Intraoperative ultrasound guidance, with the surgeon holding the probe
  • Maximum three BBLs per surgeon per day (operator fatigue lowers proprioception)
  • Specific written informed consent noting fat embolism risk

Where the safety recommendations come from:

  • ASERF (Aesthetic Surgery Education and Research Foundation, 2018) — Multi-Society Task Force practice advisory. Established subcutaneous-plane-only fat grafting and intraoperative ultrasound as the safety baseline.
  • ABCS (American Board of Cosmetic Surgery) — Surgeon-survey data correlating subcutaneous-only technique with 1:23,000 career mortality versus 1:6,214 for the older intramuscular pattern.
  • WAGS (World Association of Gluteal Surgeons) — International consensus on cannula gauge (4 mm or larger), single-hole tip, motion-only injection, and parallel-to-back trajectory.
  • Florida Medical Board (HB 1471, 2019–2023) — Translated the multi-society guidance into state regulation: subcutaneous-only mandate, three-BBLs-per-surgeon-per-day limit, intraoperative ultrasound, and a prohibition on non-surgeons performing fat harvest or injection.

The four converge. Dr. Troell's protocol matches every recommendation above and extends them with the awake-anesthesia + elevated-epinephrine wetting solution described in the 2026 Medical Research Archives paper.

Questions to Ask Any Surgeon You Consult

If you are considering BBL surgery — at this practice or elsewhere — the published society guidance suggests these specific questions before scheduling. They apply to every surgeon, including Dr. Troell. Your right to ask and to verify the answers is independent of practice.

  1. Which anatomical plane will you inject fat into? The current ASERF / ABCS / WAGS consensus is subcutaneous only; intramuscular injection is associated with significantly higher PFE risk.
  2. Will the procedure be performed awake under tumescent anesthesia, or under general anesthesia? Each has different risk and feedback characteristics. Ask the surgeon to explain their reasoning.
  3. What intraoperative ultrasound guidance is used, and who holds the probe? Society guidance is intraoperative ultrasound with the surgeon holding the probe.
  4. What is your own complication record? Specifically: career rate of PFE, fatal outcomes, infection, seroma, revision. A surgeon unwilling to share is a warning sign.
  5. What is your maximum volume per buttock, and what determines that ceiling? Published society guidance favors lower volumes that stay within the subcutaneous space; very large volumes carry higher pressure-driven risk independent of plane.
  6. What is your board certification, and where can I independently verify it? ABFPRS, ABCS, ABOto/ABOHNS, FACS, and your state medical board all offer public lookups.
  7. What are the candidacy exclusions in your practice? A surgeon who never declines patients on medical, weight, medication, or psychological grounds is a warning sign.
  8. Will the informed consent document specifically address fat embolism risk? Society guidance recommends procedure-specific consent, not just generic surgical consent.
  9. What is the post-operative monitoring plan, and what is the protocol if I develop chest pain or shortness of breath? PFE most often presents intraoperatively or within hours; a clear after-hours contact path matters.

The Patient as a Safety Sensor

Among the safety features most strongly emphasized in this protocol, the awake, oral-sedation approach is the one with the most direct biomechanical rationale. The patient is alert, calm, and comfortable on super-wet wetting solution (lidocaine, epinephrine, and bicarbonate diluted into 1L or 3L lactated Ringer's) with parenteral medications titrated as needed. There is no general anesthesia, no endotracheal intubation, and no muscle paralysis. The available published evidence supports the awake-tumescent approach as one of several acceptable techniques under current society guidance; randomized comparison to general anesthesia under modern ultrasound-guided protocols has not been performed.

The reason: when a fat-injection cannula touches the gluteus maximus or medius muscle fascia, an awake patient elicits an immediate noxious response — a verbal complaint or a withdrawal reflex within a fraction of a second. That feedback alerts the surgeon that the cannula has wandered out of the subcutaneous plane before fat is delivered into the muscle. Under general anesthesia, that same fascia contact produces no warning at all.

This was confirmed by Chia and colleagues in 2018: 32 women undergoing BBL under local anesthesia received an average of 359 cc of fat per buttock, and the immediate patient feedback gave the surgeon real-time awareness of any misguided cannula. The awake-anesthesia approach reframes the patient as a safety sensor — not as a passive recipient of the procedure.

Awake anesthesia also reduces another risk independent of PFE: anesthesia-related mortality. Survey data from the American Society of Plastic Surgeons (1997) and Grazer (2000) document a mortality rate from liposuction alone under general anesthesia of between 1:5,000 and 1:5,225. By contrast, awake tumescent anesthesia performed by dermatologists shows a theoretical mortality risk of approximately 1:500,000.

The mechanism behind "awake anesthesia" is the wetting solution itself. The same fluid that fills the subcutaneous space to displace fat for low-pressure aspiration — super-wet lactated Ringer's with lidocaine, epinephrine, and bicarbonate — is the anesthetic. There is no separate anesthetic delivery system. The patient is not awake despite the surgery; the patient is awake because the wetting solution provides the local anesthesia, lets oral sedation and parenteral midazolam stay in the comfort-only range, and preserves the protective reflex that flags cannula-to-muscle contact within a fraction of a second. Awake anesthesia and tumescent technique are not two parallel features of the protocol — they are the same mechanism.

Risk Profile: Awake Tumescent vs IV Sedation vs General Anesthesia

Published anesthesia mortality figures are not directly comparable across procedure types or eras. The summary below describes the three anesthesia approaches as they apply to body-contouring and BBL surgery specifically, with the caveats society guidance has placed on each. None of these comparisons are randomized-controlled; the figures span different decades, surgical scopes, and patient populations.

Awake oral sedation + tumescent local anesthesia (the protocol described in this article)

  • Mortality estimate cited from tumescent dermatologic liposuction literature: approximately 1:500,000 (theoretical, based on safe lidocaine dosing).
  • Patient retains protective reflexes — can report cannula-to-muscle contact in real time.
  • Limited by lidocaine maximum safe dose (50 mg/kg standard; 10 mg/kg with cytochrome-P-450 inhibitors).
  • Requires patient tolerance for awareness of the procedure (anxiety, motion, communication).
  • Caveat: the 1:500,000 figure is from dermatologic tumescent liposuction; combined-procedure BBL-specific outcome data are smaller and not directly comparable.

IV sedation (intermediate — not the protocol in this article, but used by some practitioners)

  • Reduces patient awareness while preserving spontaneous respiration.
  • Mortality estimates are not separately well-characterized in the BBL-specific literature.
  • Reduces but does not eliminate the awake-feedback safety mechanism described above.
  • Carries its own risks: airway compromise, oversedation, drug interaction.

General anesthesia (endotracheal intubation, muscle paralysis)

  • Liposuction-alone mortality under general anesthesia in survey data: between 1:5,000 and 1:5,225 (ASPS 1997, Grazer 2000). These figures are from older eras; combined-procedure BBL cases may differ.
  • Eliminates the cannula-to-muscle awake-feedback signal entirely.
  • Required for some patient or surgical indications (e.g., concurrent abdominoplasty under the same anesthesia, certain medical conditions).
  • Carries general-anesthesia-specific risks: malignant hyperthermia, intubation trauma, postoperative cognitive effects, anesthetic toxicity.

The available published evidence supports a preference toward awake or sedation-tumescent technique for body-contouring procedures performed in carefully selected patients, but does not preclude appropriate use of general anesthesia in cases where it is indicated.

VASER Ultrasound + Super-Wet Wetting Solution

VASER (Vibration Amplification of Sound Energy at Resonance) is third-generation ultrasound liposuction. A 5-ring probe delivers pulsed ultrasound energy at 60% intensity to selectively disrupt fat cells while leaving connective tissue and vasculature intact. This produces three downstream benefits relevant to BBL:

  1. High adipocyte viability for grafting. Independent laboratory analysis shows fat harvested under VASER at 60% energy preserves 87–92% of adipocytes and 87–97% of adipose-derived stem cells (ADSC).
  2. Better skin retraction. Liposuction alone produces 8–10% skin retraction. VASER adds another estimated 20%. When combined with Renuvion helium-based radiofrequency plasma technology (HBT), an additional 20–30% retraction is achieved.
  3. Cleaner fat harvesting. Vented cannulas (VentX) reduce trauma during aspiration, and suction pressure is held at half an atmosphere to minimize cellular damage.

The wetting solution is delivered super-wet (volume of fluid roughly equal to fat to be removed) under tumescent technique. Dr. Troell's protocol uses an epinephrine concentration of 1.5 mg/L — higher than Klein's standard solution (1.0 mg/L) — which minimizes bruising without raising intraoperative heart rate and theoretically further reduces PFE risk by vasoconstricting the small veins of the subcutaneous space.

The 360-degree liposuction phase typically addresses the abdomen, flanks, lower back, inner and outer thighs, middle back, inferomedial buttock, and superior posterior thigh — the anatomical "frame" that defines the buttock shape from negative space. Fat removal in these areas does as much for the gluteal aesthetic as the fat grafting itself.

The wetting-solution protocol is also what makes the awake technique work at the volume scale published in the 2026 study. The elevated epinephrine concentration — 1.5 mg/L versus Klein's standard 1.0 mg/L — extends the vasoconstriction needed to keep intraoperative bleeding minimal across a 1-hour-45-minute to 2-hour procedure without raising heart rate to a level that would require general anesthesia. The 950 cc of unprocessed fat harvested in a typical case is delivered over a wetting volume calibrated to keep the patient comfortable, awake, and hemodynamically stable. Without this specific wetting-solution chemistry, awake large-volume 360-degree liposuction with simultaneous gluteal fat grafting would not be feasible — the technique signature is the solution, not just the cannula.

How Harvested Fat Becomes Graftable Fat

Editorial illustration of centrifuge tubes showing layered processed fat over a concentrated cellular pellet, representing centrifugation-filtration fat processing on warm creamy stone medical surface
Centrifugation-filtration on the MediKan TP-101 system separates harvested fat into clear supernatant (oil, blood, wetting solution — discarded), compacted purified adipocytes (the graftable layer), and a dependent pellet of concentrated stromal vascular fraction and adipose-derived stem cells.

Unprocessed harvested fat contains adipocytes, blood, oil, anesthetic solution, dead cells, and lipase enzymes. Injecting this raw aspirate has two consequences: a high proportion fails to survive (fat necrosis, oil cysts), and the large volumes required to compensate for non-survival raise PFE risk for reasons of pressure and pure cannula time in the tissue. The fix is to compact and purify the harvest before grafting.

Dr. Troell's protocol uses centrifugation-filtration fat processing on the MediKan TP-101 system. The harvested fat is transferred into 60-cc syringes with a manufacturer-patented 100-micron filter, centrifuged at 3,000 rpm for 3 minutes, and compacted into purified fat at roughly 60% of harvested volume. The supernatant (oil, blood, wetting solution, damaged adipocytes) is discarded. The dependent pellet contains concentrated stromal vascular fraction (SVF) and adipose-derived stem cells (ADSC).

Two enrichments are added to each 25 mL of processed fat: 1 mL of platelet-rich plasma (PRP) from the patient's own blood and 1 mL of concentrated ADSC/SVF. Both promote neovascularization — the formation of new blood vessels into the graft within the critical 1–2 day window before adipocyte death. Adipocytes that establish vascular supply within that window survive long-term; those that don't, don't.

Editorial illustration of medical vials representing concentrated stromal vascular fraction, adipose-derived stem cells, and platelet-rich plasma used in fat graft enrichment
The dependent pellet from centrifugation yields concentrated stromal vascular fraction and adipose-derived stem cells (ADSC). One milliliter of ADSC/SVF plus one milliliter of platelet-rich plasma (PRP) is added to every 25 mL of processed fat — the enrichment that drives neovascularization in the critical 1–2 day post-injection window.

Volumetric retention has been objectively measured (Teratech 10-MHz diagnostic ultrasound) at 75–85% of grafted volume at 7 months post-injection. Coleman has shown that fat-graft volume stabilizes after 2–3 months and remains stable for up to 12 years.

Typical Volumes per Patient

One of the most consequential differences between Dr. Troell's technique and the high-volume "Mendieta" approach is total grafted volume. Mendieta described intramuscular gluteal fat grafting of 450 to 1,100 cc per buttock side (900 to 2,200 cc total). Del Vecchio and Wall reported an average of 1,003 cc per case with a range up to 4,400 cc using SAFELipo expansion vibration lipofilling. Dr. Troell's average is substantially lower:

  • 240 cc of purified, compacted, enriched fat grafted per buttock
  • 45 cc per hip dip area
  • 570 cc total of processed fat for both buttocks plus both hip dips combined
  • 950 cc of unprocessed, harvested fat is the typical input that yields the 570 cc processed output

Lower volumes are not a marketing decision. They reflect the limit of the subcutaneous space — the endpoint of grafting is defined by three observations: fat egresses from the incisions, every depression or indentation has been filled, and the gluteal shape is symmetric. Past those endpoints, additional fat does not improve the result and does increase pressure-related PFE risk independent of plane.

Patients who want substantially larger augmentation than a single subcutaneous session can achieve are offered three alternatives: (1) a staged second fat grafting session from areas not previously addressed by liposuction; (2) silastic gluteal implant placement (up to 350 cc in a single surgery, expandable to 700 cc in a staged procedure); or (3) composite augmentation combining a gluteal or custom hip silastic implant with simultaneous fat grafting.

The volume discipline is the safety argument, not just the aesthetic argument. Once the subcutaneous space is filled, adding more fat cannot be done at low pressure in the same plane — it requires either deeper-than-subcutaneous injection (which mechanically forces fat through the gluteal venous system) or higher injection pressure (which produces the same pressure-driven embolus risk). The 240-cc-per-buttock and 570-cc-total ceiling and the zero-PFE outcome in the 2026 cohort are the same data point measured two different ways. Volume restraint is the most consequential safety mechanism in the technique — the cannula plane, the awake anesthesia, and the wetting-solution chemistry all reinforce a volume ceiling that the surgeon cannot exceed without trading safety for aesthetics.

Renuvion HBT and VASERSmooth Cellulite Subcision

Two additional technologies are integrated into the procedure when indicated:

Renuvion helium-based plasma radiofrequency (HBT) delivers 85°C heat to collagen fibers for 0.44 to 0.08 seconds, shrinking them by approximately 65%. The protocol uses 80% energy, 1.5 L/min helium flow, and probe movement no greater than 3 cm/second. Three probe movements (six passes total) cover each 1.5-cm plane — full surface-area and depth coverage of the treated zone. HBT was performed in 34.8% of the 2026 study cohort (n=39).

VASERSmooth cellulite subcision addresses dimpling caused by fibrous septae anchoring skin to the underlying fascia. After infiltration of 75–125 cc of wetting solution per buttock, a standard VASER probe pre-treats the subcutaneous space (60% energy, pulsed mode). A V-shaped tip on the VASERSmooth handpiece then cuts the cellulite fibers in continuous mode at 80% energy. Indentations marked preoperatively are filled with fat after subcision. VASERSmooth was performed on 6.25% of the cohort (n=7).

Neither HBT nor VASERSmooth produced complications in the 2026 study — no skin burns, no vascular compromise, no skin necrosis.

112 Patients: GAIS Improvement, Satisfaction, and Complications

The 2026 study followed 112 consecutive adult women (mean age 36, BMI range 22–31) who underwent the protocol between 2016 and 2022. Mean follow-up was approximately one year, with several patients followed for more than 10 years. Indications were aesthetic gluteal contouring (85%, n=95) or size augmentation (15%, n=17). All patients had refused silastic implants.

97.6% Improved, much improved, or very much improved on the Global Aesthetic Improvement Scale (GAIS)
92% Reported subjective satisfaction with the overall procedure (n=103)
14.6% Total complication rate — all minor (n=13)
4.5% Revision rate for additional gluteal or hip fat grafting (n=4 of 112)

Complications observed in this cohort:

  • 7 patients (7.8%) experienced minor contour irregularities
  • 5 patients (5.6%) developed seromas treated by needle aspiration
  • 1 suspected atypical mycobacteria infection — no growth in culture; resolved on six weeks of sulfamethoxazole-trimethoprim
  • 0 pulmonary fat emboli observed in this cohort
  • 0 oil cysts observed in this cohort
  • 0 bacterial infections diagnosed in this cohort
  • 0 anesthesia-related complications observed in this cohort (no airway obstruction, no lidocaine toxicity, no allergic reactions)
  • 0 fatal outcomes in this cohort

Important reading note. "Zero observed events in a 112-patient cohort" is not the same as "risk eliminated." The published evidence supports a non-zero baseline risk for each of these complications under any protocol, in any patient population, with any surgeon. The zero-events outcomes above reflect a single-surgeon retrospective series with specific patient selection (see the limitations section below). They do not imply that the procedure carries no risk — they describe what was observed under one carefully-controlled protocol.

Of the patients dissatisfied with the result, 7 wanted more fat volume than the subcutaneous space could accept and 2 wanted a different aesthetic outcome from the body contouring as a whole. None of the dissatisfied patients experienced a safety event.

Limitations of the 2026 112-Patient Series

The outcome data presented above come from a retrospective study of 112 consecutive female patients operated on by Dr. Troell between 2016 and 2022, published in Medical Research Archives 14(4) in 2026. Several characteristics of the study should be kept in mind when interpreting the numbers:

  • Retrospective design. Data were collected from existing patient records, not prospectively defined endpoints with pre-registered statistical analysis. This is the standard for surgical case-series research, but it introduces selection bias and limits causal claims.
  • Single-surgeon protocol. All 112 procedures were performed by Dr. Troell under one specific protocol. The outcomes reflect the combined effect of patient selection, surgical skill, anesthesia approach, processing protocol, and post-operative care as practiced at this clinic. They are not a general claim about awake-BBL technique performed by other surgeons under different protocols.
  • Cohort selection. The cohort excluded patients who requested general anesthesia and patients who requested silastic gluteal or hip implants. Patients in the series had self-selected for the awake technique and had been screened for medical, anesthetic, and weight-stability criteria. The complication rate in the published cohort is therefore lower than it would be in an unselected population.
  • Exclusion criteria. Patients on certain medications, patients above their ideal body weight, and patients with anatomic features inconsistent with subcutaneous-only grafting may have been deferred preoperatively. The zero-PFE outcome reflects this filtering as much as it reflects the surgical technique itself.
  • Surgeon-specific volume restraint. The 240 cc per-buttock average is meaningfully lower than the 450–1,100 cc range described by other published practitioners (Mendieta, Del Vecchio). Outcomes at higher volumes — even with subcutaneous-only technique — are not directly comparable.
  • Follow-up duration. Mean follow-up is approximately one year, with some patients followed beyond ten years. Late complications (more than 12 months post-op) may be under-captured in retrospective record review.
  • Generalizability. These results should not be read as a forecast of outcomes for other surgeons, other patient populations, other volumes, or different protocols. The published cohort is one carefully-controlled data point within a larger and still-evolving body of BBL safety evidence.

Patients comparing surgeons should ask each candidate for their own complication record, their own cohort data, and the same study-limitations questions for those data. Society guidance increasingly recommends transparent disclosure of surgeon-specific complication rates as part of informed consent.

Where the Claims in This Article Come From

Not every claim in this article has the same level of evidence behind it. The summary below separates three categories: what independent surgical societies have converged on; what is specific to Dr. Troell's protocol and the 112-patient retrospective cohort published in 2026; and what remains uncertain or actively debated in the BBL literature.

What is independent-society consensus (multiple sources, multiple authors, converging guidance):

  • Subcutaneous-plane-only fat grafting is safer than intramuscular injection (ASERF 2016/2018; ABCS; WAGS; multi-society 2018 advisory).
  • Intraoperative ultrasound guidance, with the surgeon holding the probe, reduces inadvertent muscular injection (multi-society 2018 advisory; Florida HB 1471).
  • Cannula diameter (4 mm or larger), single-hole tip, and motion-only injection reduce embolic risk (society consensus).
  • Maximum of three BBLs per surgeon per day reduces operator-fatigue contribution to risk (Florida regulation; society guidance).
  • Procedure-specific informed consent regarding fat embolism is recommended (society advisories).

What is specific to Dr. Troell's protocol or to the 2026 cohort (single-surgeon, retrospective):

  • The specific combination of awake oral-sedation anesthesia + VASER ultrasound at 60% energy + MediKan TP-101 centrifugation-filtration + PRP + ADSC/SVF enrichment is the protocol described in the 2026 Medical Research Archives paper.
  • The 1.5 mg/L epinephrine concentration (vs Klein's standard 1.0 mg/L) is Dr. Troell's protocol modification.
  • The 240 cc per-buttock / 570 cc total volume average is the cohort's observed average, not a society-set ceiling.
  • The 97.6% GAIS improvement and 0 PFE / 0 fatal outcomes are findings from this single 112-patient retrospective series.
  • The 75–85% volumetric retention at 7 months was measured in this cohort with Teratech 10-MHz diagnostic ultrasound.

What remains uncertain or debated in the broader BBL literature:

  • Whether awake anesthesia is clinically superior to general anesthesia under modern ultrasound-guided protocols. Single-cohort case series cannot resolve this; randomized comparison has not been performed.
  • Whether stem-cell / ADSC enrichment meaningfully improves long-term volumetric retention beyond standard centrifugation. The literature is mixed; the mechanism is plausible.
  • Whether the 63–82% PFE risk reduction associated with subcutaneous placement scales identically across surgeons of varying training and ultrasound proficiency.
  • The optimal upper-bound volume per session. Society guidance has converged on technique discipline rather than a fixed milliliter cap.
  • The role of operator fatigue and case volume: society guidance is "no more than three per day," but the dose-response curve is not well characterized.

Who Is Not a Candidate for This Technique

The 2026 study excluded two categories of patients:

  1. Patients requesting general anesthesia. The safety advantage of the awake technique is forfeited under general — cannula-to-muscle contact no longer produces feedback. Patients who require general anesthesia for any reason (medical, psychological, prior experience) are referred to alternative providers.
  2. Patients requesting silastic gluteal or hip implants. Implant-based augmentation is a different procedure with different risk and recovery profiles. Patients who specifically want implants are evaluated separately for that pathway.

Additional considerations that may affect candidacy:

  • Body weight stability. Patients above their ideal body weight are recommended a weight-loss trial before grafting, since fat-graft volume tracks with overall weight changes.
  • Cytochrome P-450 inhibitors (antidepressants, benzodiazepines, macrolides, beta-blockers, calcium channel blockers, antifungals) lower the maximum safe lidocaine dose from 50 mg/kg to 10 mg/kg — medications must be reviewed and timed perioperatively.
  • Oral estradiol is stopped at least two weeks (preferably one month) preoperatively to lower deep vein thrombosis risk.
  • GLP-1 agonists are stopped two weeks preoperatively per current anesthesia guidelines.
  • Smoking and vaping cessation a minimum of 2–3 weeks before and 2–4 weeks after surgery, to lower infection risk and protect graft survival.

Recovery, Compression, and Body Position

The first weeks after surgery determine how much grafted fat survives. The protocol below was followed by the 2026 cohort:

  • Compression garment worn continuously for one month, then nights only for an additional week. The buttocks are not in the compression — pressure on the graft compromises vascularization.
  • Sitting position: patients may sit on the front edge of a chair but not against the back for a minimum of two weeks — preferably four to five weeks. Sleep on the stomach or side for the same duration.
  • Lymphatic massage: self-administered finger-tip technique on liposuction sites four times daily for two minutes each, for two months. A trained specialist provides external massage starting day 5 postoperatively.
  • Pain control: gabapentin 300 mg three times daily and a COX-2 inhibitor twice daily for 10 days. Acetaminophen and short-acting opioids reserved for breakthrough pain to minimize narcotic exposure.
  • Antibiotic prophylaxis: first-generation cephalosporin 500 mg four times daily for one week. Antibacterial wipes for the toilet seat for two weeks (lateral infragluteal incisions are near the perianal region).
  • No water exposure (tub, pool, body of water) until incisions are completely healed at 4–5 weeks. Showers are fine after the first day.
  • Exercise: nothing for 3–5 weeks to reduce seroma risk. Then return to a low-fat, lower-calorie diet and at least five days per week of muscle strengthening plus 30+ minutes of aerobic exercise.

Patients are seen at day 1, weeks 1 and 2, months 1, 2, 3, and 6, and yearly thereafter. Final gluteal volume is first assessed at three months.

Common Questions About Stem Cell–Enriched BBL

Is awake BBL painful?

The procedure is performed under oral sedation (a combination of lorazepam or alprazolam, hydrocodone or oxycodone, and ondansetron), parenteral midazolam and fentanyl titrated as needed, and super-wet tumescent wetting solution containing lidocaine. Patients are comfortable and cooperative but alert enough to provide the safety feedback the technique depends on. Most patients describe the experience as "pressure" rather than pain. Postoperative pain is managed with gabapentin and a COX-2 inhibitor to minimize narcotic exposure.

How long does the surgery take?

Operative time for 360-degree liposuction with gluteal fat grafting averages 1 hour 45 minutes to 2 hours. Each anatomic area takes 25–30 minutes total (5 minutes super-wet, 4–8 minutes VASER, 10–15 minutes liposuction and fat harvest). Fat grafting to each buttock takes 10–20 minutes. If high-definition abdominal etching is added, an additional 5–10 minutes. If VASERSmooth cellulite subcision is added, 5–8 minutes. If Renuvion HBT skin tightening is added, 4–7 minutes per area or 12–15 minutes for typical 360-degree liposuction zones.

How much fat will I actually keep long-term?

Centrifugation-filtration processing yields 60% of the harvested volume as compacted, purified, enriched fat. Of the volume injected into the subcutaneous space, ultrasound measurement at seven months has documented 75–85% volumetric retention. Coleman's long-term data shows that fat-graft volume stabilizes by 2–3 months and remains stable for up to 12 years thereafter. The PRP and ADSC enrichment promote the neovascularization that determines which adipocytes survive past the first 1–2 days.

What if I want a larger result than 240 cc per buttock?

Three options are presented in advance: (1) a staged second fat grafting session at least three months after the first, drawing fat from areas not previously treated; (2) silastic gluteal implant placement (350 cc in a single procedure, expandable to 700 cc in a staged procedure); or (3) composite augmentation combining an implant with simultaneous fat grafting. Going past the subcutaneous-space limit in a single session is not offered because doing so requires deeper or higher-pressure injection, both of which raise PFE risk independent of plane.

Is the awake technique used by other surgeons?

Awake, tumescent, subcutaneous-only BBL is a recognized technique within the cosmetic and plastic surgery societies that have published gluteal fat grafting safety guidelines (ABCS, WAGS, ISAPS, ASERF). Florida has codified subcutaneous-plane-only fat grafting and intraoperative ultrasound into state law. The awake-anesthesia variant is performed by a smaller subset of those surgeons; many continue to operate under general anesthesia. The patient should ask any prospective surgeon: (1) what plane fat will be injected into, (2) whether the surgery will be performed awake or under general anesthesia, (3) what intraoperative ultrasound guidance is used, and (4) what the surgeon's own complication record is.

Are there hip dips that won't fill with fat alone?

Hip dip depth varies widely. Most hip dips fill predictably with 45 cc of compacted, enriched fat per side. Severe hip dips with a bony or structural origin (rather than a soft-tissue origin) may not fully correct with fat alone — a custom hip silastic implant produces a more definitive result in those cases. The decision is made at consultation based on photographs, palpation, and patient goals.

How does Troell Cosmetic Surgery handle insurance and payment?

Troell Cosmetic Surgery is a cash-pay specialty practice and does not bill insurance for any procedure, including cases that may be medically indicated. We can provide a superbill on request that patients may submit independently to their carrier; any reimbursement is determined between the patient and their insurer. Financing options through CareCredit and Alphaeon are available for patients who prefer to split payment over time.

Source, Authorship, and Medical Review

Portrait of Dr. Robert J. Troell, MD, FACS

Dr. Robert J. Troell, MD, FACS

Author and medical reviewer. Founder and Medical Director of Troell Cosmetic Surgery & Facial Plastic Clinic, Las Vegas, NV. 30+ years of body-contouring practice. Clinical instructor for Touro University Nevada College of Osteopathic Medicine.

  • Board-Certified Facial Plastic & Reconstructive Surgeon (ABFPRS)
  • Board-Certified Cosmetic Surgeon (ABCS)
  • Board-Certified in Otolaryngology — Head & Neck Surgery (ABOto, ABOHNS)
  • Fellow of the American College of Surgeons (FACS)
  • Fellow of the American Academy of Cosmetic Surgery (FAACS)
  • Author of the 2026 peer-reviewed BBL safety + outcomes study cited below

This article summarizes findings from the peer-reviewed publication:

Troell, R. (2026). Gluteal & Hip Stem Cell Enriched Fat Grafting (Brazilian Butt Lift): Optimizing Outcomes While Minimizing Complications. Medical Research Archives, 14(4). DOI: 10.18103/mra.v14i4.7467. Open access.

Key supporting references cited in the original paper:

  • Mofid MM, Teitelbaum S, Suissa D, et al. Report on mortality from gluteal fat grafting: Recommendations from the ASERF Task Force. Aesth Surg J. 2017;37(7):796-806.
  • Cuzalina A, Mostofi P, Hah W. Gluteal fat grafting technique and mortality update among surveyed ABCS surgeons. Am J Cosm Surg. 2024;41(2):85-94.
  • Del Vecchio D, Kenkell JM. Practice advisory on gluteal fat grafting. Aesth Surg J. 2022;42(9):1019-1029.
  • Pazmino P, Del Vecchio D. Safety in gluteal augmentation. Clin Plast Surg. 2023;50:521-523.
  • Chia CT, Theodorou SJ, Dayan E, et al. "Brazilian Butt Lift" under local anesthesia: a novel technique addressing safety concerns. Plast Reconstr Surg. 2018;142(6):1468-1475.
  • Pozza ED, Ordenana C, Al-Deen Said A, et al. Anatomic-Radiologic Study on Gluteal Danger Zones. Plast Reconstr Surg Glob Open. 2019;7(8 Suppl):16-16.

Verify these credentials independently. You have the right to confirm any surgeon's board certification and license status through public lookups. Dr. Troell's credentials can be verified at:

Current Nevada medical license status: active, in good standing as of the most recent medical review date above. Patients are encouraged to re-verify before scheduling.

Independent society advisories referenced in this article. Each society publishes its own gluteal-fat-grafting safety guidance independent of any individual practice; their recommendations are the foundation of the protocol described here.

  • ASERF — Aesthetic Surgery Education and Research Foundation, Multi-Society Task Force on Safety in Gluteal Fat Grafting (2016, 2018 advisories): aserf.org
  • ABCS — American Board of Cosmetic Surgery gluteal fat grafting guidance: americanboardcosmeticsurgery.org
  • WAGS — World Association of Gluteal Surgeons consensus on cannula gauge, plane, and ultrasound guidance
  • ISAPS — International Society of Aesthetic Plastic Surgery global gluteal-fat-grafting safety reporting: isaps.org
  • Florida Board of Medicine — HB 1471 (2023), which translated multi-society guidance into state regulation: subcutaneous-only mandate, three-BBL-per-day limit, intraoperative ultrasound requirement, prohibition on non-surgeons performing fat harvest or injection

Conflict-of-interest disclosure. This article summarizes a technique used by Troell Cosmetic Surgery & Facial Plastic Clinic and a peer-reviewed retrospective study authored by Dr. Robert J. Troell. Dr. Troell and the practice have a direct interest in patients considering this procedure. The published cohort data described in this article come from Dr. Troell's own clinical series; they have not been independently replicated by other surgeons under the same protocol. The independent society guidance described above is published separately and is not affiliated with this practice.

Promotional — Complimentary Consultation Available

Considering Body Contouring with Fat Grafting?

Consultations at Troell Cosmetic Surgery include a comprehensive medical evaluation, body contouring assessment, technique-specific options review, and detailed informed consent.

5375 S Fort Apache Rd #101, Las Vegas, NV 89148
Mon–Fri, 8:30 AM – 5:00 PM
3 Boards ENT + Facial Plastic + Sleep Medicine
30+ yrs Specialty Surgical Practice
2 Pubs Peer-Reviewed Nasal Valve Repair

Medically Written and Reviewed by

Dr. Robert J. Troell, MD, FACS

  • Board-Certified Facial Plastic & Reconstructive Surgeon (ABFPRS)
  • Board-Certified Cosmetic Surgeon (ABCS)
  • Board-Certified Otolaryngologist — Head & Neck Surgery (ABOto)
  • Board-Certified Sleep Medicine Specialist (ABSM) — First Surgeon Certified in the United States
  • Fellow, American College of Surgeons (FACS)
  • Residency & Fellowship: Stanford University Medical Center
  • Doctor of Medicine: University of South Florida College of Medicine
  • 58+ peer-reviewed publications including work on nasal valve and alar rim repair [1] [2]

Published: April 23, 2026 · Last medically reviewed: April 23, 2026 · View all publications

Functional rhinoplasty is nose surgery performed to restore or improve nasal breathing — correcting structural problems like a deviated septum, collapsed nasal valves, alar rim weakness, enlarged turbinates, or a combination of these issues that obstruct airflow. It can be performed alone or combined with cosmetic refinement in a single procedure called septorhinoplasty.

Dr. Robert J. Troell, MD, FACS performs functional rhinoplasty as a specialty surgical practice in Las Vegas. He is board-certified in three converging specialties — otolaryngology (ENT), facial plastic and reconstructive surgery, and sleep medicine — with over 30 years of operative experience and two peer-reviewed publications on nasal valve and alar rim repair.

Important to know up front: Troell Cosmetic Surgery is a self-pay specialty practice. We do not bill insurance for any procedure, including functional ones. Patients choose this path for a specific reason — covered in detail below. Free consultations are available so prospective patients can evaluate the fit before committing.

Trouble Breathing Through Your Nose?

Schedule a free consultation with Dr. Troell to evaluate your nasal anatomy, breathing patterns, and surgical options. No pressure — just an honest assessment.

Symptoms That Point to a Structural Nasal Problem

Functional rhinoplasty addresses physical obstructions inside the nose. The most common signs that surgery may help include:

  • Chronic mouth breathing, especially while sleeping or exercising
  • Persistent nasal congestion that doesn't resolve with allergy medication or decongestants
  • Snoring or noisy breathing that disrupts sleep for you or a partner
  • Difficulty breathing on one side — often a sign of a deviated septum
  • Whistling or collapsed nostrils when inhaling deeply — a hallmark of nasal valve or alar rim weakness
  • Recurring sinus infections linked to poor airflow and drainage
  • Diagnosed sleep-disordered breathing (mild to moderate sleep apnea, upper airway resistance syndrome)
  • Breathing problems after a previous rhinoplasty — structural collapse or scarring from a prior procedure
  • History of nasal trauma (broken nose, sports injury) that left the airway compromised

If you recognize three or more of these symptoms, a structural evaluation is warranted. The cause is rarely a single issue — most patients have a combination of septal deviation, valve weakness, and turbinate enlargement that compound to restrict airflow.

Functional vs Cosmetic Rhinoplasty — and Why They're Often Combined

Patients often think of rhinoplasty as one operation. In practice, it splits into two distinct surgical goals that can be performed separately or together in a single procedure called septorhinoplasty.

Functional Rhinoplasty Cosmetic Rhinoplasty Combined Septorhinoplasty
Primary Goal Restore nasal breathing Refine nasal appearance Both, in one operation
Surgical Focus Septum, valves, turbinates, alar rim Bridge, tip, dorsum, projection, symmetry Internal structure + external aesthetics
Surgeon Skill Set Airway anatomy expertise Aesthetic judgment + facial proportion Dual-board specialty required
Anesthesia General or local with sedation Typically general General
Recovery 1–2 weeks visible 2–3 weeks visible swelling, months for final shape 2–3 weeks visible, full settling at 12 months
Why Combine One anesthesia, one recovery, one fee structure, prevents future revision

The case for combining is strongest when a patient already wants cosmetic refinement and has measurable breathing issues. Doing both at once is more efficient and substantially reduces the risk of needing a second surgery later — revision rhinoplasty is the most technically demanding nasal procedure.

The case against combining is when functional surgery alone will resolve the patient's complaint and they have no aesthetic concern. Septoplasty-only or turbinate-only procedures are simpler, faster, and don't change the external appearance.

The Procedures Within Functional Rhinoplasty

"Functional rhinoplasty" is an umbrella term. The actual operation may include any combination of the following techniques, chosen based on the specific structural problem:

Close-up of precision facial plastic surgery instruments arranged on a dark walnut surface — fine forceps and micro-scissors used in functional rhinoplasty
Functional rhinoplasty requires specialized instrumentation tuned to delicate structures — septum, valves, alar rim, and turbinates.

Septoplasty — Straightening a Deviated Septum

The septum is the cartilage and bone wall that divides the two nasal passages. When it's deviated — from genetics, growth, or injury — it can block airflow on one or both sides. Septoplasty repositions or removes the deviated portion without changing the external shape of the nose. It's the most common functional nasal procedure and the foundation that many other functional repairs build on.

Why dual ENT + facial plastic training matters here: septoplasty is technically straightforward, but the structural choices made during the procedure — how much septal cartilage to preserve, how to maintain dorsal and caudal support — directly determine whether future cosmetic refinement is possible or whether over-resection compromises the nasal framework. ENT-trained surgeons focus on airway; facial-plastic-trained surgeons focus on structural support. Dual training lets the same surgeon hold both concerns at the same time.

Turbinate Reduction

The inferior turbinates are bony structures lined with mucosa that warm and humidify air. Chronic enlargement — from allergies, irritants, or compensatory growth on the side opposite a septal deviation — restricts airflow. Reduction techniques range from radiofrequency ablation to submucous resection, performed at the same time as septoplasty when both contribute to obstruction.

Why sleep medicine training matters here: turbinate tissue swells with sleep position, allergen exposure, and inflammation — patterns that an ABSM-certified surgeon is specifically trained to evaluate. Understanding the airway at rest, under load, and during sleep informs how aggressive the reduction should be, and whether turbinate reduction alone will resolve the patient's complaint or whether it needs to be combined with other procedures.

Nasal Valve Repair

The internal nasal valve is the narrowest segment of the airway and the most common site of dynamic collapse during inspiration. Weakness here can cause the side wall to draw inward when breathing deeply, producing the whistling or collapsing sensation patients describe. Repair techniques include spreader grafts, butterfly grafts, and alar batten grafts, depending on the specific anatomy.

Dr. Troell's work in this area was published in the American Journal of Cosmetic Surgery in 2019, describing a transcutaneous alar rim graft technique for managing nasal alar rim and valve collapse. [1]

Why publication-backed expertise matters here: the valve is a three-dimensional structure that fails in different patterns depending on whether the weakness is cartilaginous, mucosal, or scar-related. No single graft technique solves every presentation — part of the surgeon's job is to identify the failure mode before selecting the repair. A surgeon who has published on this specific problem has done the pattern-recognition work in a way that gets peer-reviewed.

Alar Rim Repair

The alar rim is the rim of cartilage at the bottom edge of each nostril. Weakness, retraction, or collapse here causes both an aesthetic notching and a functional reduction in the nasal opening. Repair typically involves cartilage grafts placed along the rim to support and reposition the structure.

This is one of the more technically demanding areas of functional nasal surgery. Dr. Troell co-authored the original peer-reviewed evaluation of a procedure for nasal alar rim and valve collapse reconstruction, published in Otolaryngology–Head and Neck Surgery, Volume 122, in 2000. [2] The techniques described in that paper remain part of the modern repertoire for severe alar rim collapse.

Why the ENT + facial plastic convergence enabled this technique: alar rim repair sits at the intersection of two surgical disciplines — airway reconstruction (ENT) and aesthetic nasal tip work (facial plastic). The 2000 paper was written from exactly that cross-trained perspective, describing a reconstruction method that solves the functional airway problem without creating a cosmetic distortion. Twenty-plus years later, patients benefiting from that technique are a durable reminder of why the dual-board foundation matters.

Septorhinoplasty — Combined Functional + Cosmetic

A single operation that combines any of the functional procedures above with cosmetic refinement of the external nose — bridge reduction, tip refinement, dorsal hump removal, projection adjustment. The internal work is performed first; the external work follows in the same operative session under the same anesthesia.

Combining is technically harder than performing either operation alone because the surgeon must preserve airway integrity while simultaneously reshaping the external structures that support that airway. This is the procedure where the dual-board credentials matter most.

Why this is specifically a triple-cert problem: the functional work requires ENT-level airway expertise, the cosmetic work requires facial plastic aesthetic judgment, and the patient's breathing during and after anesthesia requires airway awareness that benefits from sleep medicine training. Most surgeons hold one of these credentials — a few hold two. The combination of all three across a single practitioner is unusual, and it's specifically in combined septorhinoplasty that the combination stops being a credential and starts being a tactical advantage.

Polypectomy & Sinus Procedures

When nasal polyps or chronic sinusitis are contributing to obstruction, a polypectomy or limited sinus procedure may be added at the same time. These are less common in elective functional rhinoplasty but important to evaluate during consultation.

Why Patients Choose a Specialist Over an Insurance-Covered ENT

Editorial sculptural composition representing precision facial plastic surgery aesthetic

For patients who can use insurance, septoplasty and basic functional procedures are commonly covered. So why do patients pay out-of-pocket for specialty care?

The honest answer: insurance reimbursement structures put pressure on case time, technique selection, and technology choices. A surgeon working under insurance constraints may have only 45–60 minutes per case, limited ability to use specific graft techniques, and standardized recovery protocols. For straightforward septoplasty in a young patient with simple anatomy, that's often fine. For complex cases — severe deviation, valve collapse, alar rim weakness, post-traumatic deformity, or any combination — the constraints can compromise the result.

Patients who pay specialty fees out-of-pocket are usually optimizing for one or more of the following:

  • Technique freedom. The surgeon can use the optimal repair (alar rim graft, spreader graft, butterfly graft) based on what the anatomy needs — not what the reimbursement code permits.
  • Time per case. Specialty operations frequently take 2–4 hours. There is no scheduling pressure to finish faster.
  • Anesthesia and facility quality. Board-certified anesthesiologists and accredited surgical facilities, not the lowest-cost approved network option.
  • Surgeon focus. Self-pay specialty practices typically operate on a smaller volume of more complex cases. The surgeon spends more time per patient.
  • Outcome-driven decisions. Discharge timing, follow-up frequency, and revision policy are set by the surgeon based on the patient, not by insurance utilization rules.
  • Combining functional and cosmetic in one operation. Insurance generally covers only the functional portion; the cosmetic portion must be paid separately. In practice, this means insurance-billed surgeons often cannot perform a true combined septorhinoplasty without complex billing logistics. A self-pay specialty surgeon performs the whole operation under a single fee.

This is not a universal recommendation to skip insurance. For uncomplicated septoplasty and the right patient, insurance-billed care is reasonable. The specialty path is for patients whose anatomy, prior surgical history, or combined cosmetic-and-functional goals make outcome quality the deciding factor.

Revision Rhinoplasty for Breathing Problems

Revision rhinoplasty — a second nasal surgery to correct issues from a first — is the single most technically demanding procedure in nasal surgery. Scar tissue from the first operation, altered anatomy, missing or weakened cartilage, and unpredictable healing all make the second operation harder than the first.

A common pattern: a patient has insurance-covered septoplasty, recovers, and discovers their breathing is still compromised — either because the original surgery didn't fully address the problem, or because the procedure created new issues (over-resection of septal cartilage, valve collapse, alar retraction). Months later they're researching revision options.

Revision functional rhinoplasty often requires:

  • Cartilage grafting from the rib, ear, or remaining septum to rebuild structural support that was over-resected during the first operation.
  • Valve reconstruction using spreader grafts or alar batten grafts to restore the airway dimensions lost to scarring.
  • Alar rim repair to correct retraction or notching that developed after the first surgery.
  • Realistic outcome counseling. Revision results are constrained by what tissue is available to work with. Setting expectations correctly is part of the surgeon's job.

For revision cases the operating surgeon's experience matters more than for any other nasal procedure. Dr. Troell's published work on alar rim and valve repair [1] [2] reflects the type of techniques that revision cases often require.

Functional rhinoplasty on this page is performed by board-certified facial plastic surgeon Dr. Robert Troell. Dr. Troell is board-certified in three converging specialties — otolaryngology (ENT), facial plastic and reconstructive surgery, and sleep medicine — the same three disciplines that intersect on the nasal airway. He completed his residency and fellowship at Stanford University Medical Center; Doctor of Medicine from the University of South Florida College of Medicine. His peer-reviewed publications on alar rim and nasal valve repair appear in the American Journal of Cosmetic Surgery (2019) and Otolaryngology–Head and Neck Surgery, Vol. 122 (2000). See notable achievements or view medical publications.

The Investment in Functional Rhinoplasty

Functional rhinoplasty pricing depends on the specific combination of procedures, the complexity of the anatomy, and whether cosmetic refinement is being combined with the functional work. The practice does not publish fixed prices because every nose is different and accurate quoting requires a physical evaluation.

Premium private surgical consultation environment with cognac leather seating and warm Las Vegas afternoon light
Free in-person consultation. Honest evaluation. Itemized written quote with no surprise charges.

What patients can expect:

  • Free in-person consultation. Dr. Troell evaluates the nasal anatomy, breathing pattern, and any prior surgical history. No commitment is required.
  • Itemized written quote following the consultation. The quote covers surgeon fee, facility fee, anesthesia, and post-operative care — no surprise charges.
  • Combined-procedure discount structure. Septorhinoplasty (functional + cosmetic in one operation) is typically priced below the sum of the two procedures performed separately, because the operating costs overlap.
  • Self-pay only. The practice does not bill insurance. Patients who anticipate using insurance for the functional portion should plan accordingly — specialty pricing reflects the value of the surgical model described above, not insurance reimbursement rates.

Financing Options

For patients who prefer to spread the investment over time, the practice partners with two medical financing programs:

  • CareCredit — healthcare-specific financing with promotional interest-free periods on qualifying balances
  • Alphaeon Credit — aesthetic and elective procedure financing with extended terms

Both can be applied for and approved before the consultation, so financing isn't a barrier to scheduling the evaluation.

Get a Personalized Quote

Functional rhinoplasty pricing depends on what your specific anatomy needs. The most accurate quote comes from an in-person consultation and surgical plan.

Recovery Timeline

Recovery varies significantly based on which procedures were performed. Three common timelines:

Septoplasty or Turbinate-Only

Visible recovery: ~1 week. No external incisions. Internal splints (when used) are typically removed at 5–7 days. Mild congestion and crusting persist for 2–3 weeks. Most patients return to desk work within 5–7 days. Breathing improvement begins as swelling resolves and is usually substantial by week 2–3.

Functional + Valve / Alar Rim Repair

Visible recovery: 1–2 weeks. Mild bruising around the nostrils may be present. Splints removed at 5–7 days. Swelling subsides over 2–3 weeks. Final breathing improvement is evident by 4–6 weeks once internal swelling fully resolves and the grafts integrate.

Combined Septorhinoplasty

Visible recovery: 2–3 weeks. Includes external splint, periorbital bruising, and visible swelling of the bridge and tip. External splint is removed at 1 week. Most visible swelling resolves over 3–4 weeks; the final external shape continues to refine for up to 12 months as deep swelling settles. Breathing improvement timeline matches the functional procedures (4–6 weeks for full effect).

Across all three timelines, return to exercise is typically gradual: walking immediately, light cardio at 2 weeks, full exertion and contact activity at 4–6 weeks. Eyeglasses cannot rest on the bridge for 6–8 weeks if osteotomies were performed (combined procedure only). Patients are seen at 1 week, 2 weeks, 6 weeks, 6 months, and 12 months for combined procedures; functional-only follow-up is shorter.

What Outcomes Can Patients Expect

Outcomes after functional rhinoplasty vary based on the underlying cause, the specific combination of procedures performed, and individual anatomy. The following reflects Dr. Troell's 30+ years of operative experience and his peer-reviewed work on nasal valve and alar rim repair [1] [2], together with the broader facial plastic surgery literature.

Breathing Improvement

For septoplasty correcting a deviated septum, most patients report a substantial improvement in nasal airflow — often described as "finally breathing through my nose again." The improvement is usually bilateral even when the deviation was one-sided, because a deviated septum affects both sides of the airway through compensatory turbinate enlargement on the opposite side.

For nasal valve repair (including the transcutaneous alar rim graft technique described in Dr. Troell's 2019 publication), patients with dynamic valve collapse typically report the elimination of the inward-draw or whistling sensation during deep inhalation, and a noticeably widened airflow during exercise.

For turbinate reduction, the improvement is often night-specific. Patients with allergic or inflammatory turbinate enlargement report better sleep breathing, reduced mouth-breathing, and in some cases an improvement in associated snoring intensity — though snoring driven by the soft palate or tongue base is a separate issue that functional rhinoplasty alone will not resolve.

What Doesn't Change

Functional rhinoplasty is not a cure-all. It specifically does not:

  • Eliminate allergies, chronic sinusitis, or nasal polyps that require ongoing medical management
  • Resolve all snoring — airway sources outside the nose (throat, soft palate, tongue) contribute independently
  • Change the external shape of the nose unless combined with cosmetic refinement (septorhinoplasty)
  • Guarantee an identical outcome for every patient — structural variation, healing response, and scarring all introduce natural variability

Timeline to Final Result

  • Days 5–10: Initial relief as splints are removed and early swelling subsides.
  • Weeks 2–3: Substantial improvement for septoplasty and turbinate-only procedures.
  • Weeks 4–6: Full effect for graft procedures (valve repair, alar rim repair) as internal swelling resolves and grafts integrate with surrounding tissue.
  • Months 6–12: Final settling for combined septorhinoplasty as deep swelling fully resolves and the external shape refines.

Revision Rate & Honest Caveats

The published revision rate for primary rhinoplasty varies across the specialty literature from approximately 5% to 15%, depending on case complexity, surgeon experience, and how "revision" is defined (any touch-up vs. a full second operation). For functional-only surgery performed by an experienced specialist, the rate is usually toward the lower end of that range. For combined septorhinoplasty, and for revision cases, the rate is higher. A candid revision-risk discussion specific to your anatomy and goals is part of every consultation.

Outcome Measurement

Dr. Troell's practice schedules post-operative follow-up at 1 week, 2 weeks, 6 weeks, 6 months, and 12 months for combined procedures, with a shorter schedule for functional-only cases. Each visit includes a breathing assessment, photographic review to track healing, and documentation of any early signs of complication. Post-operative patient-reported outcome tracking is part of the clinical workflow — both to support the individual patient's recovery and to inform ongoing surgical-technique refinement.

Functional Rhinoplasty FAQ

What exactly is functional rhinoplasty?

Functional rhinoplasty is nose surgery performed primarily to restore or improve nasal breathing — not to change the external appearance. It addresses internal structural issues such as a deviated septum, weak or collapsed nasal valves, alar rim weakness, and enlarged turbinates. It can be performed alone or combined with cosmetic refinement (septorhinoplasty) in a single operation.

Will functional rhinoplasty fix snoring?

It often improves snoring caused by nasal obstruction. Snoring driven primarily by the throat or soft palate (not the nasal airway) won't be fully resolved by nasal surgery alone. Dr. Troell's sleep medicine training (American Board of Sleep Medicine) helps differentiate nasal-sourced from throat-sourced snoring during consultation, so the surgical recommendation matches the actual cause.

What's the difference between septoplasty and rhinoplasty?

Septoplasty straightens a deviated septum without changing the external shape of the nose. Rhinoplasty reshapes the external nose — bridge, tip, projection. Septorhinoplasty combines both in one operation, addressing internal breathing structure and external aesthetics simultaneously.

Can I combine cosmetic and functional rhinoplasty in one surgery?

Yes — this is called septorhinoplasty and it's frequently the right choice when a patient has both an aesthetic concern and a structural breathing issue. Combining is technically more demanding than either operation alone and requires a surgeon trained in both functional airway repair and aesthetic refinement. Dr. Troell's dual board certification in facial plastic surgery and otolaryngology supports this combined work.

Will my nose look different after functional rhinoplasty?

Functional-only procedures (septoplasty, turbinate reduction) don't change the external appearance. Nasal valve repair and alar rim repair are internal but may produce subtle changes in nostril shape if they were previously notched or collapsed. If you want the appearance preserved exactly, that's discussed in consultation. If you want aesthetic refinement at the same time, septorhinoplasty is the option.

How do I know if I need functional or cosmetic rhinoplasty?

Listen to what bothers you. If it's primarily appearance, cosmetic. If it's primarily breathing, functional. If it's both, septorhinoplasty. The consultation includes physical evaluation of the internal nasal anatomy, breathing pattern assessment, and a candid discussion of what each path would or wouldn't accomplish for your specific situation.

What's the recovery time for septoplasty alone?

Most patients return to desk work within 5–7 days after septoplasty. Internal splints (when used) are removed at the first follow-up. Mild congestion persists for 2–3 weeks; full breathing improvement is typically evident by week 2–3. There is no external bruising or swelling because there are no external incisions.

Why doesn't Dr. Troell accept insurance for functional procedures?

Insurance reimbursement structures put pressure on case time, technique selection, and technology choices — constraints that can compromise outcome quality on complex functional and combined cases. The self-pay specialty model lets the surgeon use the optimal repair technique for each patient's anatomy, without scheduling or billing constraints. For uncomplicated septoplasty and the right patient, an insurance-billed surgeon is reasonable. The specialty path is for patients prioritizing outcome quality, particularly for complex anatomy, revision cases, or combined functional + cosmetic surgery. Financing through CareCredit and Alphaeon is available.

How much does functional rhinoplasty cost?

Pricing depends on the specific combination of procedures and the complexity of the anatomy. The practice does not publish fixed prices because accurate quoting requires a physical evaluation. The consultation is free; an itemized written quote follows. Combined septorhinoplasty pricing is typically below the sum of the two procedures performed separately because operating costs overlap. Financing through CareCredit and Alphaeon is available.

What are the risks of functional rhinoplasty?

All surgery carries risks. For functional rhinoplasty specifically: temporary numbness or altered sensation, prolonged congestion, septal perforation (rare), changes to nasal shape from internal grafts, and the possibility that breathing improvement is partial rather than complete. Revision procedures carry higher risk than primary procedures because of altered anatomy and scar tissue. All risks are reviewed in detail during consultation, with informed consent before surgery.

References

  1. Troell RJ. Transcutaneous Alar Rim Graft: An Effective Technique to Manage Nasal Alar Rim and Valve Collapse. American Journal of Cosmetic Surgery. 2019.
  2. Troell RJ, Powell NB, Riley RW, Li KK. Evaluation of a New Procedure for Nasal Alar Rim and Valve Collapse: Nasal Alar Rim Reconstruction. Otolaryngology–Head and Neck Surgery. 2000;122:204–211.

About This Article

This article was written and medically reviewed by Dr. Robert J. Troell, MD, FACS, a board-certified facial plastic surgeon with dual certification in otolaryngology (ENT) and sleep medicine. The clinical guidance reflects Dr. Troell's 30+ years of operative experience, his peer-reviewed publications on nasal valve and alar rim repair [1] [2], and current facial plastic surgery practice standards.

Scope of this content. This article is educational and is not a substitute for an in-person medical evaluation. Functional rhinoplasty outcomes depend on individual anatomy, prior surgical history, allergic and inflammatory status, sleep physiology, and overall health — factors that require a physical examination, history review, and in some cases imaging to evaluate properly. If you are considering functional rhinoplasty, schedule a consultation to determine whether surgery is appropriate for your specific situation.

No insurance, by design. Troell Cosmetic Surgery is a self-pay specialty practice. The practice does not bill insurance for any procedure, including functional ones. This is a deliberate operating model — covered in the "Why a Specialist" section above — not an oversight. Patients who rely on insurance coverage for medically necessary nasal procedures should weigh that before scheduling.

Author & review credentials.

  • American Board of Facial Plastic and Reconstructive Surgery (ABFPRS) — Diplomate, Active
  • American Board of Cosmetic Surgery (ABCS) — Diplomate, Recertified 2021
  • American Board of Otolaryngology — Head and Neck Surgery (ABOto) — Diplomate, Active
  • American Board of Sleep Medicine (ABSM) — Diplomate, First Surgeon Certified in the United States
  • American Board of Stem Cell and Fat Transfer Physicians (ABSCFTP) — Diplomate
  • National Board of Medical Examiners (NBME) — Diplomate
  • Fellow, American College of Surgeons (FACS)
  • Residency & Fellowship: Stanford University Medical Center, Otolaryngology-Head and Neck Surgery and Facial Plastic and Reconstructive Surgery
  • Doctor of Medicine: University of South Florida College of Medicine (with honors)
  • NPI: 1700854122 — verify at NPI Registry

Published: April 23, 2026 · Last medically reviewed: April 23, 2026 · Author and reviewer: Dr. Robert J. Troell, MD, FACS

Request a Free Consultation

If you're considering functional rhinoplasty — for breathing, snoring, post-rhinoplasty issues, or combined functional and cosmetic refinement — the next step is an in-person evaluation. Submit the form below and the office will contact you to schedule.

Blog

Temporal implants Long Term Volume Replacement

Medical Review


Temporal (Temple) Implants: Long-Term Volume Replacement for Temple Hollowing | Dr. Troell


Related Pages on Our Site

If you’re comparing options across the face, you may also find these pages helpful:
Face procedures,
Facial fat grafting for volume restoration,
Facial implants overview.

Looking for appointment details?
Schedule a consultation.

What Is Temple Hollowing (Temporal Volume Loss)?

The “temple” region is the area on the side of the forehead above the cheekbone and outside the outer corner of
the eye. Some people naturally have a concave temple shape, while others notice increasing hollowing over time.
When the temple area looks more indented, it can change how light reflects across the upper face and may make
the face look less balanced from the front or in three-quarter views.

Example illustration of temple hollowing and temporal volume loss (educational).
Example illustration of temple hollowing (educational).

Temple hollowing is not always the same from person to person. The right approach depends on anatomy, skin
quality, and how the temple contour relates to the cheek and brow.

Why Injectable Fillers Are Commonly Used for Temple Volume

A common first step for temple volume replacement is injectable hyaluronic acid (HA) filler. HA fillers are
widely used because they can add volume without surgery and allow for stepwise changes over time.

Because temples have important vascular anatomy, treatment should be performed by a qualified, experienced
provider with strong anatomical training and a plan for recognizing and managing complications.

Limitations and Considerations with Repeat HA Filler

Many patients do well with HA filler and choose to maintain results with periodic treatments. Others eventually
ask about longer-term options—often for practical and preference-based reasons:

  • Maintenance: results are temporary and typically require repeat treatments over time.
  • Short-term side effects: swelling, tenderness, and bruising can occur after each visit.
  • Rare but serious risks: published reviews describe vascular complications such as ischemia,
    skin necrosis, and—rarely—blindness
    [3]
    [4].
  • Envelope limitations in some patients: scarred or tight tissue may limit how “expansible” the
    area feels with injectables (this is individualized and should be evaluated in person).
  • Long-term cost considerations: repeat treatments can add up over years.

If you use fillers, it’s reasonable to ask your provider how they minimize risk, what products they select for
the temple region, and what their plan is if a vascular complication is suspected.

Longer-Term Volume Replacement Options

Patients who prefer an option designed to last longer than HA fillers may discuss one or more of the following:

  • Facial fat grafting: uses your own tissue to restore volume. Longevity varies, and some early
    volume change is expected. Learn more:
    Facial fat grafting for volume restoration.
  • Bellafill: an FDA-approved PMMA/collagen filler indicated for nasolabial folds and certain
    atrophic, distensible acne scars on the cheek—not a temple-specific FDA indication
    [5].
    (A qualified clinician can discuss whether a product is appropriate for a specific area.)
  • Facial implants: can provide structural or soft-tissue augmentation in specific zones.
    See:
    Facial implants overview.

The key is matching the method to your anatomy and goals—especially in the temple region, where safety and plane
selection matter.

Temporal (Temple) Implants: How They Work

Temporal implants (often called “temporal shell” implants) are soft silicone implants designed to restore
volume in excessively concave or sunken temples. Manufacturer materials describe them as soft-tissue implants
placed under the temporalis fascia and on top of the temporalis muscle
[1]
[2].

A common surgical approach uses an incision that can be camouflaged within the hairline. The implant is then
positioned in a defined anatomical plane to recreate a smoother, more youthful temple contour.

Why patients explore temporal implants

  • They want an option designed to be long-lasting, rather than scheduling repeat filler visits over time.
  • They want a predictable structural/contour change in a specific anatomic zone.
  • They prefer a surgical correction that does not depend on filler maintenance schedules.

Best-practice language: implants are intended to be long-lasting, but no outcome is guaranteed. Healing,
individual anatomy, and natural aging can influence how results look over time.

Standard vs Extended Temporal Implants

Manufacturer descriptions commonly reference two coverage patterns:

  • Standard temporal shell: described as matching typical skeletal borders of the temple region,
    with thickness where augmentation is commonly needed
    [1].
  • Extended temporal shell: described for patients seeking broader volume up the entire side of
    the forehead/temple region
    [1]
    [6].

Which design is appropriate depends on your hollowing pattern, desired contour, and overall facial proportions.
Your consultation should include mirror-based planning (and ideally photo review) so goals are clear.

Who May Be a Fit for Temporal Implants?

In general, temporal implants may be discussed for patients who have temple hollowing that affects facial
balance and who want a longer-term option than repeat filler sessions.

  • May be a fit: patients with noticeable concavity who want structural soft-tissue augmentation
    in a defined zone.
  • Discuss carefully: patients with significant scarring or complex anatomy, or those combining
    multiple procedures (because sequencing and surgical planning matter).
  • Combination planning: some patients may discuss combining approaches (e.g., implant plus fat
    grafting) depending on whether goals include both contour blending and structural restoration.

If you’ve had temple filler previously, ask how that affects timing and planning.

Recovery and Refinement (Best-Practice, Non-Prescriptive)

Recovery depends on the incision approach, the exact pocket/plane used, and whether the implant procedure is
combined with other facial surgery. Swelling is expected early on, and contour becomes clearer as swelling
resolves. Your surgeon will provide individualized aftercare, follow-up, and activity guidance based on your
plan.

If you are comparing implants with injectables, it’s reasonable to discuss how surgical recovery compares to
repeated short recoveries after filler sessions.

Questions to Ask at Your Consultation

  • “Is my temple concern primarily volume deficiency, contour shape, or both?”
  • “Which option fits my anatomy best—HA filler, fat grafting, Bellafill, or a temporal implant—and why?”
  • “Would I need a standard or extended implant based on my hollowing pattern?”
  • “Where is the incision placed, and how is it camouflaged within the hairline?”
  • “How do you minimize risk in this area, and what is your plan if a complication is suspected?”
  • “If I’ve had temple filler before, does that change planning or timing?”
  • “What does recovery typically look like for someone like me?”

Where to See Results Safely

If you want to view before-and-after examples, use the practice’s official galleries where consent and
disclaimers are provided. Photos are educational; individual results vary and are not guaranteed.

Front view example photo related to facial implant outcomes (educational). Individual results vary.
Example photo (educational). Individual results vary; not a guarantee of outcome.

You can also browse additional educational posts here:
Read more from our blog.

Next Steps

If temple hollowing is affecting how you feel in photos or in the mirror, a consultation is the best next step
to identify what’s driving the change and which option fits your anatomy and goals.

Schedule a consultation

Facial implants overview

Facial fat grafting for volume restoration

Frequently Asked Questions

Are temporal implants “permanent”?

Temporal implants are intended to be long-lasting and are designed for stable augmentation in a specific anatomical zone.
However, no surgical result can be guaranteed, and long-term outcomes depend on anatomy, healing, and goals.
Your surgeon can explain what “long-term” means in your case.

Why do some people look beyond HA filler for temples?

Many patients maintain temple volume with HA filler. Others prefer an option designed to last longer or want fewer repeat
treatments. Published medical reviews describe rare but serious vascular complications, which is why injector expertise and
a safety plan matter.

What’s the difference between standard and extended temporal implants?

Standard designs are described as matching typical temple boundaries, while extended designs are described for broader
temple/forehead-side coverage. Your surgeon recommends the design that matches your hollowing pattern and contour goals.

Is Bellafill FDA-approved for temples?

Bellafill’s FDA indications include nasolabial folds and certain atrophic, distensible acne scars on the cheek.
It does not have a temple-specific FDA indication. Your clinician can discuss what is appropriate for your anatomy and
treatment area.

Citations

  1. Implantech “Temporal Shell” flyer (ultrasoft silicone; placed under fascia on top of temporalis muscle; standard vs extended description).
    Source (PDF): https://www.implantech.com/wp-content/uploads/2016/03/Implantech_Temporal_Shell_Flyer_09-16.pdf
  2. Implantech “Temporal Shell Implant Surgical Technique” (describes implant and surgical approach/plane in technique document).
    Source (PDF): https://www.implantech.com/wp-content/uploads/2016/03/Temporal_Shell_Implant_Surgical_Technique_March-2013.pdf
  3. Hong et al. “Adverse Effects Associated with Dermal Filler Treatments” (2024) (discusses vascular complications including ischemia, necrosis, and severe outcomes like blindness).
    Source (PMC): https://pmc.ncbi.nlm.nih.gov/articles/PMC11276034/
  4. Tran et al. “Vision Loss and Blindness Following Fillers” (2021) (review focused on vision loss complications and prevention/management concepts).
    Source (PMC): https://pmc.ncbi.nlm.nih.gov/articles/PMC8294333/
  5. FDA PMA listing for Bellafill — indications include correction of nasolabial folds and certain atrophic, distensible facial acne scars on the cheek.
    Source (FDA): https://www.accessdata.fda.gov/scripts/cdrh/cfdocs/cfpma/pma.cfm?id=350569
  6. Implantech product page “Temporal Shell – Extended” (describes extended design coverage).
    Source (text): https://www.implantech.com/product/temporal-shell-extended/

Note: Citation URLs are shown as plain text for reference. Bracketed citations in the article link to this
on-page citation list.

Dr. Robert J. Troell
Dr. Robert J. Troell, MD, FACS
Board-Certified Facial Plastic & Reconstructive Surgeon

Dr. Robert J. Troell is a board-certified facial plastic and reconstructive surgeon with over 30 years of experience. He holds six board certifications and has authored more than 58 peer-reviewed publications. He practices at his AAAASF-accredited surgical center in Las Vegas, Nevada.

Complimentary Consultation

Begin Your Journey with Dr. Troell

Schedule a complimentary consultation to discuss your goals and receive an honest, expert assessment.

5375 S Fort Apache Rd #101, Las Vegas, NV 89148
Mon–Fri, 8:30 AM – 5:00 PM
Blog

Midface Volume Augmentation: Long-Term Options for Cheek Support

Midface volume loss can change under-eye and cheek contour. Learn how facial fat grafting and cheek implants address structure vs. volume—using an anatomy-based plan to avoid an overfilled look.

Key Takeaways

  • Midface changes may involve volume loss, tissue descent, or both—so the plan should be anatomy-based.
  • Two commonly discussed long-term strategies include:
    • Facial fat grafting (soft-tissue volume restoration using your own fat)
    • Cheek implants (structural projection/support in specific zones)
  • “Permanent” can be misleading in medical marketing. Implants are designed to be long-lasting, and fat grafting can be long-lasting when graft takes, but outcomes vary and aging continues.
  • Fat transfer outcomes depend heavily on technique at every stage—harvesting, processing, and placement.

Explore the Face procedures hub

What Midface Volume Loss Can Look Like

Patients describe midface volume change in different ways. These are common concerns that can reflect many anatomical patterns:

  • Cheeks look flatter in photos
  • Under-eye hollowing looks more noticeable
  • The face looks “tired” even after good sleep
  • Smile lines look deeper because nearby areas look less supported

Important: These descriptions are not diagnoses. The right approach depends on what’s driving the change—volume, position, skin quality, skeletal projection, or a combination.

Illustration showing how facial fat and soft tissues change over time
Educational illustration showing how midface tissues can change over time (anatomy varies by individual).

Midface Anatomy: Key Areas That Influence Cheek and Under-Eye Contour

Midface planning often considers multiple zones at once—especially the malar (cheekbone) region, the submalar (below cheekbone) region, and the lid–cheek junction. Your surgeon evaluates how these areas relate to your facial proportions and skin quality.

Diagram labeling malar and submalar cheek regions, lid-cheek junction, tear trough, and nasolabial fold
Educational anatomy map of midface regions commonly discussed during consultation.

Two Approaches to Midface Volume Augmentation

On this site, midface volume restoration is typically discussed in two broad categories:

  1. Volume restoration using your own tissue (facial fat grafting)
  2. Structural projection using an implant to support shape in a specific zone

Either approach may be discussed alone or alongside other procedures when appropriate.

Infographic comparing facial fat grafting versus cheek implants for midface support
Two common long-term strategies: fat grafting focuses on soft-tissue volume and blending, while cheek implants focus on structural projection in specific zones.

Option A: Facial Fat Grafting (Volume Restoration)

Facial fat grafting (also called fat transfer or lipofilling) uses your own fat to restore volume. The goal is to rebuild soft-tissue fullness and improve contour transitions in a way that looks natural and balanced.

Learn more: Facial Fat Grafting

Why this option appeals to many patients

  • Uses your own tissue (autologous fat)
  • Can be tailored by depth and goal (support vs contour blending)
  • Often discussed as part of broader facial rejuvenation planning when volume loss is a key driver

Clinical reasoning: tailoring fat to anatomy

Surgeons may tailor fat placement strategy to the anatomical layer and the desired effect. A commonly discussed concept is adjusting fat “parcel” size and consistency to match the target tissue plane:

  • Deeper layers: may receive larger parcels intended to support shape and foundation (sometimes described as “milli-fat”).
  • More superficial layers: may use finer parcels to refine contour and address skin-quality goals (sometimes described as “nano-fat”).

Technique matters: the success of facial fat transfer depends heavily on technique at every stage—harvesting, processing, and placement.

Processing methods: what’s realistic to say

There is no single universally accepted “gold standard” fat processing method. Centrifugation, filtration, and decantation are all used in practice, and published results vary across studies.

Infographic listing centrifugation, filtration, and decantation as common fat processing approaches
Fat processing methods can differ between practices; published results vary across studies.

Longevity

Fat grafting can be long-lasting when transferred fat establishes a blood supply, but early volume change is expected and retention varies between individuals. Your surgeon should discuss realistic expectations for your anatomy, including whether staged treatment is sometimes considered.

Who may be a fit (and who may need caution)

  • May be a fit: patients with midface deflation (soft-tissue volume loss) who want natural contour restoration and blending.
  • Discuss carefully: patients who smoke or use nicotine products, have unstable weight goals, or have limited donor fat—since these factors may affect planning and outcomes.

Safety approach

As with any procedure, risks exist. Surgeons may use measures designed to reduce risk—such as blunt cannulas, careful plane selection, and slow, low-pressure placement—based on facial anatomy and the planned treatment area.

Option B: Cheek Implants (Structural Midface Support)

Cheek implants are designed to enhance midface structure by adding projection in specific anatomical zones. This approach differs from fat grafting: implants primarily address framework/projection, while fat grafting primarily restores soft-tissue volume and contour transitions.

Learn more: Facial Implants

Why patients explore this option

  • They want structural projection/definition in the midface
  • They prefer a structure-first approach when the concern is primarily projection or skeletal contour
  • They want a predictable projection change in a targeted anatomical zone

Longevity

Implants are intended to be long-lasting, but no surgical result can be guaranteed. Long-term outcomes depend on implant selection, placement, healing, and whether the procedure is combined with others.

Skull illustration showing malar and submalar implant placement areas
Illustration of common cheek implant regions (malar/submalar). Educational diagram; anatomy varies by individual.

How to Choose the Right Midface Plan

A useful way to think about the decision is to match the approach to the primary anatomical driver:

  • If the primary issue is deflation/soft-tissue volume loss, fat grafting may be part of the conversation.
  • If the primary issue is structure/projection, implants may be part of the conversation.
  • If the concern is both volume and position, lifting plus volume restoration may be discussed in an individualized plan.

If lifting is part of your plan, see: The Facelift

Decision matrix comparing when fat grafting, cheek implants, or combination approaches may be discussed
Educational decision guide: matching options to your primary concern. Consultation determines appropriateness.

Healing and Refinement

Recovery and refinement vary based on the procedure and whether it’s combined with others. Swelling and bruising are common early on, and the appearance can continue to refine as healing progresses. Your surgeon will provide individualized aftercare and timeline guidance based on your plan.

Timeline infographic showing general recovery phases
General healing and refinement phases (timing varies). Individual results vary.

Real-World Examples

Before-and-after photos should be viewed in the practice’s official gallery hubs, where consent and disclaimer language is presented. Photos are educational; individual results vary and are not guaranteed.

Before and after photos showing facial volume restoration in the midface area
Before-and-after example illustrating midface contour change (educational). Individual results vary; not a guarantee of outcome.

Questions to Ask at Your Consultation

  • “Is my midface concern mainly volume loss, position change, or both?”
  • “If we add volume, what approach best matches my anatomy—fat grafting, implants, or another option?”
  • “If lifting is part of my plan, do you recommend combining lifting with volume restoration?”
  • “How should I think about longevity and maintenance for each option?”
  • “What does recovery typically look like for someone with my anatomy and goals?”

Frequently Asked Questions

Is facial fat grafting “permanent”?

Surgeons often describe fat grafting as long-lasting when transferred fat establishes a blood supply, but retention varies and some early volume change is expected. The face continues to age over time, so no result can be guaranteed permanent. A consultation is the best way to discuss expectations for your anatomy.

How do implants differ from fat grafting?

Cheek implants primarily change projection and structure in a targeted zone. Fat grafting primarily restores soft-tissue volume and contour transitions. Some patients may discuss combining approaches when both projection and volume contribute to the appearance.

What should I expect for recovery?

Recovery varies depending on the procedure and whether it is combined with others. Swelling and bruising are common early on, and contour can continue to refine as healing progresses. Your surgeon will provide individualized aftercare guidance based on your plan.

Can midface volume restoration help the under-eye area?

In some cases, restoring midface volume can improve contour transitions near the lid–cheek junction and reduce shadowing. Whether it is appropriate depends on anatomy and should be determined during an in-person evaluation.

Dr. Robert J. Troell
Dr. Robert J. Troell, MD, FACS
Board-Certified Facial Plastic & Reconstructive Surgeon

Dr. Robert J. Troell is a board-certified facial plastic and reconstructive surgeon with over 30 years of experience. He holds six board certifications and has authored more than 58 peer-reviewed publications. He practices at his AAAASF-accredited surgical center in Las Vegas, Nevada.

Premium surgical reception at Troell Cosmetic Surgery
Complimentary Consultation Available

Considering Midface Volume Restoration?

Schedule a consultation with Dr. Troell to discuss whether fat grafting, cheek implants, or a combination approach is right for your anatomy and goals.

5375 S Fort Apache Rd #101, Las Vegas, NV 89148
Mon–Fri, 8:30 AM – 5:00 PM
Blog

Will There Be Any Scars After a Facelift?

Table of Contents

Expert Author: Dr. Robert J. Troell, M.D., FACS, FAAFPRS, FAACS, FAAOHNS, FAASM ASD

Board Certifications: American Board of Facial Plastic and Reconstructive Surgery | American Board of Cosmetic Surgery | American Board of Otolaryngology–Head & Neck Surgery | American Board of Sleep Medicine | American Board of Stem Cell and Fat Transfer Physicians

Experience: Over 20 years of board-certified practice in facial plastic and reconstructive surgery | Stanford University Medical Center trained

Practice Location: Las Vegas, Nevada

Version: 1.0 – Last Updated: December 4, 2025

Direct Answer: Will There Be Scars After a Facelift?

Yes, all facelift procedures produce scars. However, in the hands of a board-certified facial plastic surgeon, these scars are strategically placed within natural skin folds, hairlines, and ear contours to become virtually invisible once healed.

This medical procedure, clinically designated as rhytidectomy (a subtype of MedicalProcedure), involves surgical incisions to lift and reposition facial tissues. The critical distinction lies not in whether scars exist, but in how they are designed, placed, and managed throughout the healing process.

According to systematic reviews of reconstructive rhytidectomy outcomes, low rates of scar complications have been documented across all major incision techniques when performed by qualified surgeons. Most facelift scars fade significantly within 6–12 months and become barely visible or completely undetectable to casual observation.

Understanding Facelift Incision Placement

Anatomical Zones of Incision

Facelift incisions are strategically placed in four primary zones, each designed to maximize concealment:

1. Temporal (Temple) Region

  • Incisions begin in the temporal tuft of hair or along the hairline
  • Trichophytic incisions (beveled at 20–45 degrees) allow hair follicles to regrow through the scar
  • Proper placement prevents elevation of the sideburn above the root of the helix

2. Preauricular (In Front of Ear) Region

  • Follows the natural crease where the ear meets the face
  • Can be pretragal (in front of the tragus) or retrotragal (behind the tragus)
  • Retrotragal incisions are preferred for women; pretragal for men to avoid placing bearded skin onto the tragus

3. Perilobular (Around Earlobe) Region

  • Designed with V-shaped incisions to prevent “pixie ear” deformity
  • Suspension sutures at the SMAS level eliminate tension on visible skin

4. Postauricular (Behind Ear) and Occipital Region

  • Extends into the natural sulcus behind the ear
  • Continues along or within the hairline depending on neck skin excess
  • W-plasty or trichophytic closure techniques minimize visible hairline scarring

Critical Incision Design Principles

Dr. Robert J. Troell, with over 20 years of experience in facial plastic surgery, emphasizes that favorable facelift results can be marred by poor scarring. The surgeon’s skill is often judged by the appearance and quality of the final incisions.

Incision Design Principles and Clinical Rationale
Incision Design Principle Clinical Rationale
Curvilinear incisions around ear Avoids straight-line scarring; distributes tension
Three-crescent technique Separate crescents around helix root, tragus, and earlobe
Trichophytic beveling Hair regrows through scar, camouflaging incision
Tension-free closure Prevents scar widening, blunted tragus, and pixie ear

Types of Facelift Techniques and Scar Profiles

Different facelift techniques produce varying incision patterns and scar outcomes. This comparison reflects evidence-based outcomes from peer-reviewed literature.

Facelift Technique Comparison by Scar Profile
Technique Incision Length Scar Visibility Ideal Candidate Results Duration
Mini Facelift Shorter (around ears only) Minimal scarring; less visible Mild aging (40s–50s) 5–7 years
SMAS Facelift Moderate (hairline to behind ears) Well-concealed in natural folds Mild-moderate aging 5–10 years
Deep Plane Facelift Standard (hairline, ears, behind ears) Tension-free closure; fades exceptionally well Moderate-advanced aging 10–15 years
Short Scar/MACS Lift Limited (temple to earlobe) No post-auricular scars Mild-moderate sagging 5–8 years

Why Deep Plane Technique Produces Superior Scar Outcomes

The deep plane facelift operates beneath the superficial musculoaponeurotic system (SMAS), releasing key ligaments and repositioning deeper facial structures. This approach offers a significant advantage for scarring because:

  • Tension-free skin closure: The lift occurs in deeper tissues, not the skin
  • No skin stretching: Prevents widened or visible scars
  • Natural tissue repositioning: Avoids the “pulled” look that reveals surgical intervention

Scar Healing Timeline: What to Expect

Scar maturation follows predictable biological phases. Understanding this timeline helps patients set realistic expectations.

Facelift Scar Healing Timeline
Phase Scar Appearance Patient Experience Care Recommendations
Initial Healing (Days 1–14) Red or pink, slightly raised; swelling and tenderness Discomfort manageable; bruising peaks days 3–4 Keep incisions clean; avoid sun; sleep elevated
Proliferative (Weeks 2–8) New tissue forming; scars flatten; redness fades Stitches removed (week 2); tightness improves Begin silicone gel/sheets if approved
Early Maturation (Months 1–3) Scars pinkish; continue to fade and flatten Most swelling resolved; near-final results Continue silicone; may start scar massage
Active Remodeling (Months 3–6) Scars fade to lighter tones; less noticeable Minimal swelling; natural movement restored Apply SPF 30+ daily; continue management
Long-Term Fading (Months 6–12+) Scars blend with skin; barely visible Final results; scars virtually undetectable Maintain sun protection; consider laser if needed

Clinical Note: While everyone heals at a different rate, most facelift scars fade significantly within 6–12 months, gradually blending into the patient’s skin tone and natural contours.

Factors That Influence Scar Formation

Patient-Specific Factors

Factor Impact on Scarring
Age Younger patients have better collagen production; older patients may heal slower
Skin Type Fair skin typically develops less noticeable scars; darker skin has higher hyperpigmentation and keloid risk
Skin Elasticity Better elasticity = improved healing and lighter scars
Ethnicity African descent has higher keloid risk; Asian skin may scar differently
Genetics Family history of keloids or hypertrophic scarring increases risk

Modifiable Risk Factors

  • Smoking: Significantly impairs circulation and delays healing; cessation required 4–6 weeks before and after surgery
  • Sun Exposure: UV rays darken scars and prevent proper fading; SPF 30+ essential for 12 months
  • Medications: Blood thinners, NSAIDs, and certain supplements increase bleeding and hematoma risk
  • Nutritional Status: Protein, vitamin C, and zinc support collagen synthesis
  • Infection: Delays healing and increases scar severity

Scar Prevention and Treatment Options

First-Line Scar Prevention: Silicone-Based Products

Silicone gel sheeting and topical silicone gel represent the gold standard for post-operative scar management. A systematic review and meta-analysis confirmed that topical silicone gel was effective in post-operative scar prevention, with significant improvements in vascularity, pigmentation, pliability, and height.

Silicone Therapy Protocol

  1. Begin 2 weeks post-surgery after incisions are fully closed
  2. Apply silicone sheets for minimum 12 hours daily, increasing to 24 hours as tolerated
  3. Continue treatment for 2–4 months
  4. Silicone gels (Dermatix, BioCorneum) offer easier application for facial incisions

Scar Massage Therapy

Scar massage, initiated 2–4 weeks post-surgery with surgeon approval, offers multiple benefits:

  • Increases blood flow for nutrient delivery to scar tissue
  • Activates mechanotransduction to reorganize collagen fibers
  • Reduces tethering, tightness, and hypersensitivity

Technique: Apply firm circular pressure for 5 minutes, 3–4 times daily

Laser Scar Treatment

Laser Treatment Options for Facelift Scars
Laser Type Mechanism Best For
Pulsed Dye Laser (PDL) Targets scar vascularity Redness, early hypertrophic scars
Fractional CO2 Laser Ablates tissue; stimulates collagen Textural irregularities, raised scars
Erbium:YAG Layer-by-layer resurfacing Precise treatment of small areas
Nonablative Nd:YAG Stimulates collagen without ablation Minimal downtime preferred

Clinical Guidance: Laser scar reconstruction is typically initiated 6 months after initial surgery, when scar tissue becomes less vascular and more responsive to treatment.

Patient Satisfaction and Outcomes

Evidence-Based Satisfaction Rates

A 2024 analysis of 2,153 facelift reviews found:

  • 92.24% of patients left positive reviews
  • 91.91% rated their facelift as “Worth It”
  • 79.10% cited aesthetic results as primary reason for satisfaction
  • 74.92% emphasized surgeon bedside manner as critical to positive experience

Complication Rates by Technique

Skin Necrosis Rates by Facelift Technique (Meta-Analysis)
Technique Skin Necrosis Rate
Deep Plane 0.49%
Composite 0.37%
SMAS Plication 0.69%
SMASectomy 1.04%
High Lateral SMAS 1.39%
SMAS Flap 1.57%

Frequently Asked Questions

How long until my facelift scars are barely noticeable?

Most patients can expect their scars to become barely noticeable within 6–18 months after surgery. By the 6-month mark, many patients find their scars have faded significantly. Full maturation continues for up to 18–24 months.

Where are facelift scars located?

Facelift scars are typically located in the hairline at the temples, along the natural crease in front of or behind the tragus (ear cartilage), around the earlobe following natural contours, behind the ear in the postauricular sulcus, and extending into the hairline behind the ear.

Will my scars be visible when I wear my hair up?

When incisions are properly designed and healed, facelift scars should be virtually invisible even with hair pulled back. The postauricular incision is placed within the natural fold where the ear meets the skull, remaining hidden. Trichophytic techniques allow hair to grow through the scar, camouflaging any visible line.

What is the difference between scarring in men vs. women?

Male facelift scars are treated differently to accommodate facial hair patterns and shorter hairstyles. Incisions are strategically placed within the natural beard line. Pretragal incisions are typically preferred in men to prevent placing bearded skin onto the tragus.

Can facelift scars be completely eliminated?

While facelift scars cannot be completely eliminated, they can be significantly minimized and made less noticeable. Proper post-operative care, silicone therapy, sun protection, and working with a skilled surgeon are key to achieving natural-looking results where scars blend seamlessly with natural anatomy.

How does surgeon experience affect scar outcomes?

Surgeon skill is often judged by the appearance and quality of final incisions. Board-certified facial plastic surgeons possess specialized training in facial anatomy and aesthetic incision design. Factors within surgeon control include precise incision placement, tension-free closure techniques, appropriate suture selection, and comprehensive post-operative care protocols.

When to Consult a Board-Certified Facial Plastic Surgeon

A consultation with a facial plastic surgeon credentialed by organizations such as the American Board of Facial Plastic and Reconstructive Surgery (ABFPRS) or the American Board of Cosmetic Surgery (ABCS) provides:

  • Individualized assessment of facial anatomy and aging patterns
  • Discussion of incision design tailored to your hairline, ear structure, and skin type
  • Review of your medical history for healing factors
  • Realistic expectations for scar appearance and timeline
  • Post-operative care protocol to optimize healing

About Dr. Robert J. Troell

Dr. Robert J. Troell is a Diplomate of the American Board of Cosmetic Surgery, the American Board of Facial Plastic and Reconstructive Surgery, and holds additional board certifications in Otolaryngology–Head & Neck Surgery, Sleep Medicine, and Stem Cell and Fat Transfer. He completed his residency in Otolaryngology–Head & Neck Surgery and fellowship training at Stanford University Medical Center, where he served as Clinical Professor from 1995 to 2013.

With over 20 years of experience performing facial plastic surgery in Las Vegas, Nevada, Dr. Troell has contributed to peer-reviewed publications on facial rejuvenation, fat grafting, and advanced surgical techniques.

Dr. Robert J. Troell, Facial Plastic Surgeon

Credentials and Affiliations

  • Diplomate, American Board of Facial Plastic and Reconstructive Surgery
  • Diplomate, American Board of Cosmetic Surgery (Recertified 2021)
  • Diplomate, American Board of Otolaryngology–Head & Neck Surgery
  • Diplomate, American Board of Sleep Medicine
  • Fellow, American Academy of Facial Plastic and Reconstructive Surgery (FAAFPRS)
  • Fellow, American College of Surgeons (FACS)
  • Adjunct Professor, Touro University Nevada College of Osteopathic Medicine
  • Visiting Professor, Department of Plastic Surgery, University of Nairobi, Kenya

Medical Disclaimer: This information is intended for educational purposes only and does not constitute medical advice. Individual results vary based on patient-specific factors. Consultation with a board-certified facial plastic surgeon is necessary to determine candidacy and expected outcomes for facelift surgery.

Complimentary Consultation

Begin Your Journey with Dr. Troell

Schedule a complimentary consultation to discuss your goals and receive an honest, expert assessment.

5375 S Fort Apache Rd #101, Las Vegas, NV 89148
Mon–Fri, 8:30 AM – 5:00 PM
Blog

Why Deep Plane Facelifts Outperform Other Techniques

Why Deep Plane Facelifts Outperform Other Techniques

By Dr. Robert J. Troell, M.D., FACS, FAAFPRS
Diplomat, American Board of Facial Plastic and Reconstructive Surgery
Diplomat, American Board of Cosmetic Surgery

The evolution of facelift surgery has brought significant advances in how surgeons restore youthfulness, structure, and balance to the aging face. Among the various methods available today, the deep plane facelift has emerged as the gold standard—delivering long-lasting, natural-looking results far superior to traditional techniques. Clinical research demonstrates that deep plane facelifts achieve patient satisfaction rates of 94.4% compared to 87.8% for SMAS techniques, with results lasting 10 to 15 years versus 5 to 10 years for more superficial approaches.1

The deep plane approach uniquely addresses the true anatomical causes of facial aging, allowing the face to be lifted, reshaped, and volumized in a way that looks both refined and natural—avoiding the “windswept” or overtightened appearance that older techniques sometimes produced.2

Understanding Facial Aging: Why Most Patients Need More Than Surface Correction

Facial aging varies significantly from patient to patient, and not everyone requires a full facelift. In fact, only about 15–20% of patients are ideal candidates for an isolated anterior neck lift or platysmaplasty alone. This limited approach works well when aging is isolated to the central neck and involves:3

  • A small incision beneath the chin
  • Separation of the skin from underlying structures
  • Suturing of the platysma muscle if it has begun to split or band

However, for patients experiencing sagging jowls, midface descent, deeper nasolabial folds, or generalized facial laxity, a neck-only surgery will not achieve comprehensive rejuvenation. Research confirms that facial sagging is most visible at the lateral facial areas, such as the jowls and cheeks, requiring intervention at deeper anatomical levels.2

The Triple Threat of Facial Aging

Understanding why faces age reveals why the deep plane technique outperforms surface-level approaches:

  • Collagen and Elastin Loss: Production slows significantly beginning in the thirties, weakening the skin’s natural support structure.2
  • Volume Redistribution and Loss: Youthful facial fat pads thin and descend, causing tissue pooling at the jawline, creating jowls.2
  • Ligament Laxity: Retaining ligaments loosen and the SMAS stretches, allowing soft tissue descent.4

What Makes the Deep Plane Facelift Different

The deep plane facelift goes beyond tightening the skin or plicating the SMAS. Instead, it lifts at the deeper anatomical levels where aging actually occurs. The deep plane facelift, originally described by Sam Hamra in 1990, utilizes a plane of dissection below the superficial muscular aponeurotic system (SMAS) of the midface, allowing for direct lysis of key facial retaining ligaments and maximum mobilization of the superficial soft tissue.2 This technique lifts as a unified composite:

  • The SMAS and platysma muscle layer
  • Deep facial fat pads
  • Facial retaining ligaments
  • Descended midface tissues

By working beneath these structures, the deep plane facelift restores youthful contours from the inside out—repositioning the entire facial framework rather than simply pulling the skin tighter.2

The Science Behind Deep Plane Superiority

Recent anatomical research has changed our understanding of why extensive-release techniques outperform minimal interventions. The deep fascia of the face consists of multilayered sheets that support soft tissues against gravity while allowing certain mobility for facial expression.5

When tissues are lifted without surgical release—as in thread lifts, minimal access lifts, or skin-only procedures—the fibers are dragged into an “upward-pulled” position that eliminates their natural antigravitational support function. This places the entire weight of the lifted tissues on fixation sutures, causing early recurrence as sutures stretch or cut through tissue.5

In contrast, the deep plane technique releases retaining ligaments and repositions tissues to a higher level, allowing them to reattach in their new position with preserved antigravity architecture—explaining why results last significantly longer.5

The Key: Releasing Osteocutaneous Ligaments

True elevation requires releasing major retaining ligaments that prevent deeper tissues from lifting when only superficial layers are addressed. The retaining ligaments of the face are important in understanding concepts of facial aging and rejuvenation. They are located in constant anatomic locations where they separate facial spaces and compartments.4

The extended deep plane technique releases four key retaining ligaments in the face and neck:6

  • Zygomatic cutaneous ligaments (cheek region) — the strongest of all facial retaining ligaments
  • Masseteric cutaneous ligaments (jawline)
  • Mandibular cutaneous ligaments (lower face)
  • Cervical retaining ligaments (neck)

Why Ligament Release Matters

Releasing these ligaments allows the surgeon to:4,6

  • Mobilize the midface effectively without tension
  • Elevate the cheek and nasolabial folds as a unified unit
  • Improve jawline definition naturally
  • Achieve upward rejuvenation following natural vectors

This step is why deep plane facelifts outperform SMAS-plication or skin-only lifts, which can look tight or short-lived. Their main significance relates to their surgical release in order to achieve the desired aesthetic outcome.4

Natural, Tension-Free Results

By placing tension only at the level of the fascia, the deep plane technique creates a tension-free skin closure and ensures long-term results.2 The skin is not responsible for holding the lift—deeper tissues are. The skin is redraped without tension, creating:

  • Softer, natural facial expressions
  • No windswept look
  • Thinner, nearly invisible incisions
  • Results lasting 10–15 years1

Measured Outcomes

A systematic review and meta-analysis comparing patient satisfaction and complications of SMAS and deep plane facelifts found significant differences in outcomes:1

Outcome Measure Deep Plane Facelift SMAS Facelift
Patient Satisfaction 94.4%1 87.8%1
Average Years Younger 11.9 years7 8–10 years
Result Duration 10–15 years2 5–10 years
Superior Midface Rejuvenation Yes8 Limited8

Why Volume Restoration Matters

Facial aging involves more than sagging—it includes loss of volume in the cheeks, temples, jawline, and midface. Volume loss includes fat, muscle, and bone loss, which contributes to the overall aging appearance.2 Volume placement during a deep plane facelift is essential for optimal outcomes.

Volume Enhancement Options

Facial Implants (Most Predictable & Long-Lasting)

Implants provide permanent, precise improvement to:9

  • Cheek projection
  • Chin and jawline definition
  • Mandibular angle sculpting

Research shows submalar implant augmentation with facelift achieves a 95.7% satisfaction rate with minimal complications.10

Fat Transfer (Autologous Fat Grafting)

Uses the patient’s own fat for natural volume restoration. Autologous fat transfer contains stem cells and growth factors that may improve skin quality over time while providing volume restoration that integrates naturally with existing tissues.11

Dermal Fillers

Ideal for refinement but results are temporary (6–18 months), requiring ongoing maintenance treatments.9

A Comprehensive Rejuvenation Strategy

The deep plane facelift is a full rejuvenation system that may include:6

  • Platysmaplasty (when the neck muscles require tightening)
  • Facial implants for structural enhancement
  • Fat transfer for volume restoration
  • Comprehensive neck contouring
  • Midface elevation with ligament release

Why Traditional Approaches Fall Short

Traditional facelifts treat only surface issues. The deep plane technique addresses every layer of aging—skin, muscle, fat, ligaments, and structure.

Mini Facelift Limitations

Mini facelifts primarily target only the skin, with results typically lasting approximately 5–7 years. They cannot adequately address significant midface descent, deep nasolabial folds, or substantial jowling.12

SMAS Plication Limitations

While SMAS plication represents an improvement over skin-only techniques, it typically lifts in a more lateral or diagonal direction without fully releasing underlying retaining ligaments—sometimes resulting in a tight or unnatural appearance.13

Recovery and Expectations

Recovery from facelift surgery involves predictable stages:14,15

Week 1–2: Peak swelling occurs around days 3–5, with bruising that gradually resolves. Most patients describe discomfort rather than severe pain, manageable with prescribed medication. Adequate pain medication is necessary, as patients often report mild peri-incisional pain for three to four days postoperatively.2

Week 2–3: 50–60% swelling resolved; return to light activities. Expect bruising and swelling to go away in approximately two to three weeks.15

Month 1–3: 85–90% swelling resolved; contour refinement continues.

Month 6+: Full sensation return and final results. It could take two to three months before your face feels “back to normal.”14

Why Expert Surgeons Prefer the Deep Plane Technique

A properly executed deep plane facelift can produce dramatic and sustainable rejuvenation to the lower face and the midface.2 Surgeons who specialize in this advanced technique recognize its distinct advantages:

  • Stronger lifting power through composite flap mobilization
  • Predictable, natural results without the pulled look
  • Longer-lasting outcomes (10–15 years versus 5–10 years)
  • Improved midface volume and cheek contour through fat pad repositioning
  • Better jawline sculpting with ligament release
  • Minimal skin tension and reduced scarring
  • Ability to integrate implants or fat transfer as needed

Addressing Common Patient Concerns

Will I Look Overdone?

No. The deep plane facelift specifically avoids the overtightened or “windswept” appearance by placing tension on the deeper SMAS layer rather than stretching the skin. Patients retain their unique facial expressions while reversing sagging and folds.2

How Painful Is Recovery?

Mild to moderate discomfort rather than severe pain is typical. The tightness sensation that occurs represents healing and gradually diminishes.14

Are Results Permanent?

While your face will continue to age naturally, the structural repositioning achieved is permanent. Deep plane facelift results typically remain evident for 10–15 years before patients may consider additional intervention—and even then, you’ll never return to your pre-surgical appearance.1,2

Conclusion: The Modern Standard for Facial Rejuvenation

The deep plane facelift is superior because it addresses aging at its anatomical root. By releasing retaining ligaments, lifting deeper tissues as a composite unit, and restoring volume, it produces natural and long-lasting results. The biomechanical principle is clear: no-release lifting techniques place the entire weight of lifted tissues on fixation sutures, leading to early recurrence. The deep plane approach releases tissues and allows them to reattach in a higher position with preserved structure—explaining superior longevity.5

For patients seeking meaningful rejuvenation—and for surgeons committed to excellence—the deep plane facelift represents the gold standard for facial plastic surgery.1,2


About Dr. Robert J. Troell: Dr. Troell is a board-certified facial plastic and cosmetic surgeon with over 35 years of surgical experience. He holds certifications from the American Board of Facial Plastic and Reconstructive Surgery, the American Board of Cosmetic Surgery, the American Board of Facial Cosmetic Surgery, and the American Board of Otolaryngology–Head and Neck Surgery. Dr. Troell completed his residency at Stanford University Medical Center and has served as Clinical Professor at Stanford University Medical Center (1995-2001). He has published extensively in peer-reviewed journals on facial rejuvenation techniques including the Laryngoscope, Otolaryngology–Head and Neck Surgery, and Sleep.16

Image of Dr. Robert J. Troell MD


References

  1. Aesthetic Plastic Surgery. “The Deep Plane versus SMAS Facelift: A Systematic Review and Meta-Analysis.” Aesthetic Plast Surg. 2025. MEDLINE, EMBASE, Web of Science systematic review of 21 studies with 2,896 patients. PMID: 40801931.
  2. Raggio B, Patel B. “Deep Plane Facelift.” StatPearls [Internet]. Treasure Island (FL): StatPearls Publishing; 2023. National Library of Medicine/NCBI Bookshelf. NBK545277.
  3. “Platysmaplasty Facelift.” StatPearls [Internet]. Treasure Island (FL): StatPearls Publishing; 2023. National Library of Medicine/NCBI Bookshelf. NBK563291.
  4. Alghoul M, Codner MA. “Retaining ligaments of the face: review of anatomy and clinical applications.” Aesthet Surg J. 2013 Aug 1;33(6):769-82. PMID: 23855010.
  5. Cotofana S, et al. “Anatomy of the Facial Glideplanes, Deep Plane Spaces, and Retaining Ligaments.” Plast Reconstr Surg. 2023. PMC11195933.
  6. Jacono A, Bryant LM. “Extended Deep Plane Facelift: Incorporating Facial Retaining Ligament Release and Composite Flap Shifts to Maximize Midface, Jawline and Neck Rejuvenation.” Clin Plast Surg. 2018 Oct;45(4):527-554. PMID: 30268241.
  7. Hodges EL, Zimbler MS. “Outcome analysis in 93 facial rejuvenation patients treated with a deep plane facelift.” Arch Facial Plast Surg. 2011 Feb;13(1):30-5. PMID: 20966814.
  8. Annals of Plastic Surgery. “Comparing the Safety and Efficacy of Superficial Musculoaponeurotic System and Deep Plane Facelift Techniques: A Systematic Review and Meta-analysis.” Ann Plast Surg. 2025. 47 studies involving 10,766 patients. PMID: 40600822.
  9. American Academy of Facial Plastic and Reconstructive Surgery. “Facial Implants.” AAFPRS Patient Education. www.aafprs.org.
  10. Little JW. “Enhancing Facelift With Simultaneous Submalar Implant Augmentation.” Aesthet Surg J. 2018 May 27;39(4):351-364. PMID: 30169617.
  11. Sinno S, et al. “Autologous Fat Transfer for Facial Rejuvenation: A Systematic Review on Technique, Efficacy, and Satisfaction.” Plast Reconstr Surg Glob Open. 2017 Nov;5(11):e1606. PMC5889440.
  12. Safety and Effectiveness of Limited Incision Facelifts: A Systematic Review and Meta-analysis. Aesthet Surg J Open Forum. 2023;5(Suppl 1). PMC10320643.
  13. Evolution of Superficial Muscular Aponeurotic System Facelift Techniques and Complications: A Review of 6,086 Patients. J Craniofac Surg. 2023. PMC10819192.
  14. Cleveland Clinic. “Facelift (Rhytidectomy): What Is It, Recovery & What to Expect.” Cleveland Clinic Health Library. my.clevelandclinic.org/health/treatments/11023-facelift.
  15. Mayo Clinic. “Face-lift.” Mayo Clinic Patient Care & Health Information. www.mayoclinic.org/tests-procedures/face-lift/about/pac-20394059.
  16. American Board of Cosmetic Surgery. “Dr. Robert J. Troell – Diplomat of the American Board of Cosmetic Surgery.” www.americanboardcosmeticsurgery.org/doctors/robert-j-troell/

Dr. Robert J. Troell
Dr. Robert J. Troell, MD, FACS
Board-Certified Facial Plastic & Reconstructive Surgeon

Dr. Robert J. Troell is a board-certified facial plastic and reconstructive surgeon with over 30 years of experience. He holds six board certifications and has authored more than 58 peer-reviewed publications. He practices at his AAAASF-accredited surgical center in Las Vegas, Nevada.

Complimentary Consultation

Begin Your Journey with Dr. Troell

Schedule a complimentary consultation to discuss your goals and receive an honest, expert assessment.

5375 S Fort Apache Rd #101, Las Vegas, NV 89148
Mon–Fri, 8:30 AM – 5:00 PM
Blog

Your 360 Tummy Tuck Recovery Time: A Week-by-Week Guide

Key Takeaways

Medical information disclaimer
This page provides general educational information and is not a substitute for professional medical advice. Always follow your surgeon’s specific instructions. When to seek urgent care: Call your surgeon or seek emergency care now for chest pain, shortness of breath, calf pain/swelling, fever > 100.4°F (38°C), increasing redness, foul drainage, or uncontrolled pain.

A 360 tummy tuck is a significant investment in yourself and your confidence. The procedure creates the beautiful foundation, but the recovery period is where you truly protect that investment and ensure your results last a lifetime. How you care for your body after surgery directly influences the final outcome. This isn’t a passive waiting game; it’s an active healing phase where you partner with your body. To get the most from your procedure, it’s essential to understand the 360 tummy tuck recovery time and how to best support yourself through it. Here’s your complete guide to healing beautifully.

GET IN TOUCH

  • Go for full-circle contouring: A 360 Tummy Tuck isn’t just about a flat stomach; it sculpts your waist, hips, and lower back for a completely balanced and proportional silhouette from every angle.
  • Set the stage for a smooth recovery: Your healing journey begins before the procedure. By preparing your home as a recovery sanctuary, arranging for help, and understanding the timeline, you can focus entirely on resting comfortably.
  • Partner with your body through healing: Recovery is an active process that requires patience. Following post-op instructions, embracing gentle movement, and fueling your body with healthy foods are essential for achieving and maintaining your final results.

What Is a 360 Tummy Tuck?

If you’ve worked hard to reach your health goals but are still dealing with loose skin or a stubborn pooch, you’re not alone. Sometimes, diet and exercise can’t address everything, especially changes from pregnancy or significant weight loss. That’s where an abdominoplasty, or tummy tuck, comes in. This procedure is designed to create a firmer, flatter abdomen by removing excess skin and fat while tightening the underlying muscles. It’s a powerful way to restore your core and achieve the contour you’ve been working toward.

While a traditional tummy tuck focuses on the front of the abdomen, a 360 Tummy Tuck takes a more comprehensive approach. Think of it as full-circle contouring. This advanced procedure addresses not just the front, but also your flanks, hips, and lower back. By combining a tummy tuck with liposuction around your entire midsection, it creates a beautifully balanced and sculpted silhouette from every angle. It’s about creating harmony and proportion for your whole torso, not just one part of it.

What the Procedure Involves

So, what actually happens during a 360 Tummy Tuck? The procedure begins with an incision made low on the abdomen, typically from hip to hip, so it can be easily hidden by a bikini bottom. Your surgeon will then carefully lift the skin, repair and tighten the weakened or separated abdominal muscles, and remove excess skin and fat. This process is what creates that smooth, firm abdominal wall.

Because this is a 360-degree procedure, liposuction is used to sculpt the flanks, hips, and lower back, removing stubborn fat deposits and enhancing your natural curves. Finally, your belly button is repositioned to look natural with your new, flatter tummy. It’s a detailed process designed to give you a complete and transformative result.

Traditional vs. 360: What’s the Difference?

The main difference between a traditional tummy tuck and a 360 tummy tuck is the scope of the treatment area. A traditional tummy tuck primarily addresses the front of the abdomen—the area between your ribs and pubic bone. It’s excellent for flattening the stomach and removing a “belly apron” of loose skin.

A 360 Tummy Tuck, however, offers a more complete transformation. As the name suggests, it involves a circumferential approach that treats your entire midsection. By including liposuction for the flanks, hips, and back, it eliminates love handles and bra rolls, cinches the waist, and creates a more defined hourglass shape. It’s the ideal choice if you’re looking for comprehensive contouring that enhances your profile from all sides.

Is a 360 Tummy Tuck Right for You?

It’s important to understand that a tummy tuck is not a weight-loss surgery. Instead, it’s a contouring procedure designed to refine your shape after you’ve done the hard work. The best candidates are individuals who are at or near their ideal body weight but are bothered by loose skin, stubborn fat pockets, or weakened abdominal muscles that don’t respond to exercise.

This procedure is particularly effective for women after pregnancy or for anyone who has experienced significant weight fluctuations. If you’re in good overall health, are a non-smoker, and have realistic expectations for your results, a 360 Tummy Tuck could be the perfect final step in your journey. A personal consultation is the best way to determine if it’s the right fit for your specific goals.

How to Prepare for a Smooth Recovery

Going into your 360 tummy tuck with a solid plan can make all the difference in your recovery. A little preparation goes a long way in ensuring you feel comfortable, supported, and stress-free as you heal. Think of the days leading up to your surgery as your time to nest and get everything in order. By setting up your space, stocking your pantry, and lining up your support system, you can focus on the most important thing after your procedure: resting and recovering. Let’s walk through the key steps to get you ready.

Create Your Recovery Sanctuary

Your home should be a peaceful retreat after your surgery. Designate one area—likely your bedroom or a comfy spot in the living room—as your recovery zone. The key is to have everything you need within arm’s reach to minimize getting up and down. Stock your bedside table with water, medications, your phone charger, and some light entertainment like books or a tablet. Propping yourself up with plenty of pillows will be essential for comfort. Remember, your body needs serious downtime to heal. As one surgeon advises, “Rest is very important for 10-14 days at home,” so creating a tranquil environment is one of the best things you can do for yourself.

Your Recovery Shopping List

Before your surgery, take some time to stock up on essentials so you don’t have to worry about errands later. Your focus should be on comfort and nutrition. Grab some loose, comfortable clothing that’s easy to put on and take off, like button-down pajamas and slip-on shoes. On the food front, focus on items that support your body’s healing process. Experts recommend you “eat foods high in protein and fiber” to aid tissue repair and prevent constipation, which can be common after surgery. Think lean meats, beans, fruits, and vegetables. And don’t forget to stay hydrated—drinking plenty of water is crucial for a smooth recovery.

Assemble Your Support Team

You won’t be able to do it all on your own for the first few days, and that’s completely okay. Now is the time to call in your support system. You will absolutely need a trusted friend or family member to help you out. As one plastic surgeon notes, “You’ll need someone to drive you home and ideally stay with you for at least 24 hours.” Arrange for this person to help with meals, medication reminders, and simple tasks around the house. If you have children or pets, organize their care in advance so you can rest without worry. Don’t be afraid to ask for help—your loved ones want to support you.

What to Realistically Expect

Understanding the recovery timeline helps you set realistic expectations and be patient with your body. While everyone heals at their own pace, there are some general milestones you can anticipate. According to one clinic, “Most people can go back to work in about 7-10 days,” assuming you have a desk job. If your work is more physically demanding, you’ll need more time off. You’ll be able to ease back into your fitness routine slowly, but you should wait to “start tough exercises again in about 4-6 weeks.” The most exciting part—seeing your new contours—takes time, too. You can expect to “start to see the final results around 3-6 months” as the swelling fully subsides.

Your Week-by-Week Recovery Timeline

Knowing what to expect can make all the difference as you heal from your 360 tummy tuck. Everyone’s journey is unique, but having a general roadmap helps you prepare for each stage. Think of this as your guide to the weeks and months ahead, helping you understand what your body is going through and how you can best support its healing process. Remember to be patient with yourself and celebrate the small milestones along the way. Your beautiful new contours are revealing themselves day by day, and this timeline will help you appreciate the transformation as it happens.

Week 1: Rest and Initial Healing

Potential complications to know

  • VTE (blood clots): Abdominoplasty—especially extended or circumferential procedures—carries a recognized VTE risk. Early ambulation, compression, and any surgeon-directed chemoprophylaxis reduce risk. Seek urgent care for calf pain/swelling, chest pain, or shortness of breath. [3]
  • Surgical site infection (SSI): Watch for spreading redness, warmth, fever > 100.4°F (38°C), foul drainage, or worsening pain. [4][5]
  • Seroma/hematoma & wound issues: Follow dressing/drain instructions closely; report increasing, tense swelling, new bleeding, or separation of the incision. [2]
  • Individual variation: Timelines vary by health status and procedure extent; always follow your surgeon’s specific instructions. [1][2]

Your Guide to Post-Op Care

Your only job this first week is to rest. Seriously. After your procedure, you’ll be recovering from general anesthesia, so you’ll need a trusted friend or family member to drive you home and help out for at least the first couple of days. You can expect some soreness, bruising, and swelling—this is all a normal part of the process. You’ll be wearing a compression garment around the clock to help minimize swelling and support your healing tissues. While some discomfort is normal, it’s important to know the signs of potential complications. Be sure to call us right away if you develop a fever or notice any unusual pain or redness around your incision.

Weeks 2-3: Turning a Corner

During weeks two and three, you’ll likely start to feel much more like yourself. The initial discomfort will begin to fade, and you’ll notice the swelling and tenderness going down. This is when you can start reintroducing some light activity into your day. Think gentle walks around the house or short strolls outside, but listen to your body and avoid anything that feels like a strain. Many of our patients feel ready to return to a desk job during this period. You’ll continue to wear your compression garment, and if you had surgical drains, they are usually removed by this point.

Weeks 4-6: Easing Back into Your Routine

By now, you should have more energy and feel a significant improvement in your comfort levels. Swelling will be much less noticeable, and you can begin to get a clearer picture of your new shape. With your surgeon’s go-ahead, you can start incorporating more physical activity, like brisk walking. This is a great time to gradually get back to your normal daily life, whether that’s running errands, meeting friends for lunch, or enjoying your favorite hobbies. Just remember to continue avoiding heavy lifting and strenuous workouts until you’re fully cleared.

Weeks 7-12: Increasing Your Strength

This is often the phase where you get the green light from your surgeon to reintroduce more vigorous exercise. It’s exciting to get back to your fitness routine, but it’s crucial to do so carefully. When you start working on your core again, pay close attention to your technique to protect your healing abdominal muscles. Your body has been through a lot, so ease back in slowly and listen for any signals that you might be pushing too hard. A gradual return to your fitness routine is the safest way to build back your strength without compromising your results.

Months 3-6: Seeing Your Final Shape Emerge

Patience pays off! Between three and six months after your surgery, you’ll really start to see the final, beautiful results of your 360 tummy tuck. While minor swelling can sometimes linger for up to a year, your new, sculpted silhouette will be clearly visible. To keep your results looking their best for years to come, this is the perfect time to fully embrace a healthy lifestyle. Committing to a balanced diet and a consistent exercise routine will not only support your recovery but will also help you maintain your new contours long-term.

Taking care of yourself after surgery is just as important as the procedure itself. Your body is doing incredible work to heal, and your job is to give it the support it needs. Following your post-operative instructions carefully will help you feel more comfortable, reduce the risk of complications, and ensure you get the beautiful, lasting results you’re looking for. Think of this phase as the final, crucial step in your transformation journey. It’s a time to be patient and gentle with yourself as your body adjusts and recovers. We’ll be here to guide you, but empowering yourself with knowledge is the best way to feel confident and in control. Below, we’ll walk through the key aspects of your at-home care, from managing discomfort to caring for your incisions, so you know exactly what to do.

Tips for Managing Discomfort

It’s completely normal to feel sore and tender after your surgery. Everyone’s experience with pain is unique, but most people find the first week to be the most challenging, with discomfort levels around a 6 or 7 out of 10. The best thing you can do is stay ahead of it by taking your prescribed pain medication on a regular schedule, especially for the first few days. Don’t wait for the pain to become intense before taking your dose. By the second week, you should notice a significant improvement, with discomfort typically dropping to a 3 or 4. This is a great sign that your body is beginning to heal and you’re on the right track.

How to Use Your Compression Garment

Your compression garment will be your best friend during recovery. This special, snug-fitting garment is essential for minimizing swelling, supporting your healing tissues, and helping your skin conform to its new contours. We know it’s not the most glamorous piece of clothing, but wearing it consistently as instructed is one of the most effective things you can do for your recovery. It provides gentle, constant pressure that helps reduce fluid buildup and makes moving around more comfortable. Think of it as a supportive hug for your midsection while your body heals and settles into its new, beautiful shape.

Caring for Your Incisions

Proper incision care is vital for minimizing scarring and preventing infection. For the first few days, we may ask you to apply a thin layer of antibiotic ointment. When you’re cleared to shower, let the warm, soapy water run over your incisions, but don’t scrub them. Afterward, gently pat the area dry with a clean towel. It’s important to resist the urge to pick at any scabs or scratch the area, as this can interfere with the healing process. Always follow the specific wound care instructions we provide, as they are tailored to your procedure and will give you the best chance at a smooth, clean heal.

How to Handle Swelling and Bruising

Swelling and bruising are a normal part of the healing process, so don’t be alarmed when you see them. These effects are most noticeable in the first couple of weeks and will gradually subside over the next two to three months. To help things along, continue to wear your compression garment faithfully. Gentle movement, like short, light walks, also helps improve circulation and reduce fluid retention. As your body heals, you’ll see the swelling go down and your new shape begin to reveal itself. Patience is key during this phase—your body is working hard, and soon you’ll see the final, stunning results of your procedure.

Moving Your Body After Surgery

It might sound counterintuitive, but moving your body is a vital part of your healing process. While you definitely need plenty of rest, incorporating gentle, approved movement will help you feel better faster and can even improve your final results. The key is to listen to your body and follow our team’s specific instructions for you. Think of this phase not as exercise, but as an active part of your recovery. It’s about encouraging your body to heal efficiently.

This isn’t a race back to the gym. Instead, it’s a gradual process of reintroducing activity in a way that supports the incredible work your body is doing to repair itself. From short walks around your living room to eventually returning to your favorite fitness class, every step is a milestone. We understand the desire to get back to your routine, but this period requires patience and a new perspective on what “activity” means. It’s about mindful movement that prevents complications and sets the stage for a smooth transition back to your regular fitness regimen. Let’s walk through what you can expect and how to move safely at each stage.

The Importance of Gentle Walks

As soon as you get the green light from your surgeon, it’s time to start taking short, slow walks. Your first few strolls might just be from the bed to the couch, and that’s perfectly fine. The goal here isn’t to break a sweat; it’s to promote healthy circulation. Gentle movement helps your blood flow, which is essential for delivering oxygen and nutrients to the healing tissues. It also significantly reduces the risk of developing blood clots, a serious potential complication after any surgery. Start with a few minutes at a time, several times a day, and gradually increase the duration as you feel stronger.

When Can You Drive and Return to Work?

Getting back to your daily routine is a huge milestone. Most patients with desk jobs can plan to return to work after about two weeks, but if your job is more physically demanding, you’ll need a bit more time. As for driving, you must be completely off prescription pain medication and able to react quickly without pain or hesitation. For most people, this is also around the two-week mark. You’ll likely feel ready to take on most of your normal, non-strenuous activities after four to six weeks. Remember, these are general guidelines, and your personal timeline will depend on your unique healing process.

Know Your Exercise Limitations

I know you’re eager to see your new contours in action at the gym, but patience is crucial here. Your abdominal muscles have undergone significant repair, and they need time to heal properly. Pushing yourself too hard, too soon can lead to complications like fluid buildup, strained incisions, or hernias. You should avoid any strenuous activities—that means no heavy lifting (anything over 10 pounds), intense cardio, or core exercises like crunches—for at least six to eight weeks. We will give you the official clearance to resume more demanding physical activities, which for most people happens around the 7- to 10-week mark.

How to Safely Reintroduce Exercise

When you get the go-ahead to start exercising again, the key is to ease back into it. Your body has changed, and your strength and endurance will need to be rebuilt gradually. Start with low-impact activities like longer walks, stationary cycling, or using the elliptical. You can also incorporate some gentle stretching to improve flexibility. Pay close attention to how your body feels. If you experience any pain, pulling, or discomfort at your incision sites, it’s a sign to stop and rest. This is a marathon, not a sprint, and honoring your body’s limits is the best way to protect your investment and enjoy your beautiful results for years to come.

How to Support Your Body’s Healing

Your surgery is just the first step. How you care for yourself during recovery plays a huge role in your final results. Think of this time as an active partnership with your body. By giving it the right support, you can help it heal efficiently and beautifully. Here are four key areas to focus on to ensure your recovery is as smooth as possible.

Eat and Drink for Faster Healing

What you eat and drink directly fuels your recovery. Your body is working hard to repair tissue, and it needs the right building blocks to do the job. Focus on a diet rich in lean protein, vitamins, and minerals to support the healing process. Think grilled chicken, fish, leafy greens, and colorful fruits. Staying hydrated is also non-negotiable; drinking plenty of water helps flush out anesthesia and reduce swelling. On the flip side, try to limit salty and sugary foods, as they can contribute to fluid retention and make swelling worse. A healthy post-surgery diet can make a noticeable difference in how you feel.

The Best Ways to Rest and Sleep

Rest is your body’s primary healing mode, so give it what it needs, especially during the first two weeks. When you sleep, your body can focus its energy on mending itself. The best way to sleep after a 360 tummy tuck is on your back in a reclined position, almost like you’re in a beach chair. You can achieve this by propping your upper body up with pillows and placing another set of pillows under your knees. This keeps your knees bent and takes all the tension off your abdominal incision, protecting your stitches and minimizing discomfort. Quality sleep is essential for recovery and will help you feel better, faster.

What to Do About Common Side Effects

Swelling and bruising are completely normal after surgery—it’s your body’s natural response. While it can take a few months to fully subside, you can take steps to manage it. Wearing your compression garment as instructed is your number one tool; it provides support and helps minimize fluid buildup. Gentle movement is also key. Taking short, light walks a few times a day encourages circulation, which helps reduce swelling and prevents blood clots. If Dr. Troell gives you the okay, using cold packs can also provide relief. Following these simple post-operative instructions is the best way to keep side effects in check.

Caring for Your Emotional Well-being

Your physical recovery is only half the story; your emotional well-being matters just as much. It’s common to feel a mix of emotions after surgery, from excitement to impatience and even a little bit of post-op blues. Be patient and kind to yourself during this time. Your body has been through a lot, and healing is a marathon, not a sprint. Lean on your support system, allow others to help you, and don’t be afraid to talk about how you’re feeling. Remember why you started this journey and celebrate the small milestones along the way. Being mentally prepared and practicing self-compassion is a critical part of a successful recovery.

Key Milestones in Your Recovery

Your recovery journey is a marathon, not a sprint, and it’s helpful to think of it in terms of milestones. While everyone heals at their own pace, you can generally expect to hit certain markers along the way that signal your progress. The first major milestone for many is returning to work. Most of our patients with desk jobs feel ready to go back within about 7 to 10 days. This doesn’t mean you’ll be 100% back to normal, but you’ll be able to manage your day with more ease. It’s a time to listen to your body and avoid pushing yourself too hard.

As you continue to heal, you’ll gradually feel more like yourself. The next big milestone is getting back to your fitness routine. By weeks four to six, you can typically get the green light to reintroduce more strenuous exercise. This is a huge step that helps many people feel like they’ve truly turned a corner and regained their strength. Finally, the grand reveal of your final, beautifully contoured shape will happen over time. It’s important to be patient, as it usually takes about three to six months for all the residual swelling to subside and for your results to fully settle. The American Society of Plastic Surgeons provides a great overview of what to expect during this period. Remember, celebrating these small victories makes the entire process more rewarding.

Recovery Red Flags: What’s Normal and When to Call Us

It’s completely normal to experience some discomfort, bruising, and swelling after your procedure. These are signs that your body is healing, and they will lessen each day. However, it’s just as important to know which signs are not normal. We want you to be an active partner in your recovery, and that means knowing when to pick up the phone. Please call our office immediately if you develop a fever, feel unusually sick, experience severe or unexpected pain, or notice significant redness spreading around your incision. These could be signs of an infection, and it’s always best to be cautious. Your safety is our top priority, and we are here to support you every step of the way.

How to Maintain Your Beautiful Results

Think of your 360 tummy tuck as a powerful head start, and a healthy lifestyle as the key to making your results last a lifetime. Once you’re fully healed, maintaining your new shape comes down to consistent, healthy habits. Regular exercise and a balanced diet are your best tools. To support your body’s healing process right after surgery, focus on a nutrient-dense diet. We recommend filling your plate with foods high in protein and fiber. Great choices include lean proteins like chicken, turkey, fish, and eggs, along with whole grains, fruits, and vegetables. These foods provide the building blocks your body needs to repair tissue and keep you feeling strong and energized.

Final Tips for a Successful Recovery

As you move into the final stages of healing, a few key practices can make all the difference in your results and long-term satisfaction. Think of this as the finishing touch on your transformation—a way to protect your investment and ensure you enjoy your new contours for years to come.

Why Following Instructions Is Crucial

Your recovery journey is just as important as the surgery itself, because how you heal directly affects your final results. Think of the post-operative instructions we provide as your personal recovery roadmap, not just a list of suggestions. Following them closely—from taking medications on schedule to respecting activity limitations and attending all follow-up appointments—is the single best thing you can do for yourself. This careful approach helps prevent complications, manage discomfort, and guide your body toward the smoothest healing process possible. We are your partners in this, and these guidelines are designed to give you the best outcome.

The Role of Physical Therapy

While you won’t be heading to a formal physical therapy session right away, gentle movement is a vital part of your recovery. We’ll encourage you to start taking short, slow walks around your home as soon as you feel up to it. This simple activity is incredibly beneficial; it promotes healthy blood flow, which reduces swelling and lowers the risk of complications like blood clots. The key is to listen to your body. Movement should feel restorative, not painful. These gentle walks help you regain strength and mobility at a safe and steady pace.

Your Guide to Minimizing Scars

Your incision scars are a normal part of the healing process, and with proper care, they can fade significantly over time. One of the most important steps is to protect them from the sun. New scar tissue is extremely sensitive to UV light, and sun exposure can cause it to darken permanently. For at least the first year, keep your scars covered with clothing or apply a broad-spectrum sunscreen diligently. Once your incisions have fully closed, we can discuss other options like silicone sheets or gels, which can help minimize a scar’s appearance by keeping it hydrated as it matures.

Lifestyle Habits for Lasting Results

A 360 tummy tuck creates a beautiful new foundation, and healthy habits are the key to maintaining it. To keep your results looking their best, focus on a healthy lifestyle with regular exercise and nourishing food. Your body needs the right fuel to finish healing, so prioritize a diet rich in nutrients like lean protein to repair tissues and fiber to aid digestion. Long-term, maintaining a stable weight is the most effective way to preserve your surgical results. By incorporating balanced meals and consistent physical activity into your routine, you’re investing in your overall health and well-being.

Related Articles

GET IN TOUCH

Frequently Asked Questions

Is a 360 Tummy Tuck only for people who have lost a massive amount of weight? Not at all. While it’s an excellent procedure for those who have experienced significant weight loss, it’s also incredibly effective for women looking to restore their core after pregnancy. It’s designed for anyone who wants comprehensive contouring for their entire midsection. If you’re bothered by loose skin on your stomach as well as stubborn fat on your hips, flanks, and lower back, this procedure addresses all those areas at once to create a balanced, harmonious shape.

How much pain should I realistically expect, and for how long? It’s best to be prepared for some significant discomfort, especially during the first three to five days. This is when you’ll want to stay on a strict schedule with your prescribed pain medication to stay comfortable. Most people find the pain lessens dramatically after the first week, and by week two, you may only need over-the-counter pain relievers. The feeling is often described as an intense muscle soreness, similar to what you’d feel after a very tough core workout.

How long until I can resume my normal daily life, like driving and caring for my kids? You should plan on having dedicated help for at least the first one to two weeks. You will not be able to lift anything over 10 pounds, which includes small children, for about six weeks. As for driving, you must be completely off prescription pain medication and able to move without hesitation, which for most people is around the two-week mark. Easing back into your routine slowly is the safest way to protect your results.

Will my results be permanent? The fat cells and excess skin removed during your procedure are gone for good, and the repair to your abdominal muscles is built to last. However, your long-term results are in your hands. Significant weight fluctuations or a future pregnancy can stretch the skin and muscles again, altering your outcome. The best way to ensure your results last a lifetime is to maintain a stable weight through a consistent, healthy lifestyle.

I’m worried about the scar. What will it really look like? A scar is an unavoidable part of this surgery, but your surgeon will place the incision very low across the abdomen, from hip to hip, so it can be easily hidden beneath underwear or a bikini bottom. In the beginning, the scar will be red and raised, but with proper care, it will fade and flatten significantly over the course of a year. Following our instructions for incision care and protecting the scar from the sun are the most important things you can do to ensure it heals as discreetly as possible.

References

  1. American Society of Plastic Surgeons (ASPS). “Tummy Tuck (Abdominoplasty): Recovery & Risks.” Patient guidance.
  2. Villanueva NL, Rios-Diaz AJ, et al. “Abdominoplasty.” StatPearls [Internet]. StatPearls Publishing (current edition).
  3. American Society of Plastic Surgeons. “Venous Thromboembolism (VTE) Prevention: Practice Principles.” Most recent update.
  4. Centers for Disease Control and Prevention (CDC). “Surgical Site Infection (SSI): Symptoms & Prevention.”
  5. Cleveland Clinic. “Surgical Wound Infection: Symptoms & Treatment.” Patient-facing explainer.

Dr. Robert J. Troell
Dr. Robert J. Troell, MD, FACS
Board-Certified Facial Plastic & Reconstructive Surgeon

Dr. Robert J. Troell is a board-certified facial plastic and reconstructive surgeon with over 30 years of experience. He holds six board certifications and has authored more than 58 peer-reviewed publications. He practices at his AAAASF-accredited surgical center in Las Vegas, Nevada.

Complimentary Consultation

Begin Your Journey with Dr. Troell

Schedule a complimentary consultation to discuss your goals and receive an honest, expert assessment.

5375 S Fort Apache Rd #101, Las Vegas, NV 89148
Mon–Fri, 8:30 AM – 5:00 PM
Blog

What to Expect 4 Weeks After Vaser Lipo Treatment

Key Takeaways

That surge of energy you’re feeling is a great sign. By now, you’re probably eager to ditch the couch and jump back into your normal life, especially your fitness routine. While your spirit is ready, it’s crucial to remember that your body is still healing internally. This stage is all about a gentle and mindful re-entry, not a sprint back to your old activities. Pushing yourself too hard can lead to setbacks like increased swelling, which can delay seeing your final results. Knowing what you can safely do 4 weeks after vaser lipo treatment is key to a smooth recovery. Let’s explore how to reintroduce light exercise, what activities to continue avoiding, and how to listen to your body’s signals.

  • Your 4-week results are a preview, not the finale: It’s exciting to see your new shape, but it’s completely normal to still have some swelling, firmness, or numbness. Be patient, as your contours will continue to refine over the next several months.
  • Prioritize light movement over intense workouts: Easing back into activity with gentle walks helps reduce swelling and supports healing. Continue to avoid heavy lifting and high-impact exercise until your surgeon gives you the green light to protect your investment.
  • Support your results from the inside out: A nutritious diet, plenty of water, and adequate rest are crucial for recovery. These habits help reduce swelling now and are the foundation for maintaining your new shape for years to come.

Your Vaser Lipo Recovery: What to Expect at 4 Weeks

Hitting the one-month mark after your Vaser Lipo procedure is a significant milestone in your recovery journey. By now, the initial discomfort has likely faded, and you’re starting to see the exciting changes you’ve been waiting for. While your body is still healing, this is the point where you get a real glimpse of your new contours. Let’s walk through what you can expect to see and feel four weeks after your treatment.

The 4-Week Milestone: What You’ll See and Feel

At four weeks, you should notice a significant improvement in your body shape. The treated areas will look slimmer and more defined as the majority of the initial swelling subsides. This is an exciting time because you can finally start to appreciate the results of your Vaser Lipo procedure. While you’re not quite at the finish line yet, the changes are becoming much more apparent. Think of this stage as a preview of your final outcome. As the last bits of swelling and bruising disappear over the coming weeks and months, your new silhouette will only continue to refine and settle.

How Your Body Is Changing

It’s completely normal to still have some swelling at the four-week mark. Your body has been through a lot, and this lingering puffiness is just a sign that it’s still in the final stages of healing. This swelling can sometimes take several months to resolve completely, so patience is key. You might also experience some residual bruising or numbness in the treated areas. Don’t be alarmed—these sensations are typical as the tissues and nerves recover. Your body is working hard behind the scenes to repair itself, and these external signs are a natural part of that intricate process.

How to Manage Swelling and Bruising

To help your body along, it’s crucial to follow your post-operative care instructions carefully. Consistently wearing your compression garment is one of the most effective things you can do. It helps minimize swelling, supports your healing tissues, and helps your skin conform to its new shape. Alongside this, maintaining a healthy lifestyle will support your recovery and your long-term results. Focus on a balanced diet rich in nutrients and stay hydrated. Gentle, regular exercise, like walking, can also aid circulation and reduce swelling, but be sure to stick to the activity guidelines we provided.

Is This Normal? Common Post-Lipo Symptoms

As you recover, it’s completely normal to wonder if what you’re experiencing is part of the standard healing process. Your body has been through a significant procedure, and it needs time to adjust and repair itself. You’re likely feeling a mix of excitement about your new shape and a bit of impatience for the final results to appear. This is the point where you might start analyzing every new sensation, every patch of swelling, and every little twinge. Knowing what’s typical can give you peace of mind and help you focus on your recovery instead of worrying. We want you to feel confident and informed as you heal, so let’s walk through some of the most common symptoms you might be seeing and feeling around the four-week mark, and clarify when it might be time to check in with us.

Handling Discomfort and Sensitivity

By week four, any significant pain from the procedure should be long gone. However, don’t be surprised if the treated areas still feel a bit tender, numb, or unusually sensitive to the touch. You might also experience some tingling or itching sensations as the nerves in the area wake up and heal. This is all a normal part of the journey. The most important thing is to listen to your body. Continue to wear your compression garment as advised, as this is crucial for managing swelling and supporting your healing tissues. If you feel any sharp, persistent pain, that’s a sign to give our office a call, but general sensitivity is typically nothing to worry about.

What to Know About Fluid and Drainage

In the first few days after your Vaser lipo, you likely noticed some pinkish-orange fluid leaking from your incision sites. This is called tumescent fluid, and it’s a mix of saline and local anesthetic used during your procedure. This drainage is not only normal but beneficial, as it helps reduce post-operative swelling and bruising. By the four-week mark, any drainage should have completely stopped, and your incision sites should be closed and healing nicely. If you notice any new or unexpected fluid leaking from your incisions at this stage, it’s important to contact your surgeon right away to make sure everything is on track with your recovery.

What’s Normal and What’s Not

At one month post-op, you should be seeing some exciting changes in your body’s contours. As the initial swelling and bruising fade, your new shape will become more defined. However, it’s crucial to remember that you’re not seeing the final result just yet. Lingering swelling is the most common symptom at this stage, and it can take several more months to fully resolve. You might also feel some firm or lumpy areas under the skin, which is a normal part of the internal healing process. To help with this, many patients find that a gentle lymphatic drainage massage can speed up the reduction of swelling and soften these firm spots.

When to Call Us

While most of your recovery should be smooth, it’s important to know which signs warrant a call to your surgeon. Your health and safety are our top priorities. Please contact us immediately if you experience any potential signs of infection, such as a fever, increasing redness or warmth around an incision, or a foul-smelling discharge. Other reasons to call include a sudden, significant increase in swelling or pain, shortness of breath, or calf pain. We would always rather you call with a question than worry at home. Trust your instincts—if something doesn’t feel right, we are here to help you through it.

Getting Back to Your Routine Safely

At the four-week mark, you’re likely feeling more like yourself and getting excited about the changes you see. This is a fantastic milestone! The initial discomfort has faded, and you’re starting to see the beautiful new contours you’ve been dreaming of. It’s completely normal to feel a surge of energy and a desire to jump right back into your old routines, especially your fitness regimen. However, while your spirit is ready, your body is still hard at work healing beneath the surface. This is a crucial period where patience pays off in a big way.

Think of this stage as a gentle re-entry, not a sprint back to the finish line. A slow, steady, and mindful approach will protect your investment and ensure you get the stunning, long-lasting results you deserve. Listening to your body is your most important job right now. We’ll walk you through exactly how to ease back into daily life, what exercises you can safely start doing, and which activities are still on the “not yet” list. Following this guidance will help you stay on track for a smooth and successful recovery, getting you closer to your final outcome without any frustrating setbacks.

Easing Back into Daily Life

By now, you should be feeling much more comfortable moving around. Most patients find they can return to work, especially if they have a desk job or a role that isn’t physically demanding. You’ll notice a significant improvement in your body’s contour as the initial swelling continues to go down. This is an exciting glimpse of what’s to come! While you’re getting back into the swing of things, continue to be mindful of your movements. Avoid any sudden twisting or straining, and if an activity causes discomfort, take it as a sign to pull back and rest. Your body is communicating with you, so it’s important to listen.

Exercises You Can Start Doing

If you’ve been missing your workouts, you can now start reintroducing some light exercise. The key word here is light. The goal is to get your body moving and your blood flowing without putting any strain on the treated areas. Think low-impact activities like walking, gentle stretching, or using a stationary bike at a slow, steady pace. These movements can help with circulation, reduce any lingering swelling, and make you feel great both physically and mentally. Remember to wear your compression garment during any physical activity unless Dr. Troell has advised otherwise, as it provides crucial support to your healing tissues.

How to Approach Your Workouts

As you begin exercising again, your mindset is just as important as the movements themselves. Start with shorter sessions and gradually increase the duration and intensity over the next few weeks. For example, begin with a 15-minute walk and see how you feel. If all is well, you can try 20 minutes the next day. This gradual progression is the safest way to rebuild your fitness without overdoing it. Pay close attention to any signals from your body. A little muscle fatigue is normal, but sharp pain, a sudden increase in swelling, or unusual discomfort are signs to stop immediately and rest.

What Activities to Skip for Now

Patience is still your best friend at this stage. It’s crucial to continue avoiding all strenuous activities and high-impact workouts. This means no heavy lifting (anything over 10 pounds), running, contact sports, or intense fitness classes like HIIT or CrossFit for at least another few weeks. These activities can increase swelling, put you at risk for injury, and negatively affect your healing tissues, potentially compromising your results. Dr. Troell will give you the final green light to return to your full fitness routine at one of your follow-up appointments. Until then, stick to gentle movement and let your body heal properly.

Caring for Yourself After Vaser Lipo

Your Vaser Lipo procedure is complete, and now the focus shifts to your recovery. Taking great care of yourself during this time is just as important as the surgery itself for achieving a smooth, beautifully contoured result. Think of these next few weeks as the final, crucial step in your transformation. By following a few key guidelines, you can support your body’s natural healing process, manage discomfort, and get back to feeling like yourself sooner.

Your Guide to Compression Garments

After your procedure, you’ll be fitted with a special compression garment. While it might not be the most fashionable item in your closet, it’s one of your most important recovery tools. You’ll need to wear this snug garment for several weeks as instructed. Its job is to apply steady pressure to the treated areas, which helps reduce swelling and provides support to your tissues as they heal. This not only makes you more comfortable but also helps your skin conform to your new body shape, ensuring the final result is as smooth as possible. Following your surgeon’s specific instructions on how long to wear it is essential.

The Role of Massage in Your Recovery

As your body heals, you may notice some swelling due to fluid buildup. This is a normal part of the process. To help manage this, we often recommend a series of gentle lymphatic drainage massages. This specialized massage technique encourages the movement of excess fluid out of the treated areas and back into your body’s natural circulation system. It’s a gentle and effective way to decrease swelling and can also help soften the tissue. Many patients find these massages to be a relaxing and beneficial part of their recovery journey, helping them feel more comfortable as their new shape emerges.

How to Care for Your Scars

Vaser Lipo is known for its minimally invasive approach, which means the incisions are very small. As a result, the scars are typically tiny and fade to be barely noticeable over time. Your main responsibility is to keep the incision sites clean and watch for any signs of infection. While rare, it’s important to be aware of the symptoms. Please call our office right away if you develop a fever, feel nauseous, dizzy, or unusually tired in the days following your procedure. Staying vigilant helps ensure your healing process goes exactly as planned, leading to the best possible scar outcome.

Eating to Heal Faster

What you eat and drink after surgery can have a real impact on your recovery speed. Your body is working hard to repair itself, and you can give it the fuel it needs by focusing on a healthy diet. Make sure you’re eating plenty of nutrient-dense foods, especially those rich in protein, vitamins, and minerals, as these are the building blocks for tissue repair. Just as important is staying hydrated. Drinking lots of water helps your body flush out excess fluid, which can reduce swelling and support the overall healing process. Simple choices like these can make a big difference in how you feel.

Seeing Your Final Vaser Lipo Results

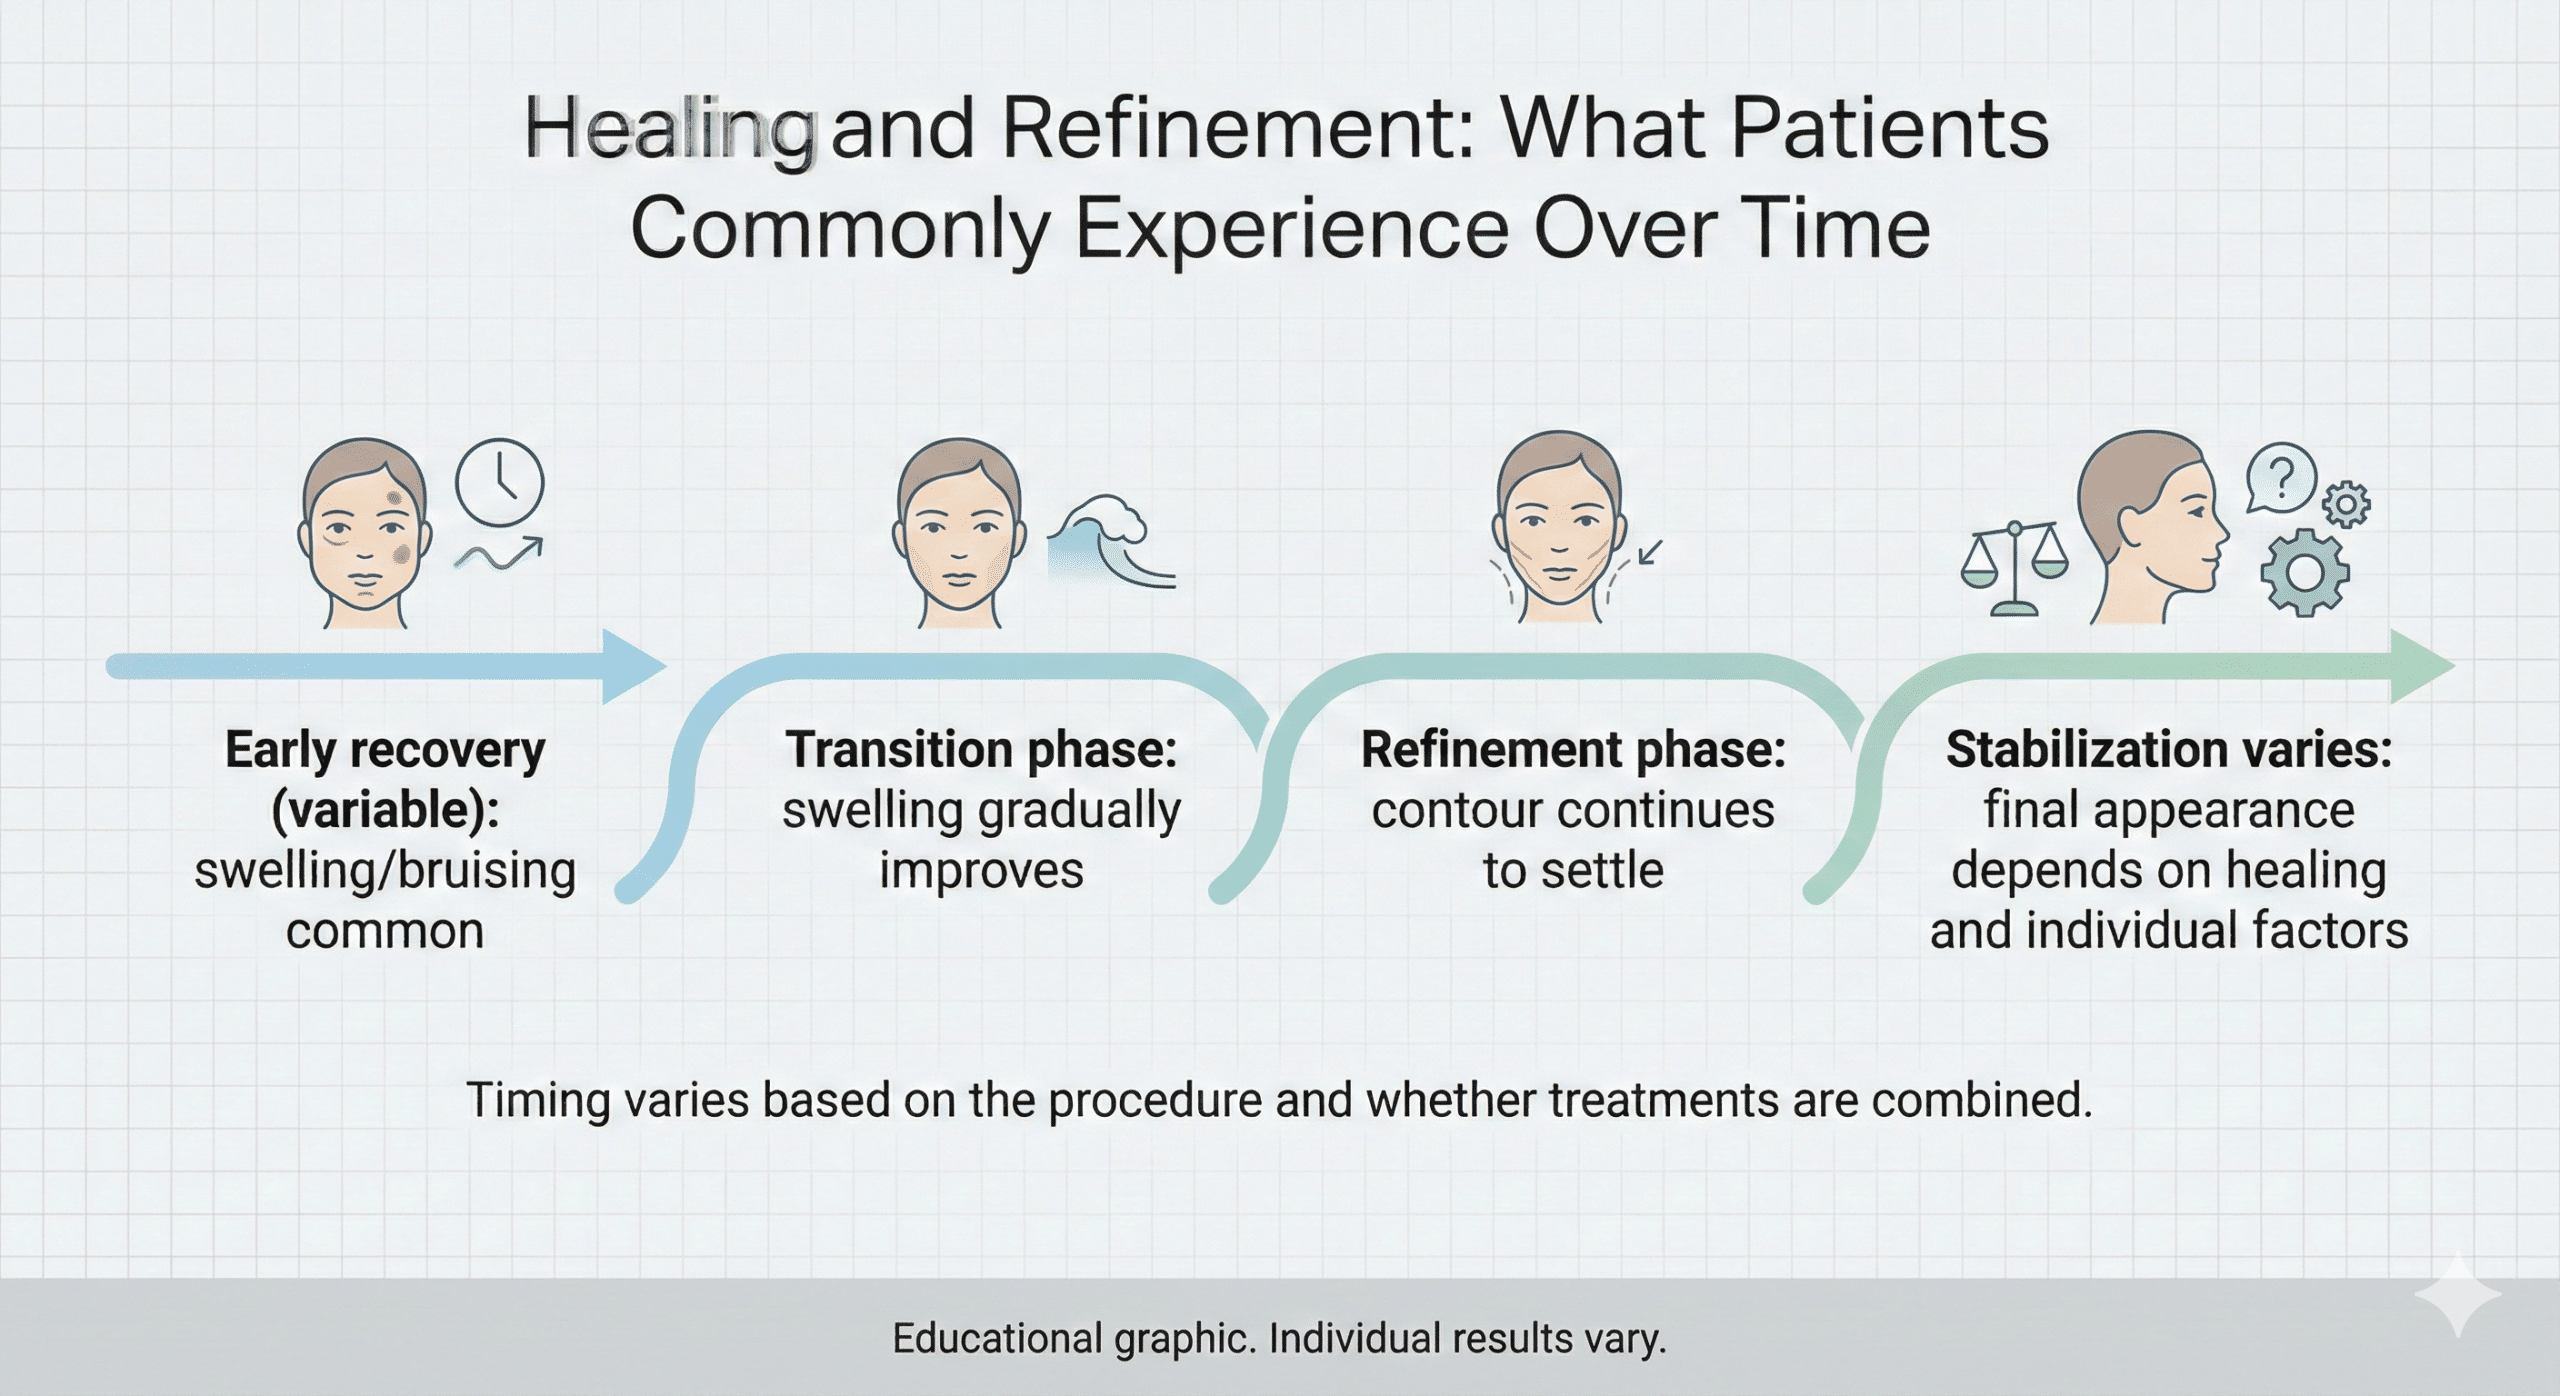
The first few weeks after your procedure are all about healing, but soon you’ll be looking for the beautiful new contours you’ve been waiting for. While you’ll notice some changes right away, the journey to your final look is a gradual process. Patience is your best friend here, as your body needs time to settle and reveal the full effects of the treatment. Let’s walk through the timeline and what you can do to support your amazing results.

When Will You See the Final Outcome?

You might catch a glimpse of your new shape right after your Vaser Lipo procedure, but the complete picture will be temporarily hidden by swelling and bruising. This is a completely normal part of the healing process. Think of it like waiting for a sculpture to be unveiled—it takes a little time. The most significant and exciting changes become clear once the swelling has substantially gone down. For most people, this happens within two to three months. At that point, you’ll be able to see the final, refined contours you’ve been working toward.

What Influences Your Recovery Speed?

Your recovery journey is unique to you. While there are general timelines, several factors can influence how quickly you heal and see your final results. One of the main factors is the extent of the procedure itself—the more areas treated or the larger the volume of fat removed, the more time your body may need to recover. Your overall health also plays a huge role. A strong immune system and good circulation can contribute to a smoother, faster healing process. Following your post-operative instructions to the letter is also critical for a great outcome.

How to Track Your Progress

By the four-week mark, you’ll likely see a significant improvement in your body’s shape. Most of the initial, more intense swelling will have subsided, giving you a much better idea of what your final results will look like. This is a great time to start appreciating the changes. To really see how far you’ve come, I recommend taking weekly progress photos. Stand in the same spot, with the same lighting, and wear a similar outfit each time. It’s easy to miss the subtle, day-to-day changes, but photos provide an objective record of your transformation.

Maintaining Your New Contour

Vaser Lipo permanently removes fat cells from the treated areas, which is fantastic news. However, it’s important to remember that the remaining fat cells in your body can still grow if you gain weight. The best way to protect the investment you’ve made in yourself is by committing to a healthy lifestyle. This doesn’t mean you need to adopt a super-strict diet overnight. Instead, focus on creating sustainable habits. Incorporate a balanced diet with plenty of whole foods and find a regular exercise routine you genuinely enjoy. These habits will preserve your beautiful new shape for years to come.

Lifestyle Habits for the Best Results

Your Vaser Lipo results are a fantastic starting point, but the choices you make during recovery are what truly solidify that beautiful new contour. Think of this period as a partnership with your body. By adopting a few key lifestyle habits, you’re not just helping the healing process along; you’re setting yourself up for long-term success. It’s all about creating a supportive environment for your body to recover efficiently and for you to enjoy your results for years to come. Simple adjustments to your daily routine can make a world of difference in how you feel and how your final outcome takes shape.

Staying Active the Right Way

By the four-week mark, you’re likely feeling more like yourself and eager to move. This is a great time to reintroduce light activity, which helps with circulation and can even lift your spirits. Gentle walks are your best friend right now. Start with short, slow strolls and see how your body responds. The goal is to encourage blood flow without putting any strain on the healing areas. You should still hold off on anything strenuous—that means no heavy lifting, high-impact cardio, or intense workouts. Listening to your body is the most important rule. If something doesn’t feel right, pull back. Your surgeon will give you the green light for more demanding physical activity when the time is right.

Your Post-Lipo Diet

What you eat plays a huge role in how well your body repairs itself. Focus on a nutritious diet packed with lean protein, vitamins, and minerals to give your body the building blocks it needs to heal. Foods rich in protein, like chicken, fish, beans, and tofu, help repair tissue. Colorful fruits and vegetables provide essential vitamins that support your immune system. It’s also wise to include fiber-rich foods like whole grains and leafy greens, which can help with any bloating or constipation from pain medication. And don’t forget to stay hydrated! Drinking plenty of water is crucial for flushing out toxins and reducing swelling. This isn’t a short-term diet; it’s a foundation for maintaining your results long-term.

Why Sleep and Rest Are Crucial

Never underestimate the power of a good night’s sleep. While you’re resting, your body is hard at work repairing tissues and reducing inflammation. Aim for 7-9 hours of quality sleep each night. You might still feel tired more easily than usual, and that’s completely normal. Your body is directing a significant amount of energy toward healing. If you feel the need to rest during the day, listen to that signal. Pushing yourself too hard can slow down your recovery. Creating a relaxing bedtime routine and ensuring your bedroom is a comfortable, quiet space can significantly improve your sleep quality and, in turn, your healing process.

Managing Stress for Better Healing

Your emotional well-being is just as important as your physical health during recovery. Stress can increase inflammation and slow down healing, so finding ways to stay calm and positive is key. One of the best ways to reduce anxiety is to feel prepared and informed. Carefully follow all the post-operative instructions we provide—they are designed to give you the smoothest recovery possible. It’s also important to avoid things that add stress to your body, like smoking and alcohol, as they can interfere with healing. Consider incorporating simple stress-management techniques into your day, such as deep breathing, listening to calming music, or light stretching once approved.

How to Maintain Your Vaser Lipo Results

Seeing your new, sculpted contours take shape is one of the most exciting parts of the Vaser Lipo journey. While the procedure permanently removes fat cells from the treated areas, it’s important to remember that this is a partnership between you and your body. The remaining fat cells can still expand if you gain weight, which can alter your results. Think of your procedure as a fantastic head start—a clean slate for you to build upon, not a one-time fix that requires no follow-up.

Maintaining your results isn’t about a restrictive, short-term diet or an impossible workout regimen. It’s about adopting a lifestyle that supports your new shape for years to come. The key is to create healthy, sustainable habits that feel good and become a natural part of your routine. By focusing on a balanced diet, consistent movement, and overall wellness, you can protect your investment and enjoy your beautiful results long-term. This next chapter is all about making simple, smart choices that help you feel as amazing as you look, inside and out.

Your Long-Term Care Plan

The best way to preserve your Vaser Lipo results is to commit to a healthy lifestyle. This doesn’t mean you have to become a fitness model overnight, but it does mean making conscious choices to support your body. The two pillars of your long-term plan are a balanced diet and regular exercise. By integrating these into your daily life, you’ll not only maintain your new contours but also improve your overall health and energy levels. It’s about finding a sustainable rhythm that works for you, ensuring you can enjoy your results for the long haul.

Tips for Managing Your Weight

A nutritious diet is your best friend when it comes to maintaining your Vaser Lipo results. Focus on filling your plate with whole foods that fuel your body and help it thrive. A diet rich in lean protein, fresh fruits and vegetables, and whole grains will provide the vitamins and minerals your body needs to stay strong and healthy. Protein is especially important, as it helps your body heal and supports muscle tone. Simple swaps, like choosing grilled chicken over fried or snacking on an apple instead of chips, can make a huge difference over time. Creating a healthy eating plan is one of the most effective ways to manage your weight and protect your results.

Building Healthy Habits for Life

Creating lasting change is all about building small, consistent habits. Start by following all of your post-operative instructions carefully—they are designed to give you the best possible outcome. Staying hydrated is a simple but powerful habit; drinking plenty of water helps flush your system and supports overall health. Incorporate gentle movement into your day, like taking regular walks. This helps with circulation and healing, and it’s a great foundation for a more active lifestyle. The goal is to find enjoyable ways to build healthy habits that stick, turning your post-procedure care into a lifelong wellness routine.

Your Follow-Up Appointments

Your Vaser Lipo procedure is complete, but your journey toward your final results is still underway. Think of your follow-up appointments as essential milestones in your recovery. These check-ups are our chance to see how beautifully you’re healing, monitor your progress, and make sure everything is on track.

Why Your Check-ups Matter

Following your surgeon’s post-operative care instructions carefully is the best way to ensure a smooth recovery and get the amazing outcome you’re looking for. We’re your partners in this process, and these appointments allow us to address any concerns and guide you through the final stages of healing. Attending every scheduled visit is key to a successful and stress-free recovery. These check-ups give you peace of mind and allow us to make sure you’re healing just as expected, ensuring your results are everything you hoped for.

Documenting Your Journey

These appointments are your dedicated time with us, so come prepared with any questions you have. It’s a great idea to keep a small log on your phone or in a notebook between visits. Jot down how you’re feeling, any new sensations, and questions that pop up—nothing is too small or silly to ask. We’ll likely take photos during your check-ups to document your progress. It can be incredibly motivating to see the side-by-side changes, especially when day-to-day healing can feel slow. These regular check-ins help us monitor your progress and ensure your body is responding well to the treatment.

Signs That Require a Doctor’s Attention

While your recovery should be straightforward, it’s important to know what to look out for. Your body is healing, but certain symptoms can indicate potential liposuction complications that need immediate attention. Please call our office right away if you notice signs of infection, such as increasing redness, excessive swelling, or discharge from your incision sites. You should also contact us immediately if you develop a fever, feel nauseous or dizzy, have trouble breathing, or feel unusually tired in the days following your procedure. Trust your instincts—if something doesn’t feel right, it’s always best to get it checked out. Your safety and health are our top priorities.

Related Articles

Frequently Asked Questions

Why do I feel hard or lumpy areas under my skin where I had the procedure? Feeling some firm spots beneath the skin is one of the most common experiences at this stage of recovery. This is a normal part of the internal healing process as your body works to resolve inflammation and residual fluid. These areas will gradually soften and smooth out over the next several weeks and months. Continuing with gentle massage, as recommended, can help speed this process along.

I feel almost back to normal. Can I start running or lifting weights again? It’s fantastic that you’re feeling so good, but it’s crucial to hold off on strenuous exercise for just a little longer. Even though you feel great on the surface, your internal tissues are still healing and settling. Jumping back into high-impact activities like running or heavy lifting too soon can increase swelling and potentially compromise your final results. Stick to light activities like walking until your surgeon gives you the official green light to resume your full fitness routine.

How much longer do I really have to wear my compression garment? While it might not be your favorite accessory, the compression garment is your best friend for a smooth recovery. The exact timeline for wearing it varies from person to person, but most patients are advised to wear it consistently for four to six weeks. It plays a vital role in minimizing swelling and helping your skin adhere to its new contours. Be sure to follow the specific instructions provided by your surgeon, as they will give you the best guidance for your individual healing.

Will my results be ruined if I gain a few pounds in the future? Your Vaser Lipo results are permanent in the sense that the treated fat cells are gone for good. However, the remaining fat cells in your body, both in treated and untreated areas, can still expand if you gain weight. A small fluctuation of a few pounds is unlikely to dramatically alter your new shape, but significant weight gain will affect your overall contour. The best approach is to view your results as a great motivator to maintain a stable weight through a balanced diet and regular exercise.

Is it safe for me to take a bath or go swimming at the four-week mark? By one month, your small incision sites are likely closed, but they may not be fully healed and sealed against bacteria. Submerging them in a bath, hot tub, or swimming pool too early can increase the risk of infection. It’s essential to get direct clearance from your surgeon during a follow-up appointment before you go for a swim or a soak. They will be able to confirm that your incisions are completely healed and ready for water.

Dr. Robert J. Troell
Dr. Robert J. Troell, MD, FACS
Board-Certified Facial Plastic & Reconstructive Surgeon

Dr. Robert J. Troell is a board-certified facial plastic and reconstructive surgeon with over 30 years of experience. He holds six board certifications and has authored more than 58 peer-reviewed publications. He practices at his AAAASF-accredited surgical center in Las Vegas, Nevada.

Complimentary Consultation

Begin Your Journey with Dr. Troell

Schedule a complimentary consultation to discuss your goals and receive an honest, expert assessment.

5375 S Fort Apache Rd #101, Las Vegas, NV 89148
Mon–Fri, 8:30 AM – 5:00 PM
$8,500–$15,000 Typical all-in cost range
6 areas Treated in a single VASER 360 session
Permanent Removed fat cells do not grow back

VASER Lipo 360 (also called "lipo 360," "360 liposuction," or simply "VASER 360") uses ultrasound energy to emulsify stubborn fat before it is gently removed — treating the entire torso in a single session. Compared with traditional liposuction, the VASER device allows for more precise sculpting around ribs, muscle definition, and tight areas like the flanks and bra line.

The typical all-in VASER Lipo 360 cost runs $8,500 to $15,000 in the U.S., depending on the number of areas, the surgeon, anesthesia type, and facility. ASPS reports a national average surgeon fee of $4,016 for liposuction generally.[1] VASER is typically a 25–40% premium on that figure because of the device fee, longer operative time, and sub-specialty training required.

Get a Personalized VASER Lipo 360 Quote

Online averages cannot reflect your anatomy, number of areas, anesthesia choice, or whether you are combining VASER with a BBL, tummy tuck, or mommy makeover. The most accurate lipo 360 price comes from an in-person consultation with a board-certified surgeon trained in VASER technology.

What Is VASER Lipo 360?

VASER stands for Vibration Amplification of Sound Energy at Resonance. The device uses ultrasound waves delivered through a small probe to selectively break apart fat cells while leaving blood vessels, nerves, and connective tissue intact. The emulsified fat is then aspirated through a cannula.

The "360" in "Lipo 360" refers to the surgical plan — treating the full circumference of the midsection in one operative session. A typical VASER 360 covers:

  • Upper abdomen (above the belly button)
  • Lower abdomen (below the belly button)
  • Flanks / love handles (both sides)
  • Mid and lower back (bra rolls, lower-back fat)
  • Axillary area (under the arms, where it transitions to back)

For patients combining VASER 360 with a Brazilian Butt Lift (BBL), the harvested fat can be purified and transferred to the buttocks in the same session — adding projection while reducing it from the midsection. This is often marketed as VASER Lipo 360 with BBL or a mommy makeover when combined with breast surgery.

VASER Lipo 360 vs Traditional Liposuction vs AirSculpt

Patients searching for "VASER vs lipo 360," "AirSculpt vs VASER," or "Revival vs VASER" are comparing three distinct ways to remove fat with different device technologies and different price tags.

Technique How it works Typical all-in cost
Traditional (suction-assisted) liposuction Manual cannula motion to break up and remove fat $5,000 – $9,000
VASER Lipo 360 Ultrasound energy emulsifies fat before removal; selective for fat, preserves connective tissue $8,500 – $15,000
AirSculpt (PatentMD) Proprietary laser + mechanical system, branded and marketed at a premium $10,000 – $22,000
Revival (laser-based) Laser-assisted liposuction; brand-franchise pricing $8,000 – $14,000
SmartLipo Laser-assisted, typically for smaller areas $4,500 – $8,500 per area

Why VASER often commands a premium: ultrasound energy allows for more precise sculpting around muscle groups (hi-def or "athletic" results), is better at fibrous / male-chest fat, and typically leaves less bruising. These advantages require a surgeon with VASER-specific training.

If "cheapest VASER lipo near me" is your question: compare honest total-cost quotes, not just surgeon-fee line items. Some clinics advertise a $4,000 "VASER" procedure that turns out to be traditional liposuction with a VASER marketing sticker.

How Much Does VASER Lipo 360 Cost?

The average cost of VASER Lipo 360 in the U.S. runs $8,500 to $15,000 all-in. ASPS's national surgeon-fee average for liposuction (all techniques) is $4,016.[1] VASER adds a device premium on top.

Your total out-of-pocket typically breaks down like this:

  • Surgeon fee — $5,000–$9,000 for VASER 360 (higher than traditional lipo; reflects the sub-specialty training and longer operative time)
  • Anesthesia — $800–$2,200 (general anesthesia with a board-certified anesthesiologist; "awake" VASER with oral sedation can reduce this)
  • Operating room / facility fee — $1,500–$3,500 at an AAAASF-accredited surgical center
  • VASER device & supplies — $400–$1,000 included in the surgical package
  • Pre-op labs, imaging, post-op garments, medications — $400–$1,200

VASER Lipo 360 Cost: A Straightforward Answer

If you are asking "how much is lipo 360?" or "how much does VASER lipo cost?" — the honest answer is $8,500 to $15,000 all-in for most patients at a board-certified practice in the U.S.

What pushes you higher in that range:

  • Coastal California, NYC, Miami, and Dubai-level pricing: add $3,000–$8,000
  • Combining VASER 360 with a BBL (fat transfer to buttocks): add $3,000–$6,000
  • Combining with a tummy tuck / abdominoplasty: add $6,000–$10,000 (but one anesthesia and one recovery)
  • Combining with breast surgery as a mommy makeover: add $7,000–$14,000
  • High-definition "hi-def" etching that sculpts visible muscle groups: adds operative time and surgeon fee

What pulls you lower:

  • Treating fewer areas — true "360" means full midsection; a "360 light" (e.g. upper + lower abdomen + flanks only) can be $2,000–$3,000 less
  • Inland Midwest, inland South, and most of Texas: trend 20–30% below coastal metros
  • Awake VASER with local + oral sedation (when medically appropriate)
  • Bundled package pricing at surgical centers that do high volume

VASER Liposuction Cost by Treatment Area

If you don't need a full 360 and just want specific areas treated, VASER is also priced per area. Rough all-in ranges:

Area Typical cost (all-in) Notes
Full VASER Lipo 360 (abdomen + flanks + back)$8,500 – $15,000Most common package
Upper + lower abdomen only$5,500 – $8,500"Mini 360"
Flanks / love handles (both sides)$3,500 – $6,500Often combined with abs
Arms (upper arm lipo)$3,500 – $6,500Requires careful technique to avoid contour deformity
Back / bra rolls$4,000 – $7,000Fibrous tissue — VASER particularly effective
Inner & outer thighs$5,500 – $9,500Treats both sides
Knees / ankles$3,000 – $5,500Small but precision-demanding
Chin / submental$3,500 – $6,500Often combined with facelift or neck lift
Male chest (gynecomastia-pattern)$6,500 – $11,000VASER is technique of choice for fibrous chest tissue
VASER 360 + BBL$12,000 – $20,000Harvested fat transferred to buttocks
VASER 360 + tummy tuck$15,000 – $23,000Combined anesthesia and recovery
Mommy makeover (VASER 360 + breast + tummy)$20,000 – $35,000Comprehensive post-pregnancy reshaping

VASER Lipo 360 Cost by U.S. City

Illustrative ranges only; individual surgeon and case variance is significant. Confirm with a consultation in your market.

City Illustrative total cost range
Las Vegas, NV$9,000 – $14,000
New York, NY$12,000 – $22,000
Miami, FL$11,000 – $18,000
Los Angeles, CA$11,000 – $17,000
San Diego, CA$9,500 – $14,000
Dallas / Houston, TX$8,500 – $12,500
Austin, TX$8,000 – $12,000
Phoenix / Scottsdale, AZ$9,000 – $13,500
Atlanta, GA$9,000 – $13,500
Chicago, IL$9,500 – $14,000
Seattle, WA$10,000 – $14,500
Salt Lake City, UT$8,500 – $12,000
Columbus, OH / Kansas City, MO$8,000 – $11,500

VASER Lipo 360 Cost by U.S. State

State Illustrative avg. all-in Notes
Nevada$11,000Las Vegas dominates; AAAASF facilities competitive
California$14,000LA/SF premium; SD below state avg
Florida$13,500Miami inflates state avg
Texas$10,500Austin/Houston below Dallas
New York$16,500NYC drives; upstate lower
Arizona$11,000Phoenix/Scottsdale market
Utah$10,000Salt Lake City market
Georgia$11,000Atlanta market
Ohio$9,500Columbus / Cincinnati / Cleveland
U.S. national average (VASER 360, all-in)~$11,500Weighted across metros

Awake VASER vs General Anesthesia

"Awake VASER" (also called tumescent VASER or conscious-sedation VASER) means the patient is sedated but not fully unconscious. Local anesthetic fluid (tumescent solution) numbs the treatment area; oral sedation or light IV sedation keeps the patient comfortable.

When awake VASER is appropriate:

  • Smaller-volume cases (fewer areas, lower total aspirate)
  • Patients with general-anesthesia risk factors (older, certain heart/lung conditions)
  • Shorter procedures that don't require the muscle relaxation general anesthesia provides

When general anesthesia is preferred:

  • Full VASER 360 with fat transfer (BBL) — longer operative time
  • Combined procedures (tummy tuck, mommy makeover)
  • Patient preference for being fully asleep
  • Hi-def sculpting cases where precise positioning is essential

Cost difference: awake VASER typically saves $800–$1,500 on anesthesia charges versus a board-certified anesthesiologist for general. Not every surgeon offers awake VASER; safety requires careful patient selection.

Key Factors That Influence Your Final Quote

  • Number of areas treated (full 360 vs partial 360 vs single area)
  • Surgeon experience and volume in VASER-specific technique
  • Anesthesia type (awake vs IV sedation vs general)
  • Facility (AAAASF surgical center vs hospital vs office)
  • Geography (coastal metro premium vs inland)
  • Hi-def / athletic etching (more operative time)
  • Combined procedures (BBL, tummy tuck, mommy makeover)
  • Revision work on a previous liposuction (more complex, higher fee)
  • Fat volume — Florida "five-liter rule" and similar state caps can drive multi-stage planning
  • Post-op care (lymphatic massage, follow-up visits, compression garments)

VASER Lipo 360 Package Pricing: What's Usually Included

Many surgical centers quote VASER 360 as a bundled package. A reputable "VASER Lipo 360 package" should include — ask specifically if each item is in or out of the quoted price:

  • Surgeon's fee
  • Anesthesia fee (general or sedation)
  • Facility / operating room fee at an accredited center
  • Pre-operative labs and medical clearance
  • VASER device usage and supplies
  • Compression garments (usually 1–2 sets)
  • Post-op medications (pain management, antibiotics)
  • Follow-up visits for 3–12 months
  • Lymphatic massage sessions (common add-on — ask whether included or $100–$150 each)
  • Revision policy (rarely included; ask what happens at year 1 or 5 if needed)

Items typically NOT included in packages: time off work, travel costs, lost wages, supplements, and any combination procedure billed separately.

How to Make VASER Lipo 360 More Affordable

Patients asking "cheapest VASER lipo near me" or "affordable lipo 360" have several honest levers:

  • Treat fewer areas — a "mini 360" (abdomen + flanks) can be $2,000–$3,000 less than a full 360
  • Awake VASER when medically appropriate — saves on anesthesia
  • AAAASF surgical center instead of hospital — lower facility fee, same safety standard
  • Geographic flexibility — Las Vegas, inland Texas, Midwest trend 20–30% below coastal metros
  • Financing (CareCredit / Alphaeon) — doesn't reduce price but spreads cost over 12–24 months
  • Combined procedures — one anesthesia, one recovery, one facility fee if you were going to do both eventually

What to avoid: quotes under $5,000 total for a genuine VASER 360 (something is being cut — unaccredited facility, non-board-certified surgeon, traditional lipo sold as VASER). Also avoid medical tourism packages that exclude U.S. malpractice coverage and revision support.

Financing Options for VASER Lipo 360

Troell Cosmetic Surgery partners with CareCredit and Alphaeon Credit, both offering deferred-interest promotional periods for qualified applicants. Monthly payment plans are discussed openly at consultation so the full out-of-pocket VASER Lipo 360 cost is transparent before booking.

See Financing Options →

From Consultation to Recovery

A realistic timeline for a typical VASER Lipo 360:

  • Consultation (1–2 visits): candidacy assessment, area planning, anesthesia discussion, photographs, written quote
  • Pre-op (2–4 weeks before): labs, medical clearance, medication review (stop NSAIDs and certain supplements)
  • Surgery day: 3–5 hours for full 360; 4–6 hours if combined with BBL or tummy tuck; outpatient at AAAASF center
  • First week: compression garment 24/7, walking encouraged, back to desk work for many patients at day 5–7
  • Weeks 2–4: swelling peaks then gradually resolves, lymphatic massage sessions begin
  • Month 3: 70–80% of final result visible
  • Month 6–9: final contour visible after residual swelling fully resolves

"VASER Lipo Near Me": How to Screen a Surgeon

Searching "VASER lipo 360 near me" or "best VASER surgeon near me" narrows by geography but not by quality. A short screening checklist:

  1. Board certification via the American Board of Plastic Surgery, American Board of Facial Plastic & Reconstructive Surgery, or American Board of Cosmetic Surgery — verify directly, not just claimed on a website.
  2. VASER-specific training and volume. How many VASER 360 cases per year? 50+ is a reasonable floor.
  3. Before-and-after gallery showing patients with your starting anatomy and your desired outcome.
  4. Accredited surgical facility (AAAASF, AAAHC, or hospital-based).
  5. Revision policy — what happens if you need a touch-up at year 1 or 5?
  6. Transparent written quote with every line item (surgeon, anesthesia, facility, implant/device, garments, follow-up).
  7. Reviews across multiple platforms (Google, RealSelf, independent directories).

A Frank Talk About Safety and Risks

Liposuction — including VASER — is a surgical procedure with real risks. Mayo Clinic and ASPS describe the main categories:[2]

  • Bleeding and hematoma — minimized with VASER's selective fat disruption
  • Contour irregularities — minimized with experienced surgeon + symmetric technique
  • Fluid accumulation (seroma) — usually resolves with compression
  • Numbness — temporary in most patients
  • Burns from ultrasound energy — rare with modern VASER devices and proper technique
  • Deep vein thrombosis (DVT) / pulmonary embolism — reduced by early ambulation and case-by-case anticoagulation
  • Fat embolism — extremely rare; relevant mostly for BBL procedures
  • Anesthesia reactions — discussed individually based on your medical history

Choosing a board-certified surgeon operating at an accredited facility is the single biggest modifiable safety factor.

Do Results From VASER Lipo 360 Last?

VASER Lipo 360 permanently removes fat cells from the treated areas. Those cells do not grow back. The remaining fat cells in your body can still enlarge with weight gain, so the best path to lasting results is stable weight — not a punishing diet, just sustainable habits.

Most patients preserve their results for 10+ years with normal maintenance. Significant weight gain (20+ lbs) can distort the new contour because fat accumulates in untreated areas preferentially.

Why Choose Dr. Troell for VASER Lipo 360?

Dr. Robert J. Troell is a board-certified surgeon with 30+ years of experience and VASER-specific training. He operates at his AAAASF-accredited surgical facility in Las Vegas.

  • Six board certifications, including cosmetic surgery and facial plastic & reconstructive surgery
  • AAAASF-accredited surgical center
  • VASER Lipo 360, including hi-def / athletic etching and fat transfer
  • Combined procedures — VASER + BBL, tummy tuck, or mommy makeover
  • Awake VASER when medically appropriate
  • Financing through CareCredit and Alphaeon

For procedure-level detail, technique discussion, and to schedule a personalized evaluation, see the VASER Liposuction consultation page with Dr. Troell.

Every procedure on this page is performed by the surgeon behind the practice. Dr. Troell is board-certified in cosmetic surgery and in facial plastic & reconstructive surgery, with 30+ years of surgical experience. Residency and fellowship at Stanford University; Doctor of Medicine from the University of South Florida College of Medicine. See notable achievements.

Locations Served in Greater Las Vegas

Troell Cosmetic Surgery serves patients from across Las Vegas, Henderson, Summerlin, North Las Vegas, and the surrounding metropolitan and outlying communities:

VASER Lipo 360 Cost FAQs

How much is lipo 360?

Lipo 360 typically costs $8,500 to $15,000 all-in for most U.S. patients at a board-certified practice. Coastal metros run higher ($12,000–$22,000), inland markets and Las Vegas trend $9,000–$14,000. The price includes surgeon fee, anesthesia, accredited facility, VASER device usage, and post-op care.

What is the average cost of VASER Lipo 360?

The U.S. national average for a VASER Lipo 360 package is around $11,500 all-in. ASPS publishes a surgeon-fee-only average for liposuction of $4,016, but VASER 360 includes anesthesia, facility fees, device usage, and multiple areas — so the all-in number is higher.

How much does VASER lipo cost near me?

It depends on your metro. California coastal cities and NYC run $12,000–$22,000. Las Vegas, Phoenix, Austin, Salt Lake City, and most Midwest cities run $8,000–$14,000. Request written all-in quotes from 2–3 board-certified, VASER-trained surgeons near you.

Is VASER lipo more expensive than traditional liposuction?

Yes. VASER Lipo 360 runs 25–40% more than traditional (suction-assisted) liposuction for the same area, reflecting the ultrasound device fee, longer operative time, and the sub-specialty training required. VASER's advantages for fibrous tissue, hi-def sculpting, and less bruising justify the premium for many patients.

VASER vs AirSculpt: which costs more?

AirSculpt is a proprietary brand-franchise technology; it is typically the most expensive of the major liposuction options ($10,000–$22,000 for a comparable case). VASER Lipo 360 runs $8,500–$15,000. AirSculpt markets itself as minimally invasive; VASER is a well-established ultrasound technique available from any surgeon with VASER training.

How much does lipo 360 cost with a BBL?

VASER Lipo 360 + BBL runs $12,000–$20,000 all-in. The harvested fat from the 360 is purified and transferred to the buttocks in the same surgical session. If your focus is the outer hip, our guide to hip dip and gluteal-frame contouring explains how the frame is shaped. Same anesthesia, same recovery — the combination is more efficient than staging them.

Will my insurance cover VASER Lipo 360?

No — VASER Lipo 360 is cosmetic body contouring. Insurance does not cover it. Some medically-necessary liposuction for conditions like lipedema may be partially covered; this is a separate conversation with your insurance carrier and primary-care physician.

Can VASER Lipo 360 be done awake?

Yes, in carefully selected patients — typically for smaller-volume cases without fat transfer. Awake VASER uses tumescent local anesthetic plus oral or light IV sedation. It saves $800–$1,500 on anesthesia charges. Full VASER 360 with BBL or a combined tummy tuck typically still uses general anesthesia.

Do VASER Lipo 360 results last?

Yes. Removed fat cells do not grow back. Remaining fat cells in untreated areas can still enlarge with weight gain, so maintaining stable weight preserves the contour. Most patients keep their results 10+ years.

What does a VASER Lipo 360 package usually include?

A reputable package includes surgeon fee, anesthesia, accredited facility, VASER device usage, pre-op labs, compression garments, post-op medications, and follow-up visits. Lymphatic massage sessions, combined procedures, and revisions are usually separate. Ask for an itemized written quote and confirm what's in vs out.

Free Consultation